
The world of rope knots is vast, but few are as universally respected and essential as the Figure 8 Follow Loop. Whether you are scaling a granite cliff in Yosemite, performing a high-angle rescue, or securing gear for an overland expedition, this knot is the gold standard for safety and reliability. Known for its incredible strength and the ease with which it can be visually inspected, it is often the very first knot taught to novice climbers and professional arborists alike.
In this comprehensive guide, we will delve into the technical nuances of the Figure 8 Follow Loop, exploring why it is preferred over other outdoor rope techniques, what materials you need to execute it perfectly, and a strict step-by-step breakdown of how to tie it. Understanding this knot is not just about following a sequence of moves; it is about mastering a life-safety skill that has been refined through decades of practical application in the field.
Alternative Names: Figure-of-Eight Follow Through, Rewoven Figure Eight, Figure Eight Thread-Through, Flemish Loop.
What Is a Figure 8 Follow Loop?
The Figure 8 Follow Loop is a loop knot typically tied at the end of a rope. Unlike the "Figure 8 on a Bight," which is tied using a loop of rope and then clipped into a carabiner, the Figure 8 Follow Loop is tied by "threading" or "following" the rope through a fixed object—most commonly a climbing harness or a permanent anchor point.
Practical Uses and Applications
The primary function of this knot is to create a secure, non-slipping loop that can withstand immense weight. Because it is symmetrical and bulky, it is highly resistant to "rolling" or untying itself under cyclic loading.
- Rock Climbing and Mountaineering: It is the standard knot used to tie a climber’s rope directly into their harness tie-in points. Its redundant structure provides a high margin of safety.
- Arboriculture: Tree surgeons use this knot to secure lifelines and climbing lines because it remains stable even when the rope is subjected to the friction and movement inherent in tree work.
- Search and Rescue (SAR): In rescue scenarios, the ability to quickly inspect a teammate’s knot is vital. The distinct "double-eight" pattern makes it easy to spot errors from a distance.
- Sailing and Rigging: While less common than the Bowline in some maritime circles, the Figure 8 Follow Loop is used when a permanent, high-strength loop is required that won’t jam as easily as other knots after being heavily loaded.
Materials and Tools Needed
To tie a perfect Figure 8 Follow Loop, you must start with the right equipment. The performance of any knot is heavily dependent on the quality and type of rope used.
- Rope Types:
- Dynamic Rope: If you are using this knot for climbing, a dynamic rope (designed to stretch and absorb the shock of a fall) is essential. These usually range from 8.9mm to 11mm in diameter.
- Static Rope: For hauling gear or rappelling (where you don’t want stretch), a static rope is preferred.
- Accessory Cord: For practice, a 6mm or 7mm accessory cord is excellent for learning the muscle memory required.
- The Attachment Point: This could be the two tie-in loops of a climbing harness, a heavy-duty steel ring, or a sturdy tree limb.
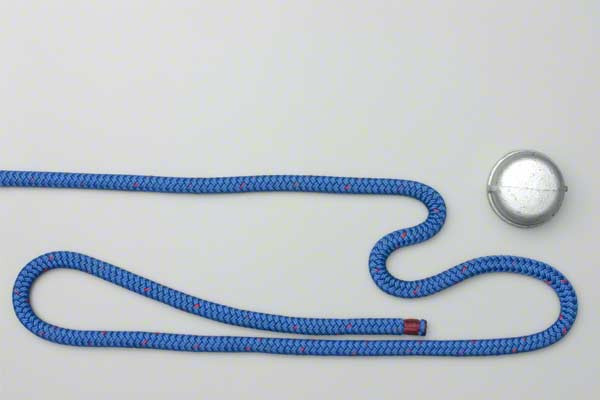
- Clear Workspace: Ensure your rope is "flaked" (laid out without tangles) before you begin. This prevents the "standing end" (the long part of the rope) from snagging while you work the "tail" (the short end).
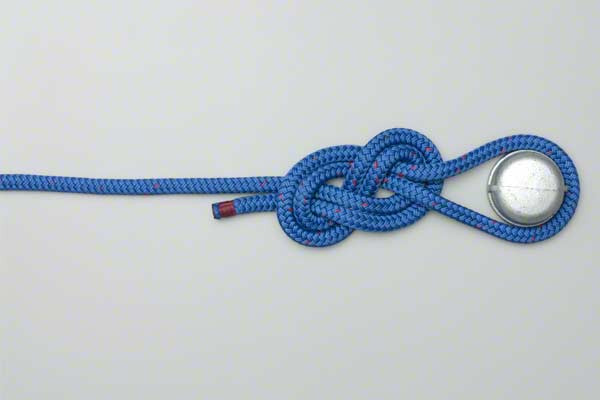
How to Tie Figure 8 Follow Loop?
To ensure maximum safety and structural integrity, follow these instructions precisely. The following steps outline the exact procedure for creating a secure Figure 8 Follow Loop.
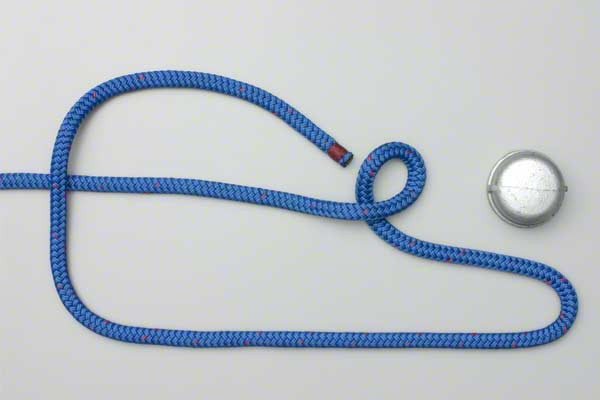
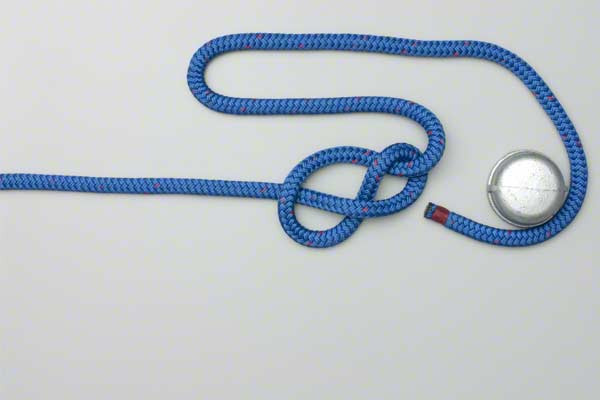
- Start by tying a loose Figure 8 knot. This serves as your foundation. Ensure you leave enough "tail" (usually about 3 feet) to complete the rest of the steps and wrap around your attachment point.
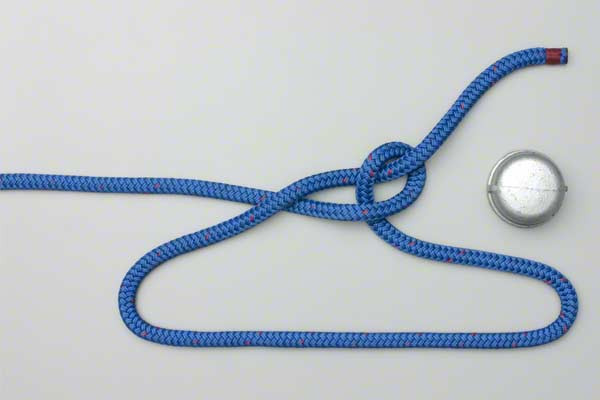
- Pass the tail around the attachment point. Thread the end of the rope through your harness loops or around the anchor you wish to secure yourself to.
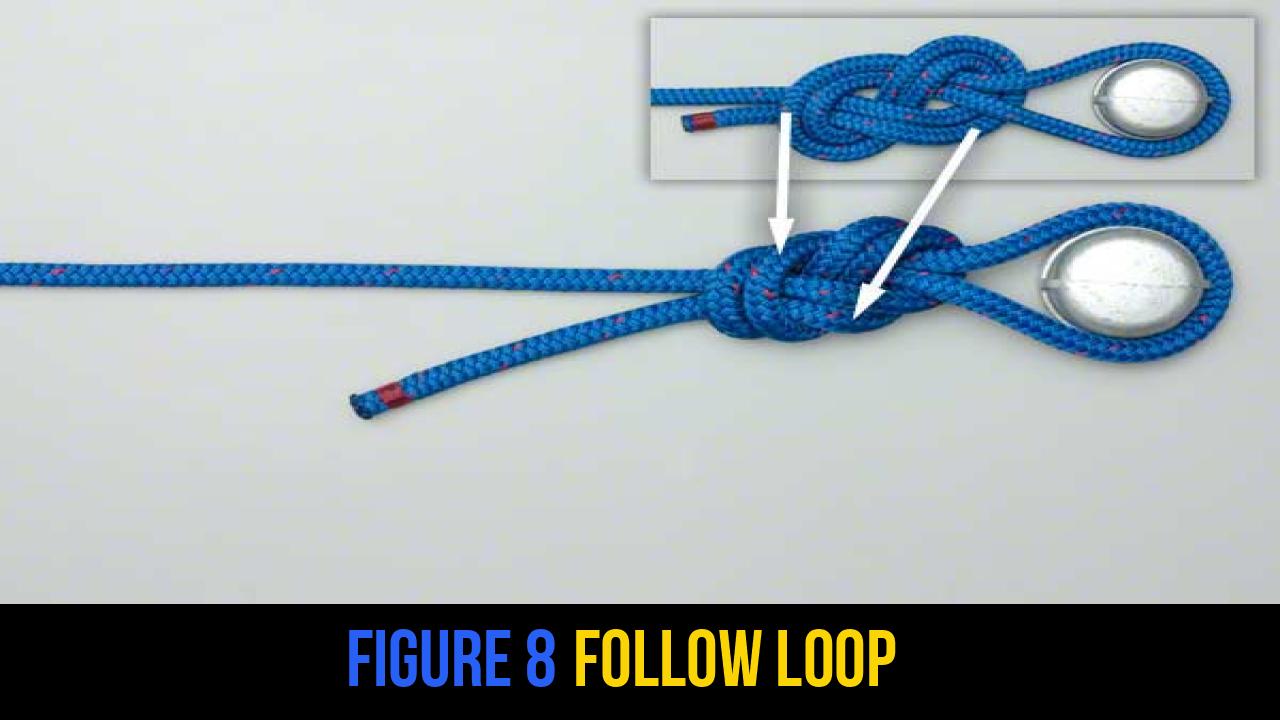
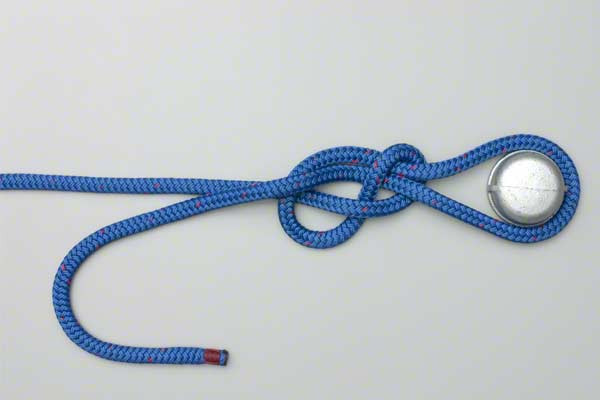
- Follow the original Figure 8 around the entire knot in reverse. Take the end of the tail and feed it back into the knot where the rope first exited. Trace the path of the original knot exactly, staying parallel to the existing strands.
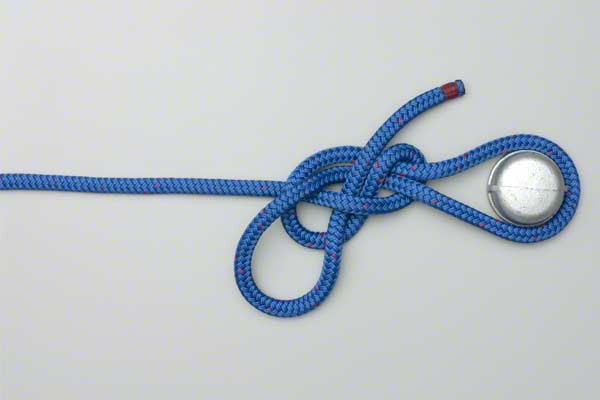
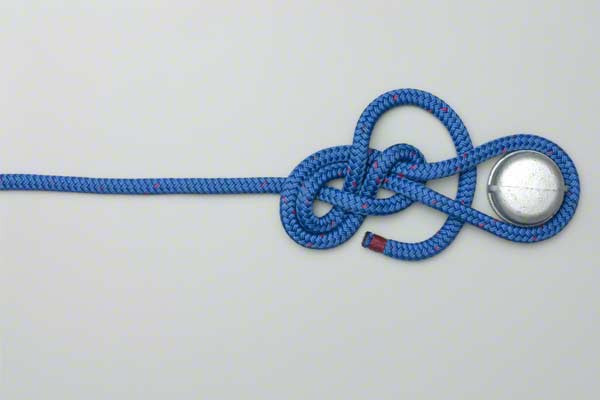
- Exit beside the standing end to complete a two stranded Figure 8 knot. Once the tail has traced the entire path, it should emerge right next to the main part of the rope. Tighten each of the four pairs of strands individually to ensure the knot is "dressed" and secure.

Common Mistakes to Avoid
Even though the Figure 8 Follow Loop is one of the most reliable rope knots, human error during the tying process can lead to dangerous situations. As an expert in outdoor rope techniques, I recommend looking out for these common pitfalls:
1. The "Short Tail" Error
One of the most frequent mistakes is not leaving enough tail after the knot is finished. A safe Figure 8 Follow Loop should have at least 6 to 10 inches (15–25 cm) of tail remaining. If the tail is too short, the knot could potentially creep or slip under extreme loads.
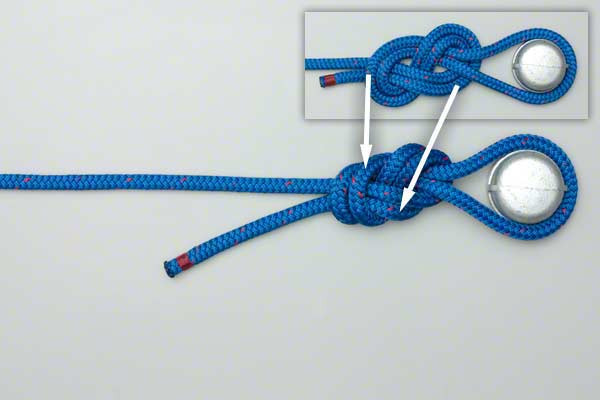
2. Crossing Strands (Poor Dressing)
"Dressing" a knot refers to arranging the strands so they lie flat and parallel without unnecessary crosses. A poorly dressed knot is harder to inspect and can be slightly weaker. While a "sloppy" Figure 8 is still very strong, a professional always ensures the strands are neatly tucked to facilitate easy visual verification.
3. Forgetting the "Two-Two-Two" Rule
When inspecting the knot, you should see three sets of parallel strands. If you count the strands from any angle, you should see pairs of two. If you see a single strand or a cluster of three, the knot is tied incorrectly and must be redone.
4. Not Tightening Individual Strands
Many beginners pull on the loop and the standing end to tighten the knot. To truly secure a Figure 8 Follow Loop, you must pull all four strands (the two entering the knot and the two exiting the knot) individually. This ensures the knot is fully seated.
Related Knots and Splicing
Expanding your knowledge of rope knots involves understanding how different knots relate to one another. Here are a few variations and related techniques:
- Figure 8 on a Bight: A variation where the knot is tied using a doubled-over section of rope to create a loop quickly for clipping into carabiners.
- Figure 8 Bend: This technique uses the same "follow-through" logic but is used to join two separate ropes of equal diameter together securely.
- Double Fisherman’s Knot: Often used as a "backup knot" or "stopper knot" behind a Figure 8, though modern testing shows a well-tied Figure 8 does not strictly require one.
- The Bowline: A classic loop knot that is faster to tie and easier to untie after being loaded, though it requires a backup and is harder to inspect visually than the Figure 8.
- Eye Splice: A permanent way to create a loop in the end of a rope by weaving the strands back into the main body, offering the highest strength retention.
Final Words
The Figure 8 Follow Loop is more than just a sequence of loops and turns; it is a foundational pillar of vertical safety. Its high breaking strength—retaining roughly 75-80% of the rope’s original efficiency—combined with its ease of inspection makes it an indispensable tool for anyone engaged in outdoor rope techniques.
As with all life-safety skills, the key to mastery is repetition. Practice tying this knot in various conditions: in the dark, with gloves on, and while tired. The goal is for the Figure 8 Follow Loop to become second nature. By following the precise steps provided and avoiding common mistakes like poor dressing or short tails, you ensure that your gear—and your life—are secured by one of the most trusted knots in history.
Whether you are a seasoned pro or a weekend warrior, always remember: Check your knot, and then have your partner check it again. Safety in the outdoors is a collaborative effort, and a perfectly tied Figure 8 is the best place to start.
