
In the world of maritime tradition and outdoor rope techniques, few elements are as foundational as the Crown knot. Whether you are a seasoned sailor, a wilderness survivalist, or a DIY enthusiast working with decorative cordage, understanding how to manipulate the individual strands of a rope is a critical skill. The Crown knot serves as the essential starting point for one of the most permanent and secure ways to finish a rope end: the Back Splice.
Unlike a standard stopper knot that sits on the outside of the rope, the Crown redirects the strands back toward the standing part of the line. This redirection is the "secret sauce" of traditional ropework, allowing the fibers to be woven back into the main body of the rope, creating a neat, bulbous end that won’t fray or unravel under pressure. In this comprehensive guide, we will explore the technical nuances of the Crown, the materials required to execute it perfectly, and the exact steps needed to master this ancient art.
Alternative Names: Crown, Back Splice Start, Crowned End.
What Is a Crown?
A Crown is a terminal knot tied in the end of a multi-strand rope (typically three-strand) where each strand is tucked over its neighbor in a circular fashion. In technical terms, it is a "multi-strand terminal knot." While it can stand alone as a decorative element or a very small stopper, its primary functional purpose is to serve as the "turnaround" point for a Back Splice.
Practical Uses in the Field
- Preventing Fraying: When a rope is cut, the ends naturally want to untwist. The Crown locks these ends in place.
- Back Splicing: As the first step of a back splice, it allows the strands to be tucked back into the rope’s lay, creating a permanent, thickened end.
- Decorative Ropework: In Macramé and "fancy work" on ships, the Crown is often stacked with other knots (like the Wall knot) to create intricate patterns on railings or handles.
- Grip Enhancement: Because the knot creates a slight swell at the end of the line, it provides a tactile "stop" for the hand, which is useful on pull-ropes or light-duty lashings.
Materials and Tools Needed
To tie a successful Crown knot, you need to consider the anatomy of your rope. Not all ropes are created equal, and the Crown is specifically designed for twisted (laid) cordage.
Recommended Rope Types
- Three-Strand Twisted Nylon: The gold standard for modern utility. It is elastic, strong, and the strands are easy to manipulate.
- Manila or Sisal: Natural fibers offer excellent grip and a traditional aesthetic, though they can be rough on the hands.
- Polypropylene: Often used in marine environments because it floats. It is stiffer and may require more tension to keep the Crown tight.
Essential Tools
- Marlinspike or Fid: For larger or tighter ropes, these tools help separate the strands of the standing part when you transition from the Crown to a splice.
- Electrical Tape or Whipping Twine: Used to temporarily "whip" the ends of the individual strands to prevent them from unravelling while you work.
- Heat Source (Lighter): For synthetic ropes, a quick sear of the ends after finishing ensures total security.
- Sharp Knife or Rope Cutter: To ensure clean ends before you begin your Crown.
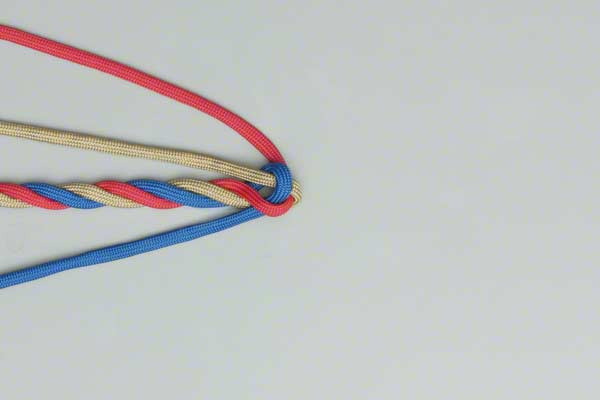
How to Tie Crown?
The following instructions detail the precise method for forming the Crown. This sequence is the technical foundation for finishing a rope and preparing it for a professional-grade back splice.
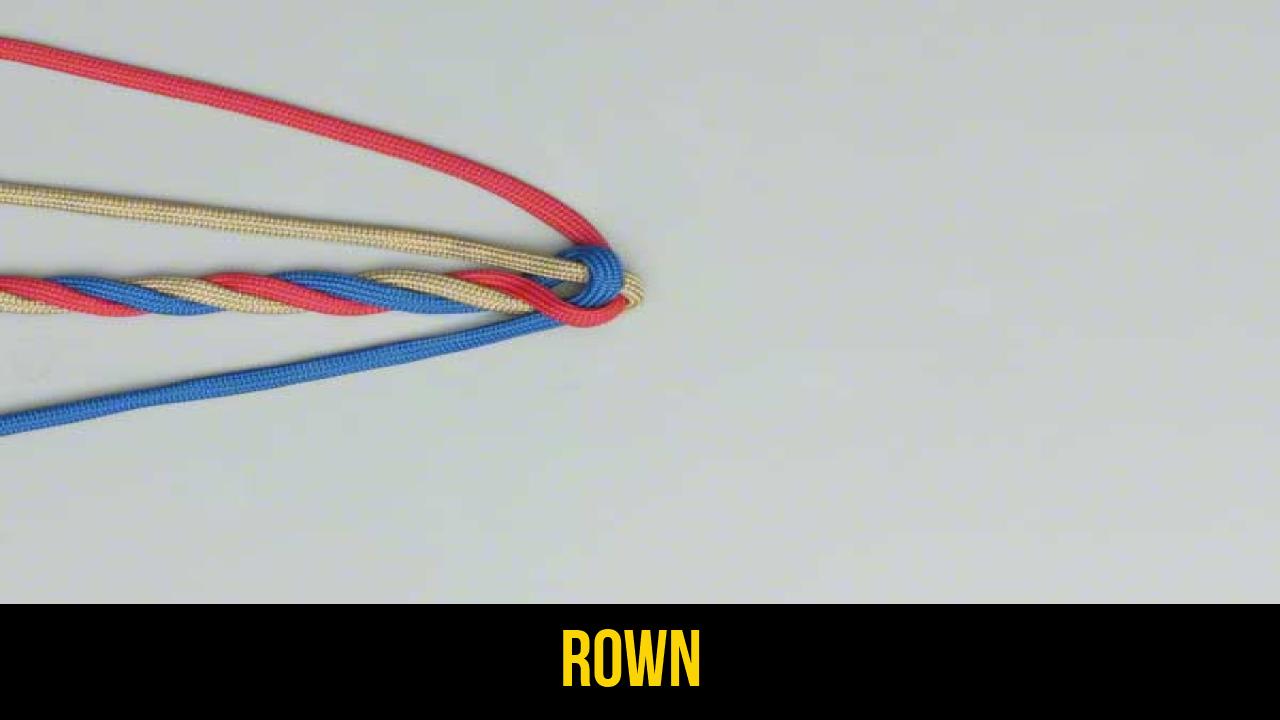
- Spread out the strands.
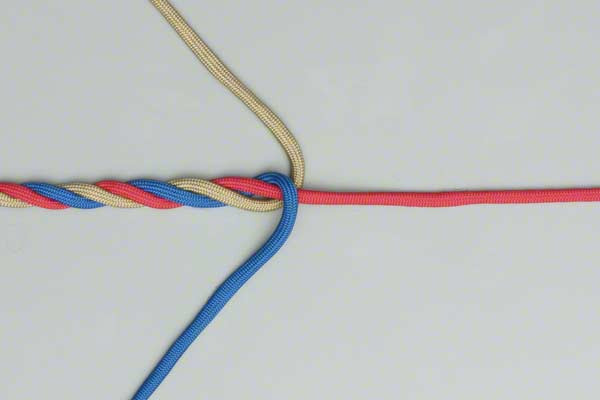
- Choose one strand and, continuing around in the direction of the rope’s twist, lay it across its neighbor.
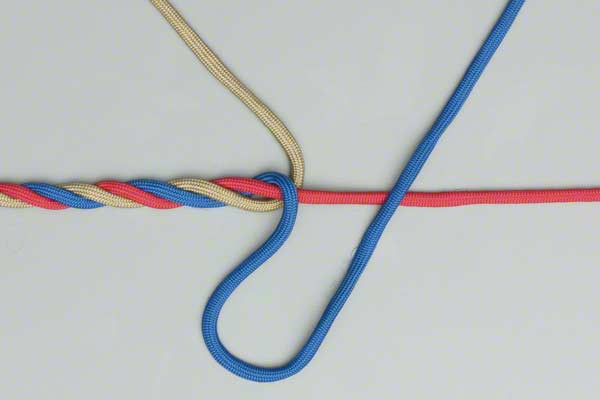
- Repeat with that strand.
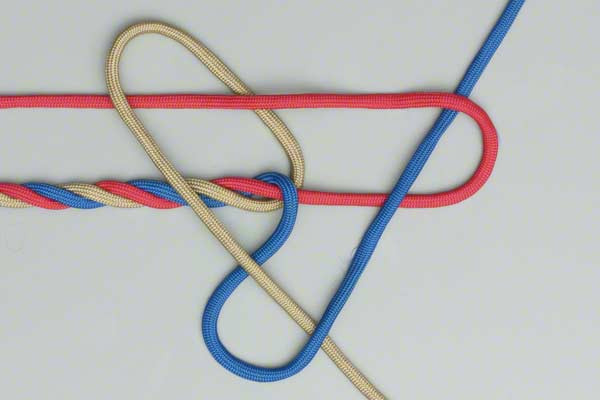
- Repeat with the remaining strand tucking it under the first.
- Tighten it to form the first part of a Back Splice.
Technical Deep Dive: Understanding the "Lay"
To execute the Crown knot effectively, one must understand the "lay" or twist of the rope. Most ropes are "Right-Hand Lay" (Z-twist). This means if you look at the rope, the strands spiral upward and to the right. When the instructions say to move "in the direction of the rope’s twist," it is vital to follow that spiral.
If you tie a Crown against the lay, the knot will feel "mushy" and will not lock correctly when you begin your tucks for the back splice. The beauty of the Crown lies in the physics of friction; each strand holds the next one down, and the final tuck locks the entire system into a circular tension loop.

Common Mistakes to Avoid
Even for those experienced in rope knots, the Crown can be tricky during the first few attempts. Here are the most common pitfalls:
1. Crossing Strands Incorrectly
The most frequent error is crossing a strand over two neighbors instead of just one. Each strand must only interact with its immediate neighbor to ensure the knot remains symmetrical. An asymmetrical Crown will result in a crooked back splice that is structurally weaker.
2. Loose Tension
If you do not tighten it sufficiently in the final step, the "crown" will have a hole in the center. In outdoor applications, this hole can collect grit, salt, or moisture, leading to internal rope rot or abrasion. Pull all three strands simultaneously and firmly to seat the knot against the un-laid portion of the rope.
3. Not Whipping the Ends
If you are working with a loose-lay rope (like cheap manila), the individual strands might start to untwist while you are trying to tuck them. Always use a small piece of tape or a "heat seal" on the tip of each strand before you start the Crown.
4. Forgetting the "Direction of Twist"
If you go clockwise on a rope that is twisted counter-clockwise, the knot will effectively try to untwist the rope below it. Always match the direction of your loops to the natural spiral of the cordage.
Related Knots and Splicing
Understanding the Crown opens the door to a variety of other outdoor rope techniques. Here are a few related knots you should know:
- Back Splice: This is the natural continuation of the Crown. Once the Crown is set, the strands are woven back into the main rope (usually three or more tucks) to create a permanent, fray-proof end.
- Wall Knot: The inverse of a Crown. While the Crown directs strands "down" toward the rope, the Wall knot directs them "up" and around.
- Wall and Crown (Double Crown): By combining a Wall knot followed by a Crown knot, you create a decorative and functional "Manrope Knot" or "Tack Knot" used for handles.
- Matthew Walker Knot: A more complex terminal knot where the strands are intertwined before being tightened. It is significantly more difficult to tie but offers a very secure and decorative finish.
- Figure-Eight Stopper: A much simpler, non-spliced alternative. While it prevents a rope from slipping through a block, it does nothing to prevent the end of the rope from fraying over time.
Safety and Maintenance
When using the Crown as part of a back splice in a load-bearing scenario (such as a dock line or a heavy-duty lash), safety is paramount.
- Inspection: Regularly inspect the Crown and the subsequent tucks for signs of "fuzzing" or broken fibers. In synthetic ropes, UV damage can make the fibers brittle, causing the Crown to lose its grip.
- Tapering: For a professional finish, once the Crown is tied and the back splice is underway, many experts "taper" the strands by cutting away some of the fibers in each successive tuck. This makes the transition from the knot back to the rope smoother, preventing the end from snagging on equipment.
- Material Limitations: Never rely on a Crown knot alone (without the subsequent splice tucks) for any application involving significant weight or safety-of-life. On its own, it is a temporary dressing; only when spliced does it become a structural component.
Final Words
The Crown knot is a masterclass in the elegant use of friction and geometry. While it may seem like a simple series of loops, it represents a bridge between basic knot-tying and the advanced world of splicing. By mastering the ability to spread out the strands and lay them correctly according to the rope’s twist, you gain the ability to maintain your gear with professional precision.
Whether you are finishing a custom tow line for an off-road excursion or simply ensuring your boat’s dock lines don’t unravel into a mess of "spaghetti," the Crown is an indispensable tool in your kit. Practice with different materials—nylon for strength, manila for tradition—and soon, this essential piece of rope knots lore will become second nature. Remember: a rope is only as good as its ends. Finish yours with a Crown.
