
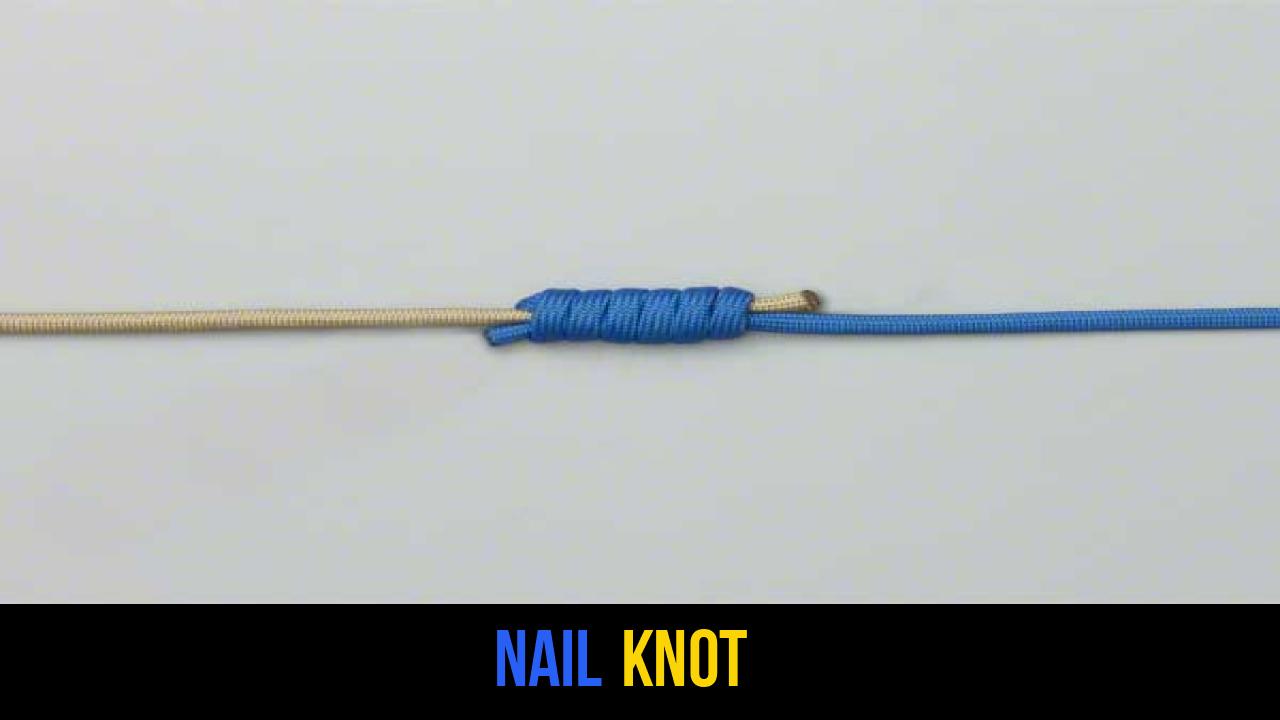
In the world of precision angling and specialized outdoor rope techniques, few connections are as revered or as essential as the Nail Knot. Known for its incredibly slim profile and remarkable strength, the Nail Knot is the gold standard for joining two lines of different diameters—most notably in fly fishing, where it serves as the primary bridge between the fly line and the leader.
Unlike bulkier knots that might catch on the guides of a rod or create a disturbance in the water, the Nail Knot creates a smooth, tapered transition. Its name originates from the traditional method of using a small nail as a temporary mandrel to facilitate the wrapping process. While modern outdoorsmen often substitute the nail for a small hollow tube or a specialized knot-tying tool, the fundamental mechanics remain rooted in centuries of maritime and angling tradition.
Whether you are a seasoned fly fisher or a survivalist looking to expand your repertoire of rope knots, mastering the Nail Knot is a rite of passage. It demonstrates an understanding of friction, tension, and the structural integrity of cordage.
Alternative Names: Tube Knot, Grinner Knot (variation), Guide’s Knot.
What Is a Nail Knot?
The Nail Knot is a friction-based hitch that essentially "grips" a host line by compressing multiple wraps of a secondary, usually thinner, line around it. Because the wraps are laid side-by-side and then tightened simultaneously, the knot acts like a Chinese finger trap—the more tension applied to the lines, the tighter the knot cinches down.
Practical Uses in the Field
While its most famous application is in fly fishing, the utility of the Nail Knot extends into various outdoor rope techniques:
- Fly Fishing: Attaching the fly line to the leader, or attaching the backing to the fly line.
- General Angling: Joining a heavy mono leader to a braided main line.
- Technical Gear Repair: Securing a small diameter cord to a thicker rope or rod-like object where a low-profile finish is required.
- Crafting and Lashing: Creating a permanent decorative or functional whipping on the end of a rope to prevent fraying.
The beauty of the Nail Knot lies in its "jamming" quality. Once properly seated, it is nearly impossible for the knot to slip, making it one of the most reliable rope knots in high-stakes environments.
Materials and Tools Needed
To tie a perfect Nail Knot, you need more than just the cordage. Because this knot involves internal threading, a "helper" tool is required to maintain the space through which the tag end will pass.
Required Materials:
- The Main Line: Usually the thicker line (e.g., a fly line or a thick utility rope).
- The Lighter Line: The thinner line that will do the wrapping (e.g., a tapered leader or thin paracord).
- A Small Tube or "Straw": Traditionally a nail was used, but a small hollow stirrer straw or a specialized metal tube makes the process significantly easier for beginners.
- Cutting Tool: A sharp pair of nippers or a knife to trim the tag ends flush.
Considerations for Cordage:
When practicing outdoor rope techniques, the material of your line matters.
- Monofilament: Stretchy and easy to seat, but requires thorough lubrication to prevent heat damage during tightening.
- Fluorocarbon: Harder and more abrasion-resistant; it requires very firm tension to "bite" into the main line.
- Braided Lines: Their textured surface provides excellent grip, but they can be more difficult to keep organized during the wrapping phase.
How to Tie Nail Knot?
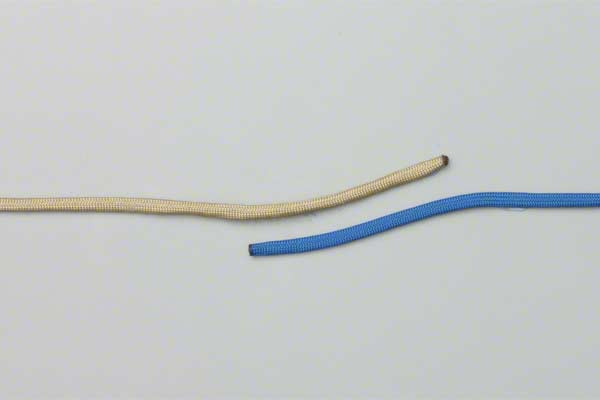
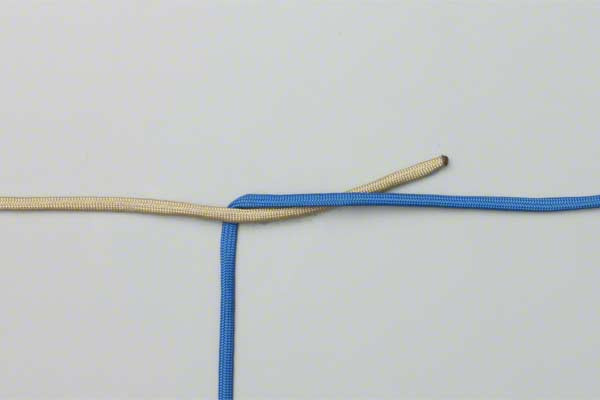
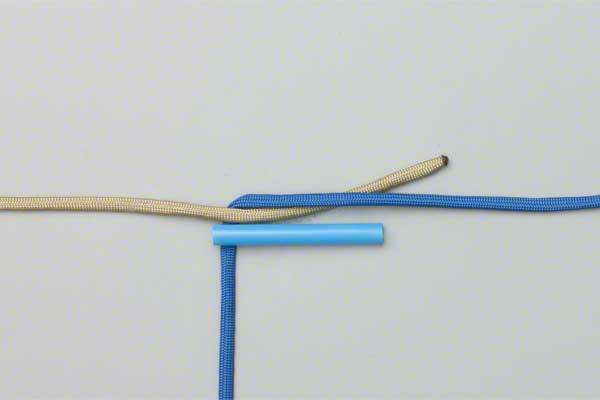
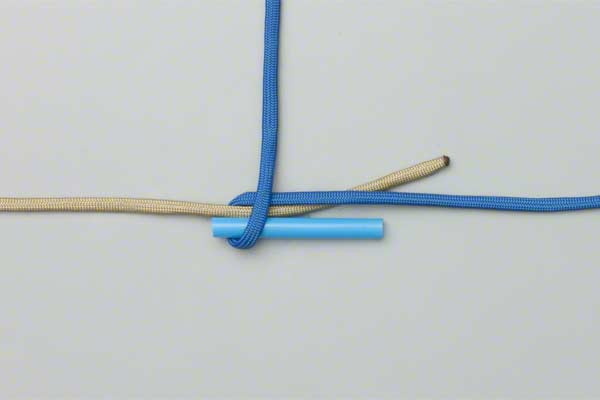
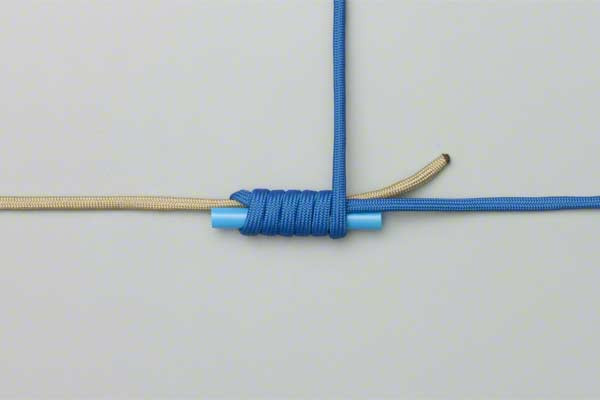
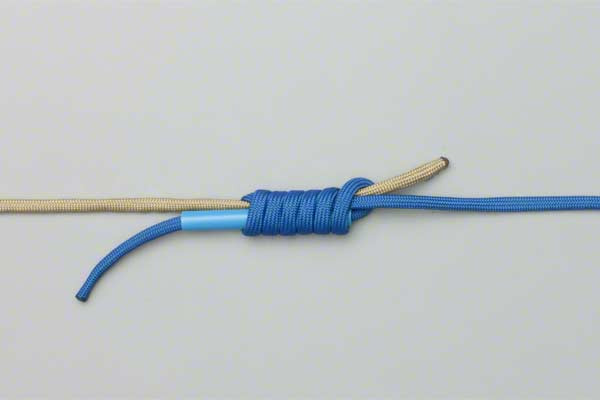
Follow these steps precisely to ensure a secure and professional connection. This method utilizes a straw to simplify the process, which is the preferred technique for modern outdoor enthusiasts.
- Overlap the two lines.
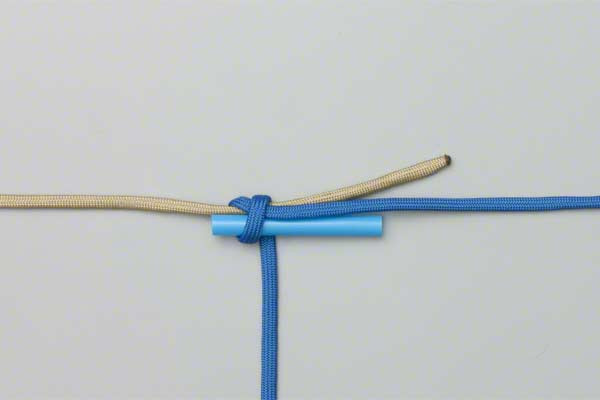
- Holding the straw and the lines together, wrap the lighter line (blue) around the straw and both lines.
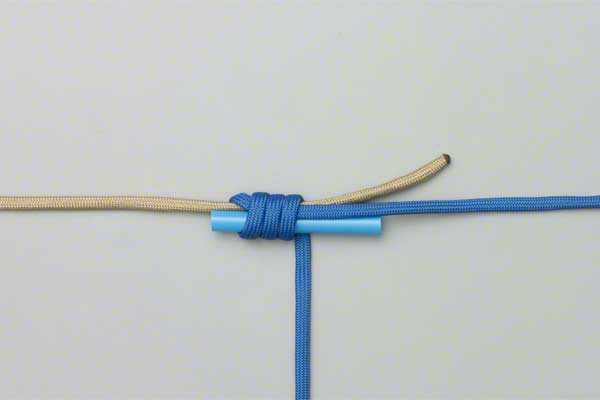
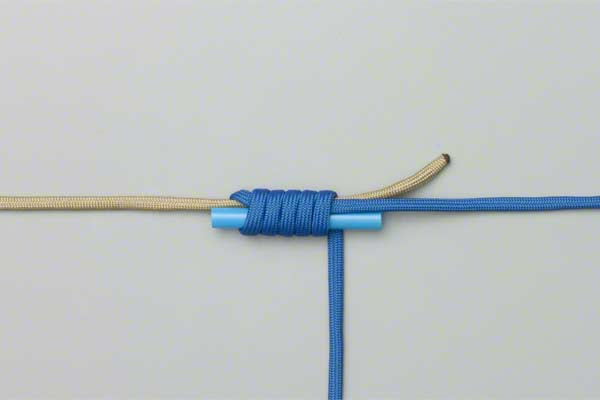
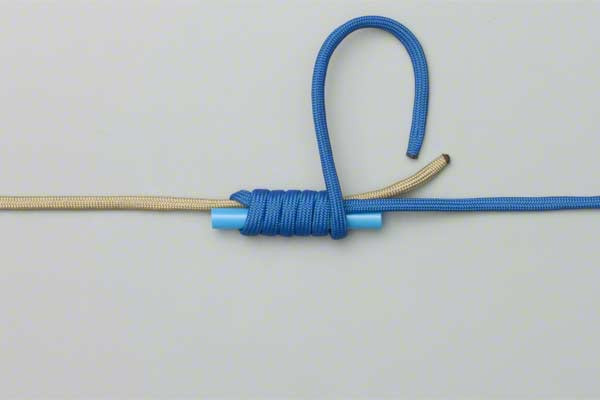
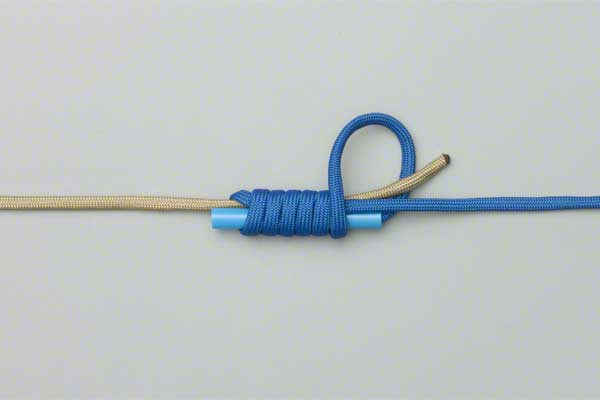
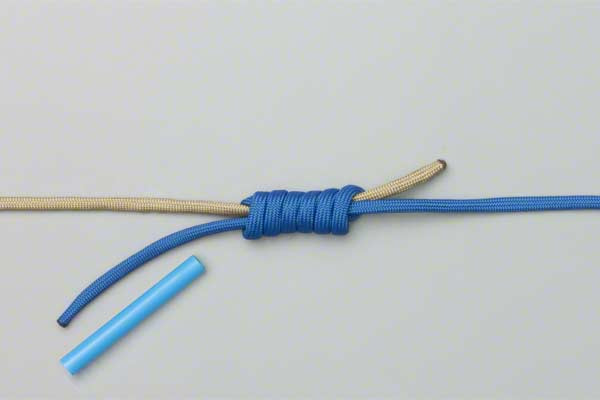
- Make six complete turns, pass the line through the straw and tighten the knot neatly around the straw.
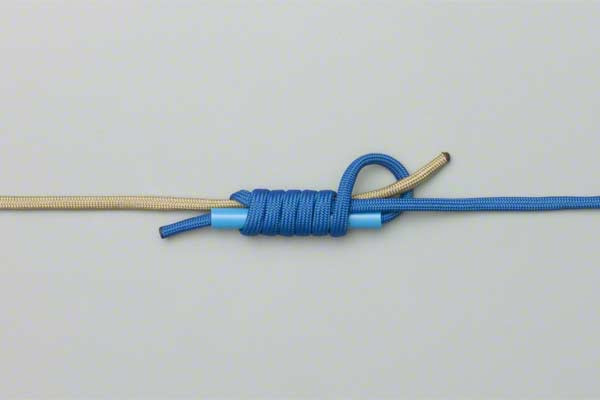
- Withdraw the straw.
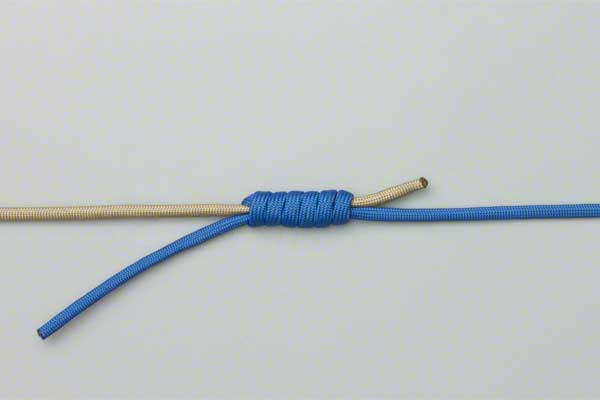
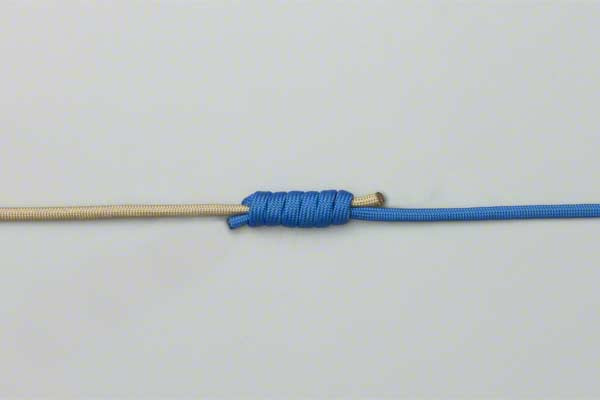
- Lubricate, pull the knot tight, and trim the ends.
Common Mistakes to Avoid
Even for those experienced in rope knots, the Nail Knot can be finicky. To ensure your knot holds up under the pressure of a trophy fish or a heavy load, avoid these common pitfalls:
1. Overlapping Wraps
The six turns must lie perfectly parallel to one another. If the "blue" line (the wrapping line) crosses over itself during the wrapping phase, the knot will become bulky and may fail to cinch down evenly. This creates a "bump" that can snag on equipment.
2. Insufficient Lubrication
Friction is the enemy of synthetic lines. When you pull the knot tight, the lines rub against each other, generating heat. This heat can weaken the molecular structure of the line, leading to a "burn" that causes the line to snap at a fraction of its rated strength. Always use water or saliva to lubricate the knot before the final pull.
3. Not Tightening Simultaneously
A common error is pulling only one end of the wrapping line. To seat a Nail Knot correctly, you must apply steady, firm pressure to both the tag end and the standing part of the lighter line. This ensures the coils compress uniformly from both sides.
4. Using the Wrong Number of Turns
While the instructions specify six complete turns, some beginners try to use fewer to save time or more to add strength. Using fewer than six turns may result in a lack of friction, causing the knot to slip. Using too many can make the knot nearly impossible to tighten fully, leaving a loose core.
The Science Behind the Knot: Why It Works
From a technical standpoint, the Nail Knot is a type of Grip Hitch. In outdoor rope techniques, we analyze knots based on their "efficiency"—how much of the rope’s original strength is retained.
The Nail Knot is highly efficient because it distributes the load across a wide surface area. By wrapping the line six times, you are creating a massive amount of surface contact. When tension is applied, the outer wraps compress the inner line. Because the inner line (the fly line) is usually softer than the outer line (the leader), the outer line actually "bites" into the coating of the inner line, creating a mechanical bond that is virtually inseparable.
Related Knots and Splicing
To become a true expert in rope knots, it is helpful to understand how the Nail Knot compares to other similar connections.
- Blood Knot: A classic knot used for joining two lines of similar diameter; it creates a very straight, symmetrical connection but lacks the "grip" of a Nail Knot on dissimilar lines.
- Albright Knot: Best for joining a thin diameter line to a much thicker one, often used for heavy shock leaders in saltwater fishing; it is faster to tie than the Nail Knot but slightly bulkier.
- Surgeon’s Knot: A simple, quick way to join lines using a double overhand technique; while strong, it creates an angled connection that is not as streamlined as the Nail Knot.
- Yucatan Knot: A high-strength connection used primarily in big-game fishing to join mono to braid; it relies on similar wrapping principles but is finished differently.
Field Tips for Professionals
If you find yourself in the field without a straw or a nail, you can use a "loop of line" technique to pull the tag end back through the wraps. However, for the most consistent results, carrying a small 2-inch section of a WD-40 applicator straw in your tackle box or survival kit is a pro-level tip.
Temperature Matters: In extremely cold weather, synthetic lines become stiff. If you are tying a Nail Knot in the winter, warm the line slightly between your fingers before wrapping to ensure the coils lay flat and tighten without kinking.
Final Words
The Nail Knot is more than just a way to catch fish; it is a fundamental component of sophisticated outdoor rope techniques. Its ability to semi-permanently fuse two different materials into a single, streamlined unit is a testament to the ingenuity of traditional knot-tying.
By following the steps of overlapping the lines, executing six complete turns, and properly lubricating the transition, you ensure that your gear is as strong as it can possibly be. Whether you are preparing for a weekend on the river or organizing your technical outdoor gear, the Nail Knot is a tool that belongs in every adventurer’s mental kit. Practice it until the movements are muscle memory, and you will never have to worry about a line failure at the moment of truth.
