
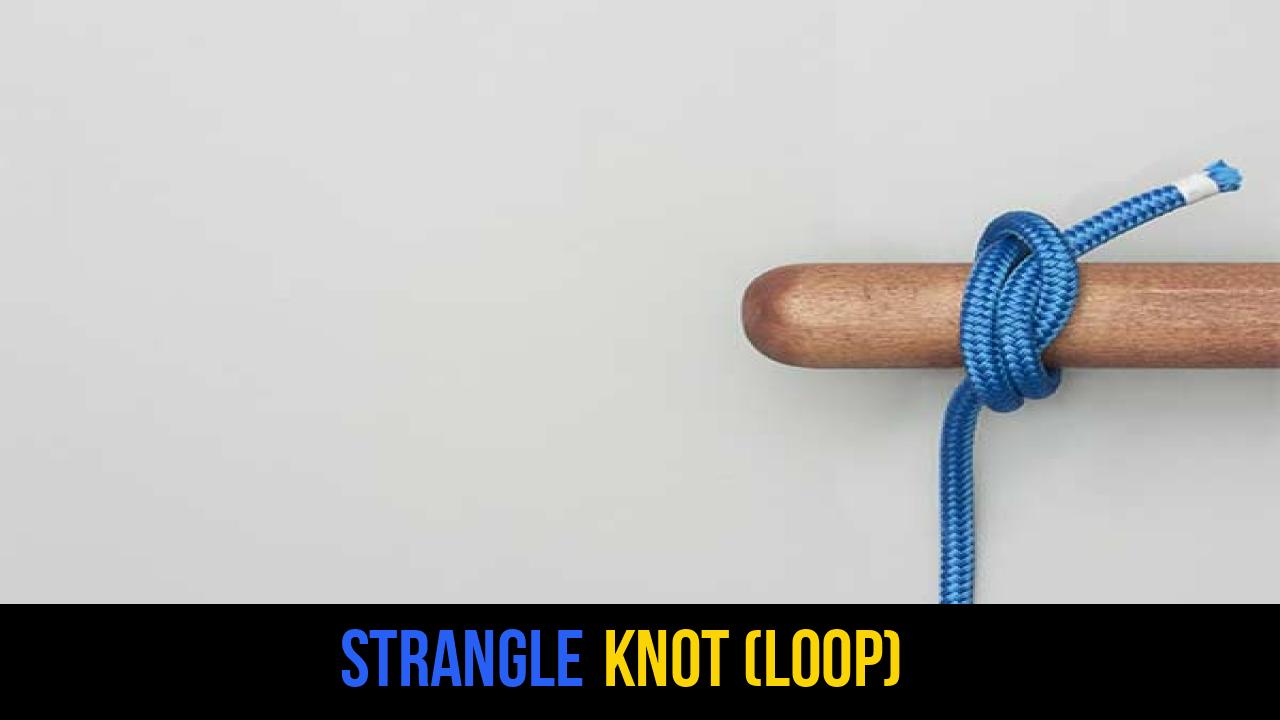
In the world of outdoor rope techniques, few skills are as foundational as the ability to tie a secure binding knot. Whether you are securing gear to a roof rack, bundling firewood in a survival situation, or performing routine maintenance on a sailboat, the integrity of your knot determines the success and safety of your task. One such knot that stands out for its incredible grip and reliability is the Strangle Knot (Loop).
The Strangle Knot (Loop) is a variation of the classic strangle knot, designed specifically to be formed and then slid over the end of a post or pole. It belongs to a family of knots known for their "permanent" nature; once tightened, they are notoriously difficult to untie, making them ideal for semi-permanent applications. Unlike a standard hitch, which may slip under fluctuating tension, the Strangle Knot (Loop) utilizes internal friction to "strangle" the object it surrounds, ensuring a steadfast hold.
Understanding the mechanics of rope knots is not just for sailors or climbers; it is a vital skill for any outdoor enthusiast. In this guide, we will delve deep into the technical aspects of this knot, providing you with the exact steps to master it, while exploring the materials and safety precautions necessary for professional-grade results.
Alternative Names: Double Overhand Binding Loop, Strangle Hitch (Pre-formed), Modified Constrictor Loop.
What Is a Strangle Knot (Loop)?
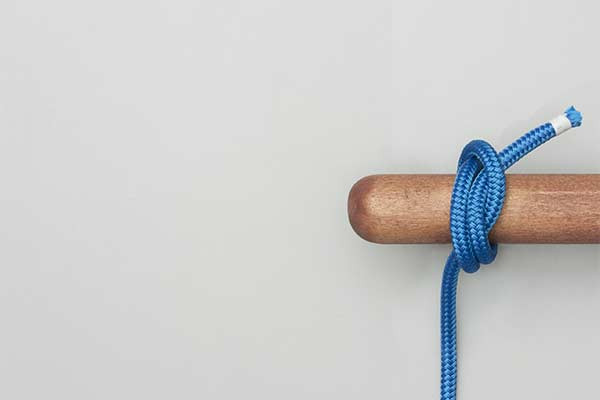
The Strangle Knot (Loop) is a heavy-duty binding knot characterized by its use of a Double Overhand structure. Technically, it is a variation of the Double Overhand Knot that has been rearranged into two parallel loops. When these loops are placed over a cylindrical object and tightened, the turns of the rope press against each other and the object simultaneously.
Practical Uses and Applications
This knot is preferred in scenarios where you need a high-friction bind that will not work loose over time. Some common applications include:
- Bushcraft: Securing the structural poles of a tripod or lean-to.
- Sailing: Whipping the end of a large rope or securing small items to rails.
- Home and Garden: Bundling PVC pipes, lumber, or rolled carpets for transport.
- Tool Repair: Providing a temporary emergency bind for a cracked wooden handle.
The primary advantage of the Strangle Knot (Loop) over simpler hitches (like the Clove Hitch) is its resistance to "spilling." Even if the object it is tied around shrinks slightly (such as green wood drying out), the knot tends to maintain its grip better than most alternatives.
Materials and Tools Needed
To practice and master outdoor rope techniques, you must choose the right materials. The performance of the Strangle Knot (Loop) is heavily dependent on the type of cordage used.
Rope Types
- Paracord (550 Cord): Excellent for practice and small-scale binding. Its nylon sheath provides enough friction for the knot to bite effectively.
- Static Climbing Rope: For heavy-duty applications, a 6mm to 8mm accessory cord is ideal. The low-stretch nature of static rope ensures the knot remains tight.
- Natural Fibers (Manila or Hemp): These provide the best "bite" due to their rough texture, making the Strangle Knot (Loop) almost impossible to slip.
- Synthetic Braided Line: While strong, some high-density polyethylene (HDPE) lines are very slippery. Use caution, as the knot may require extra tension to set properly.
Tools and Considerations
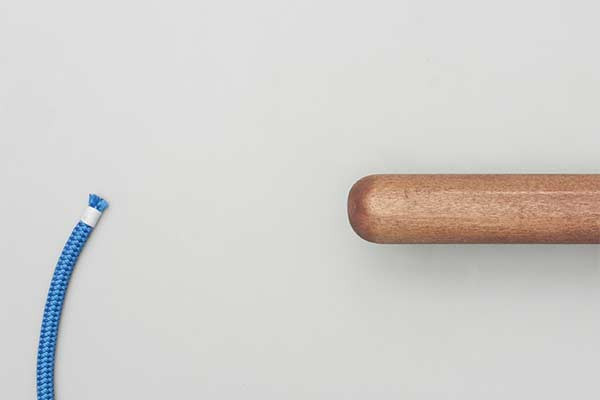
- A Pole or Spar: You will need a cylindrical object (a broom handle, a branch, or a PVC pipe) to slide the knot onto.
- Gloves: When pulling this knot tight, the friction can cause rope burn. Professional-grade leather gloves are recommended for heavy tightening.
- Knife/Cutting Tool: Since this knot is difficult to untie once loaded, you may need a sharp blade to remove it.
How to Tie Strangle Knot (Loop)?
To ensure maximum security and proper form, follow these instructions precisely. The transition from a Double Overhand to the final "Figure 8" shape is the most critical part of the process.
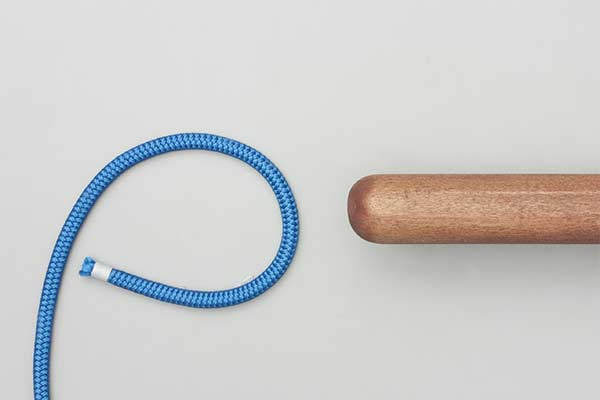
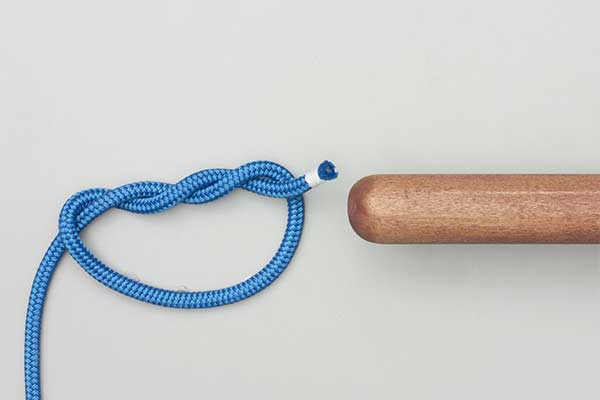
- Form a loop and pass the end through the loop twice to form a Double Overhand knot.
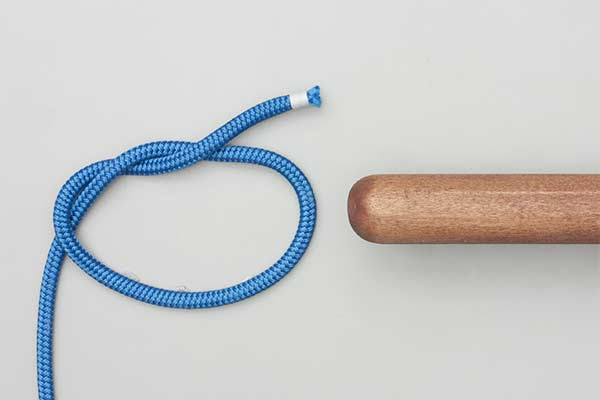
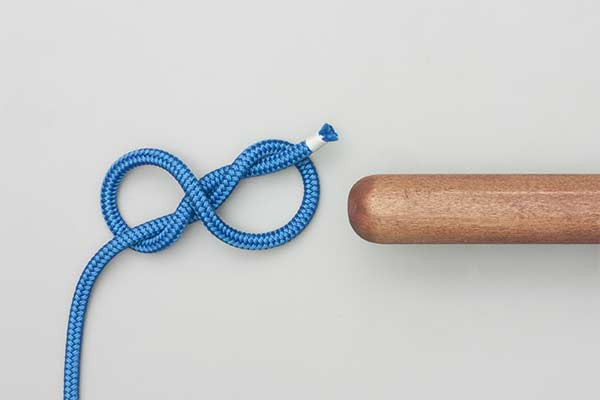
- Twist the knot to look like a figure 8.
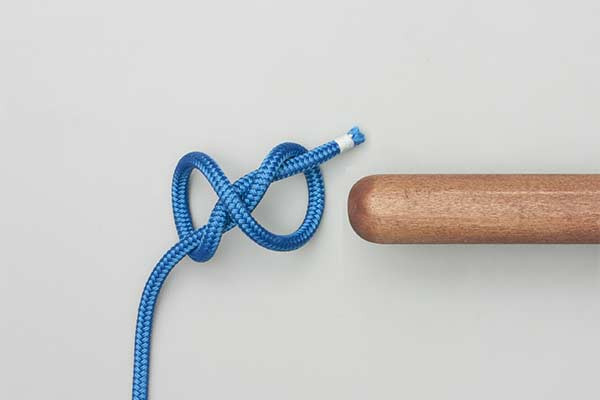
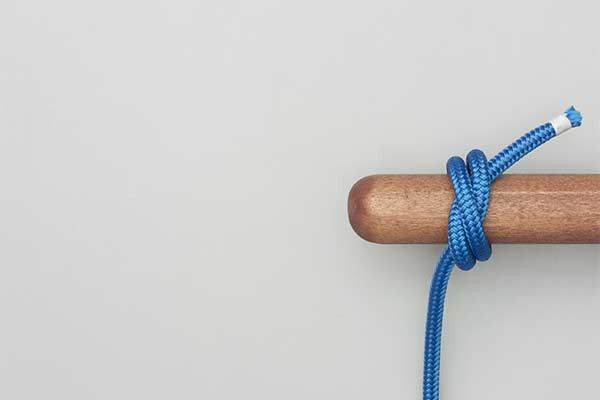
- Slide this double loop onto the pole and pull tight.
- If the knot is laid incorrectly, the knot becomes a less secure half knot beside the two loops.
The Science of Friction: Why This Knot Works
The effectiveness of the Strangle Knot (Loop) lies in its geometry. When you "Twist the knot to look like a figure 8," you are essentially creating two crossing points for the rope. As tension is applied to the standing part and the working end, the rope turns are forced inward.
In rope knots, friction is your friend. This specific configuration ensures that the rope is pressing down on itself (the "strangling" action) while also pressing against the pole. This creates a mechanical advantage where the more force is applied to the load, the tighter the knot grips the object. This is why it is categorized as a binding knot rather than just a hitch.

Common Mistakes to Avoid
Even for those experienced in outdoor rope techniques, the Strangle Knot (Loop) can be tricky to "dress" (straighten) correctly.
1. The "Half Knot" Error
As mentioned in the instructions, the most common mistake is failing to twist the double overhand knot correctly before sliding it onto the pole. If you see a simple half knot sitting beside two loops rather than the loops being integrated into the knot, the structure is compromised. This "spilled" version has significantly less friction and can fail under load.
2. Improper Dressing
"Dressing" a knot means ensuring all parts are parallel and not crossing over each other in unintended ways. If the turns of the Strangle Knot (Loop) are crossed over themselves haphazardly, the pressure won’t be distributed evenly, leading to a weaker bind.
3. Using Slippery Synthetic Ropes
In some cases, using a very smooth, plastic-like rope (like cheap yellow polypropylene) can cause the knot to slide rather than grip. If you must use these materials, ensure you apply extreme initial tension to "set" the knot into the surface of the rope.
4. Safety Warning
The Strangle Knot (Loop) is a binding knot, not a life-safety knot. Never use this as the primary attachment point for climbing or arboriculture unless it is part of a certified and tested system. Its difficulty to untie also means it should not be used in situations where a quick release might be necessary.
Related Knots and Splicing
Expanding your library of rope knots allows you to choose the perfect tool for every job. Here are several knots related to the Strangle Knot (Loop):
- Constrictor Knot: A powerhouse binding knot that is even more secure than the strangle knot, often requiring a knife to remove once tightened.
- Clove Hitch: A fundamental hitch used to secure a rope to a spar; it is faster to tie but much less secure than the Strangle Knot.
- Double Overhand Knot: The foundational stopper knot used to begin the Strangle Knot (Loop), providing bulk and security at the end of a line.
- Timber Hitch: Used for dragging logs or heavy poles, this knot relies on a series of wraps to create friction against a rough surface.
- Miller’s Knot: Historically used to tie the tops of heavy sacks, this knot shares the binding characteristics of the strangle and constrictor families.
Final Words
The Strangle Knot (Loop) is an indispensable tool for anyone serious about mastering outdoor rope techniques. Its ability to provide a semi-permanent, high-friction bind makes it superior to standard hitches for securing gear, building shelters, or performing emergency repairs.
By following the exact steps—forming the Double Overhand, twisting into a figure 8, and carefully sliding it onto your pole—you ensure a connection that is both professional and reliable. Remember that the key to any successful knot is practice; grab a length of paracord and a dowel today to perfect the "twist" and avoid the dreaded "half knot" error. With these skills in your repertoire, you are better prepared for any challenge the outdoors may throw your way.
