
In the world of outdoor rope techniques, efficiency and speed are often just as important as the strength of the knot itself. Whether you are securing a load on a moving boat, stabilizing gear during a high-wind camping expedition, or performing technical ropework where one hand must remain on a support, mastering the Surgical Tie – One Hand is an essential skill. This knot is a specialized variation of the classic Square (Reef) Knot, adapted for situations where dexterity and economy of motion are paramount.
While the name suggests a specific origin, the one-handed tie has become a staple for climbers, sailors, and survivalists who need to create a secure binding quickly. Understanding how to manipulate rope with a single hand allows for greater versatility in the field, ensuring that you can maintain control over your environment while simultaneously securing your equipment. This guide will walk you through the technical nuances of this knot, the materials best suited for its execution, and the professional tips needed to ensure it never fails when under tension.
Alternative names for this technique include: One-Handed Square Knot, Single-Handed Reef Knot, One-Handed Surgeon’s Tie, and the Dexterity Binding.
What Is a Surgical Tie – One Hand?
The Surgical Tie – One Hand is a functional method of tying a Square Knot (also known as a Reef Knot) using only one hand to perform the maneuvers while the other hand typically maintains tension on the standing part of the rope. In the context of rope knots, it is categorized as a "binding knot." Its primary purpose is to join two ends of a single rope around an object or to join two separate ropes of similar thickness.
Practical Uses in the Outdoors
In professional outdoor settings, the ability to tie a knot one-handed is more than just a "trick"—it is a tactical advantage.
- Sailing: When one hand is holding a tiller or a rail, the other can quickly secure a light line.
- Climbing and Rescue: Managing cordage while maintaining a grip on a rock face or a stretcher.
- Camping: Bundling firewood or securing gear to a pack when the other hand is needed to keep the bundle compressed.
- Fishing: Securing heavy-duty leads or nets where quickness prevents the loss of gear.
The defining characteristic of the Surgical Tie – One Hand is its symmetry. Because it results in a Square Knot, it is easy to inspect visually. If the "ears" of the knot do not sit flush against each other, the knot has been tied incorrectly, likely resulting in a "Granny Knot," which is notorious for slipping under load.
Materials and Tools Needed
To master the Surgical Tie – One Hand, you must understand how different materials affect friction and knot security. Not all ropes are created equal, and the one-handed technique requires a rope with a certain degree of "hand" or flexibility.
Recommended Rope Types
- Paracord (550 Cord): Excellent for practice due to its flexibility and moderate friction. It is a staple in outdoor rope techniques.
- Nylon Accessory Cord: Commonly used in climbing, a 3mm to 5mm cord is perfect for learning the fine motor skills required for this tie.
- Hemp or Cotton Rope: These natural fibers provide high internal friction, making the knot very secure once tightened.
- Braided vs. Twisted: Braided ropes are generally preferred for one-handed ties as they do not kink as easily as three-strand twisted ropes.
Considerations for Success
- Rope Diameter: For beginners, a rope between 4mm and 7mm is ideal. Anything thinner requires extreme finger dexterity; anything thicker may be too stiff to manipulate with one hand.
- Surface Texture: Extremely "slick" ropes (like some Dyneema or Spectra blends) may require an extra throw (a "surgeon’s twist") to prevent the first half-knot from slipping while you prepare the second.
- Practice Environment: It is best to practice this by tying the rope around a fixed horizontal object, such as a railing or a specialized knot-tying board.
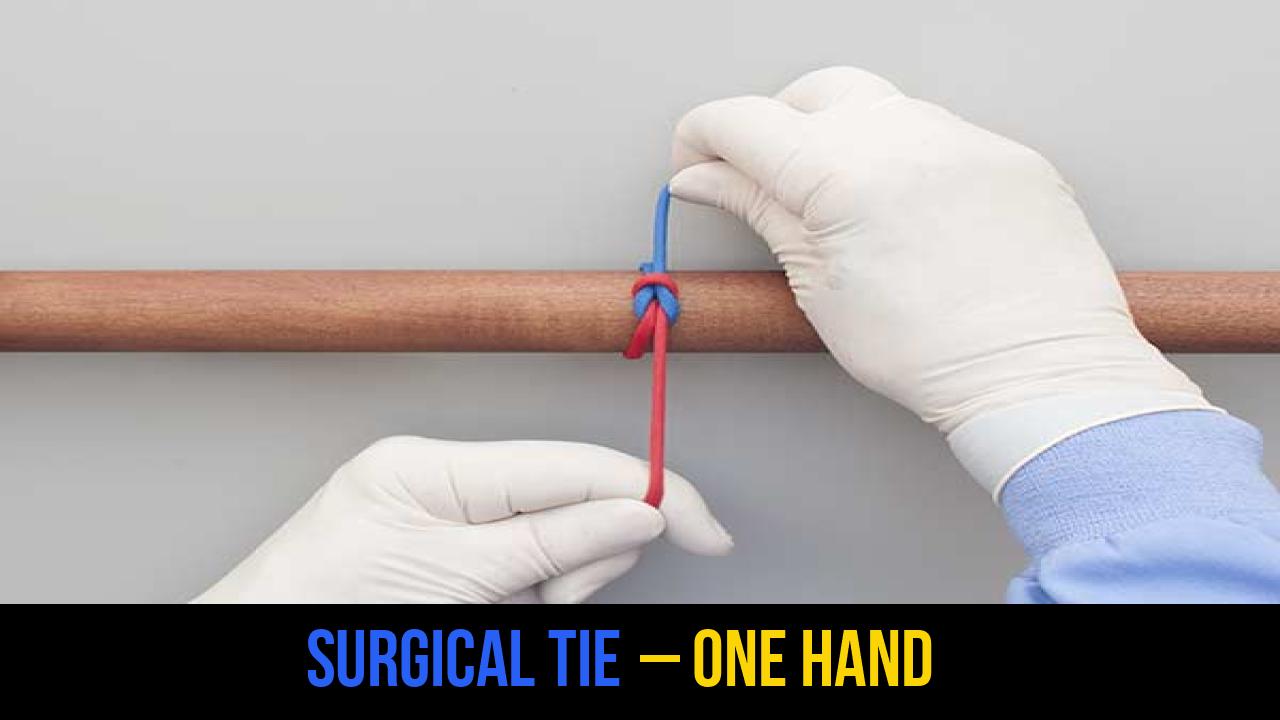
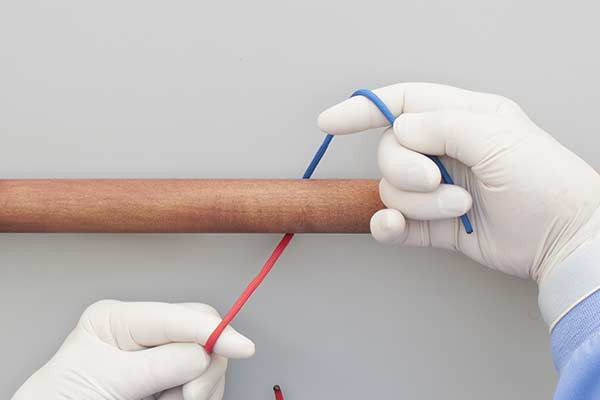
How to Tie Surgical Tie – One Hand?
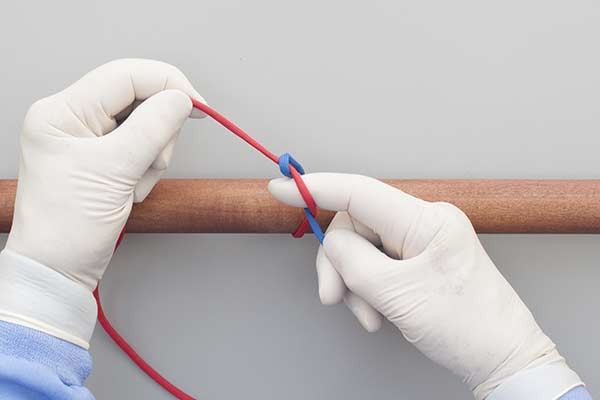
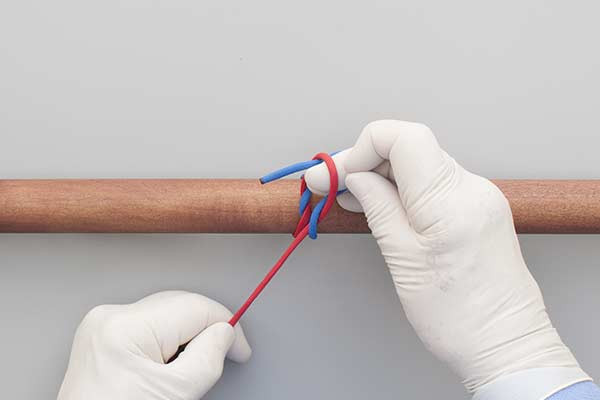
To achieve a secure and professional result, follow these instructions precisely. The key to the Surgical Tie – One Hand is the transition between using the index finger and the middle finger to manipulate the "short end" of the rope.
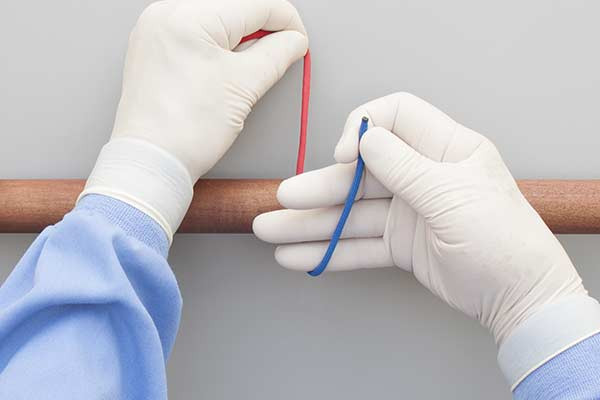
- Have the short end away from you.
- With your index finger hook the long end.
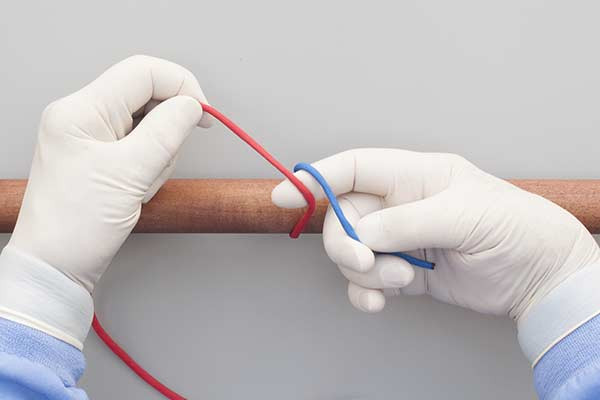
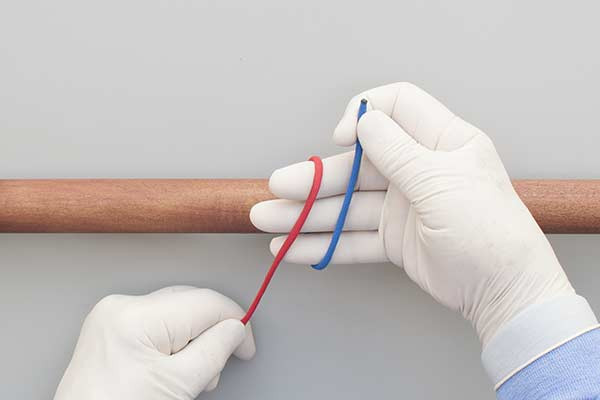
- Pull the short end under it and through.
- Tighten the Half Knot.
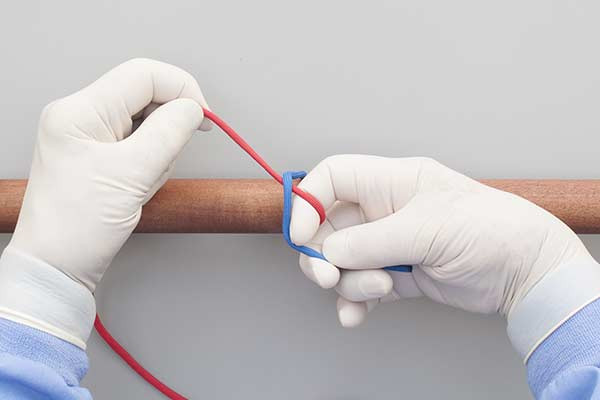
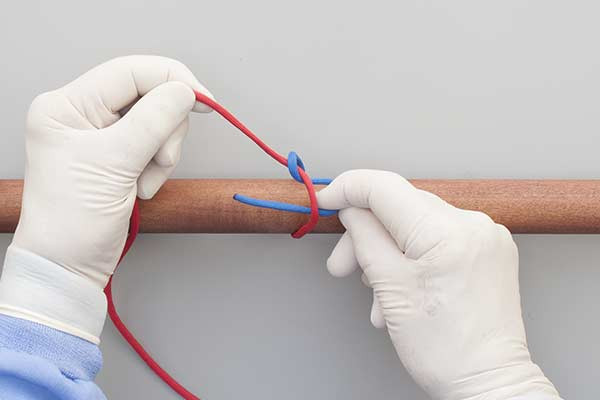
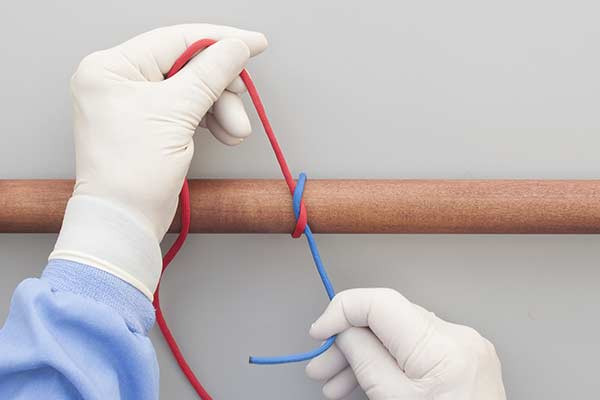
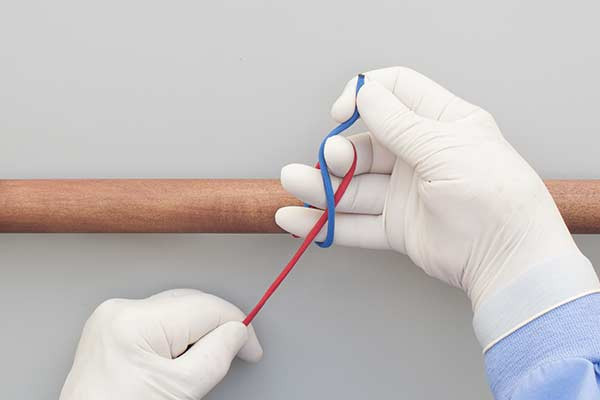
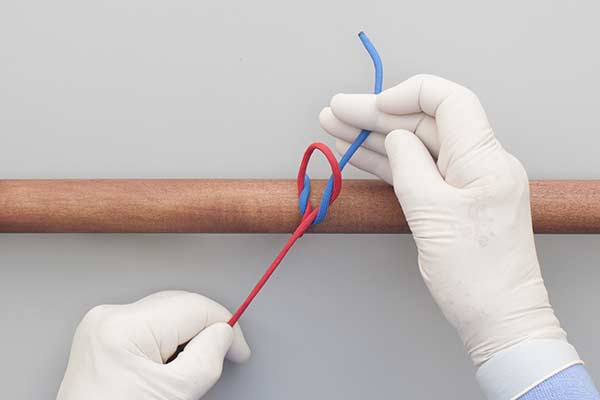
- Lay the short end, then the long end, over your hand.
- With your middle finger hook the long end.
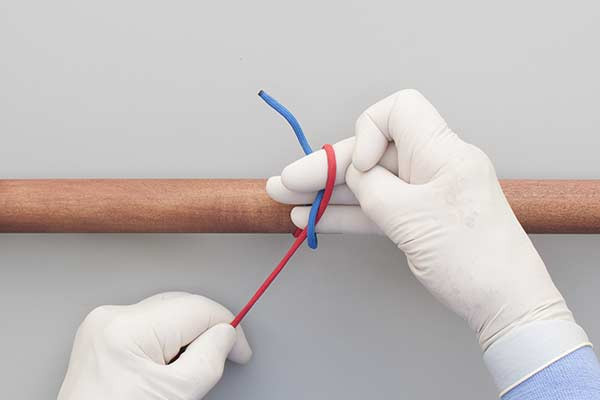
- Pull the short end under it and through.
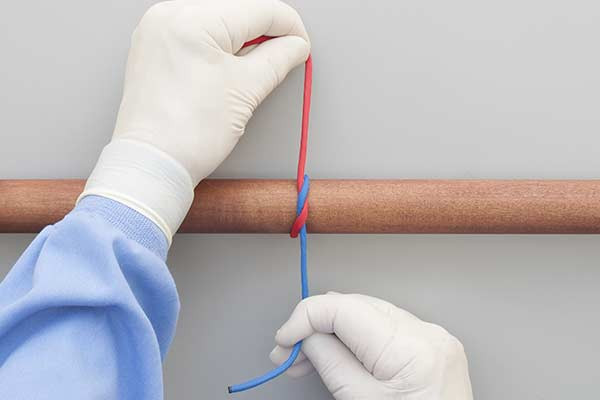
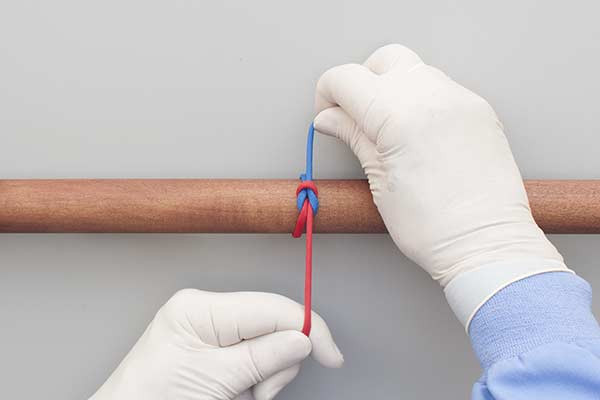
- Pull tight to complete the Square (Reef) Knot.
Common Mistakes to Avoid
Even experienced outdoorsmen can encounter issues with the Surgical Tie – One Hand if they rush the process. Precision is the foundation of safety in rope knots.
The "Granny Knot" Trap
The most common error is failing to reverse the direction of the second throw. If you repeat the index finger movement twice instead of switching to the middle finger movement as described in the steps, you will create a Granny Knot. Unlike the Square Knot, a Granny Knot will slip under tension and can jam when you try to untie it.
Insufficient Tail Length
Always ensure the "short end" has enough length (at least 3–4 inches) to be easily manipulated. If the tail is too short, it may slip out of your fingers during the "hook and pull" phase, causing the knot to collapse before it is set.
Tension Imbalance
When you tighten the Half Knot, it is vital to apply even tension to both the short and long ends. If one side remains slack, the knot may "capsize," transforming into a Lark’s Head or a simple slip knot that will not hold the load securely.
Safety Tip: Load Limits
Remember that while the Surgical Tie – One Hand results in a Square Knot, this knot is not suitable for life-critical applications (like rappelling or belaying) on its own. It is a binding knot, meant for securing objects, not for supporting human weight.
Related Knots and Splicing
Expanding your knowledge of outdoor rope techniques involves understanding how the Surgical Tie relates to other common hitches and bends.
- Square (Reef) Knot: The two-handed version of this tie; it is the fundamental binding knot used for bandages, packages, and reefing sails.
- Surgeon’s Knot: An evolution of the Square Knot where the first throw is looped twice, providing extra friction to hold the knot in place while the second throw is tied.
- Sheet Bend: Unlike the Surgical Tie, which works best with ropes of equal diameter, the Sheet Bend is the professional choice for joining two ropes of different thicknesses.
- Clove Hitch: A quick-release hitch often used to start or finish lashings, providing a different way to secure a rope to a post one-handed.
- Bowline Knot: Known as the "King of Knots," it creates a fixed loop at the end of a rope and is often taught in a one-handed version for emergency rescue scenarios.
Final Words
The Surgical Tie – One Hand is a hallmark of a proficient rope handler. By mastering the delicate interplay between the index and middle fingers, you transition from a casual user of cordage to a technical specialist capable of managing gear in demanding environments. This knot emphasizes the core principles of rope knots: symmetry, security, and speed.
As with all outdoor rope techniques, the secret to success is repetition. Practice with different rope diameters and textures until the movement becomes muscle memory. Whether you are on a boat, in a campsite, or in a survival situation, the ability to throw a secure Square Knot with one hand is a tool that will serve you for a lifetime. Always remember to inspect your knots before applying a load, and stay safe in all your outdoor adventures.
