
Mastering the Alpine Butterfly Loop: The Ultimate Guide for Outdoor Enthusiasts
In the world of technical ropework, few knots command as much respect and versatility as the Alpine Butterfly Loop. Whether you are a high-altitude mountaineer, a professional arborist, or a search-and-rescue technician, the ability to tie a secure loop in the middle of a rope—without needing access to either end—is a fundamental skill.
The Alpine Butterfly Loop knot is widely considered the gold standard for creating a fixed loop in the bight of a rope. Its symmetrical design allows it to be loaded from three different directions: from the loop itself, or from either end of the standing line. This unique property makes it superior to many other rope knots that might fail or become dangerously unstable when pulled from the "wrong" direction.
In this comprehensive guide, we will explore the mechanics, applications, and safety considerations of this essential outdoor rope technique. By the end of this article, you will not only know how to tie it but also understand why it deserves a permanent spot in your technical repertoire.
Alternative names: Butterfly Knot, Lineman’s Loop, Lineman’s Rider, and Alpine Butterfly.
What Is an Alpine Butterfly Loop?
The Alpine Butterfly Loop is a fixed-loop knot that is tied in the middle (the bight) of a rope. Unlike the Figure-Eight on a Bight, which is also a popular mid-line knot, the Alpine Butterfly is significantly easier to untie after it has been heavily loaded.
Why It Stands Out
- Multidirectional Loading: Most knots are designed to be pulled in a specific direction. The Alpine Butterfly can handle tension from the loop, the left side of the rope, or the right side of the rope simultaneously.
- Isolating Damaged Rope: One of its most critical survival uses is "isolating" a nicked or frayed section of rope. By placing the damaged portion within the loop of the knot, the tension is carried by the knot’s structure rather than the compromised fibers.
- Stability: It does not "roll" or capsize under heavy stress, making it a reliable choice for life-safety applications.
Practical Uses
- Glacier Travel: In mountaineering, the middle climbers on a rope team use this knot to clip into the main line via a carabiner.
- Arboriculture: Tree climbers use it to create attachment points or to redirect lines.
- Rigging: In hauling systems, it provides a secure point to attach pulleys or mechanical advantage devices.
Materials and Tools Needed
To practice and master this knot, you need the right equipment. The behavior of a knot can change based on the material and diameter of the cordage used.
- Rope Types: For learning, a dynamic climbing rope (9.5mm to 10.5mm) or a static kernmantle rope is ideal. These ropes hold their shape well and allow you to see the "dress" of the knot clearly.
- Accessory Cord: You can also practice with 6mm or 7mm 7mm perlon cord, though smaller diameters can be more finicky to dress.
- Gloves: When tightening knots in a professional setting, especially with synthetic fibers that can cause friction burns, technical work gloves are recommended.
- A Carabiner: To test the loop, having a locking carabiner to clip into the finished knot helps you visualize how it will be used in the field.
How to Tie Alpine Butterfly Loop?
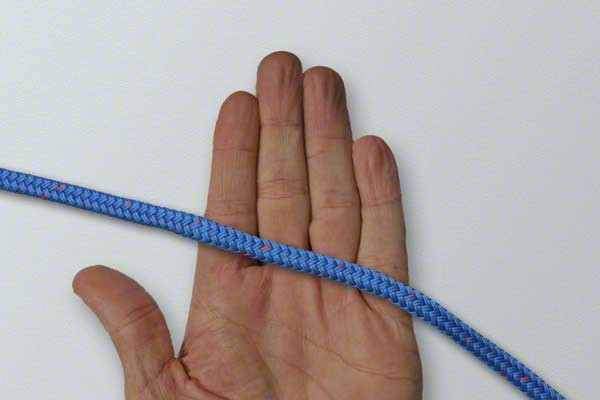
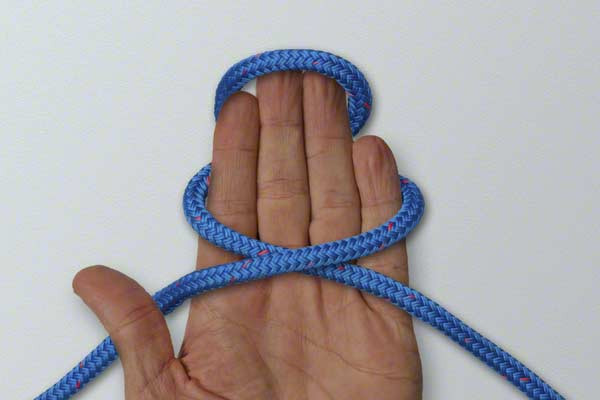
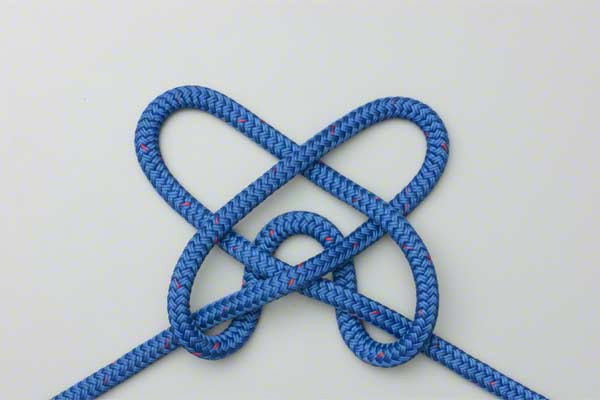
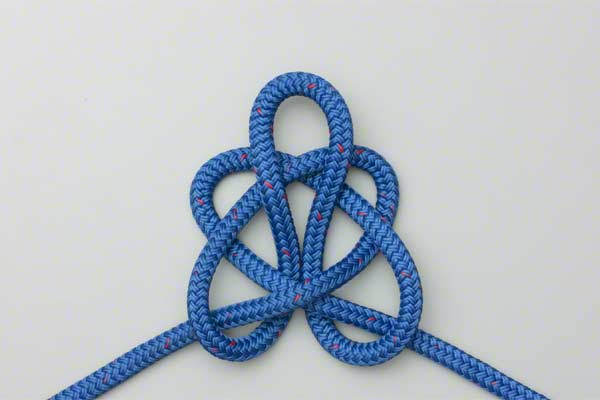
The following method is the "hand-wrap" technique, which is favored by many professionals for its speed and simplicity. Please follow these steps exactly to ensure a safe and secure knot.
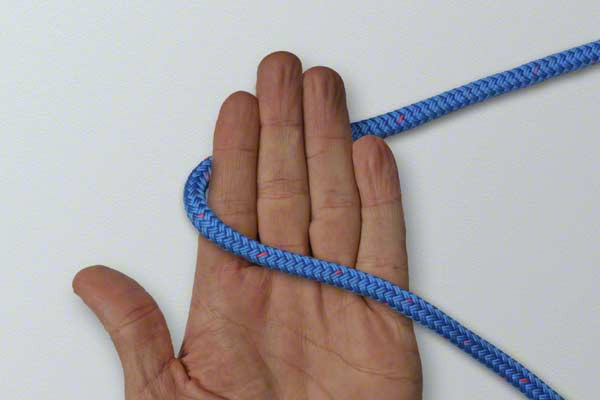
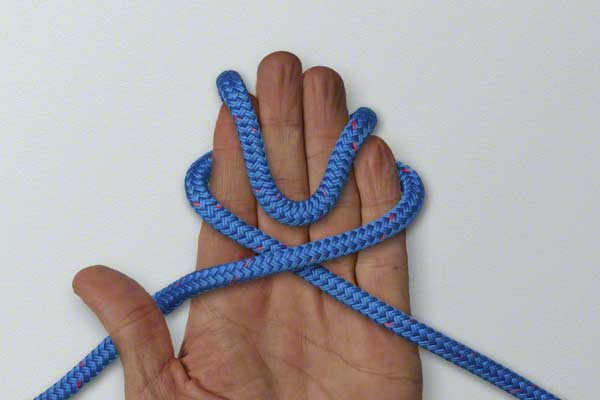
- Wrap the rope around your hand twice.
- At the end of turn one, position the rope close to your fingertips.
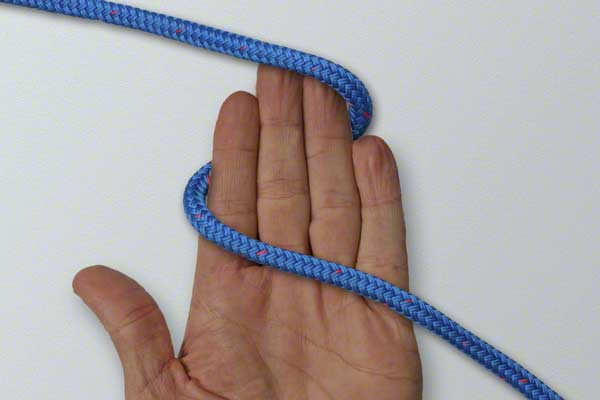
- Continue around and complete turn two back near your thumb.
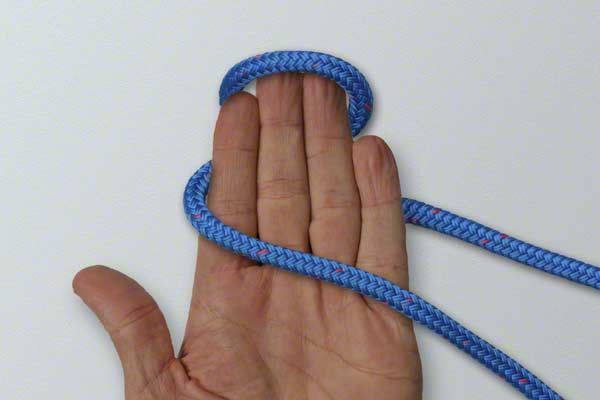
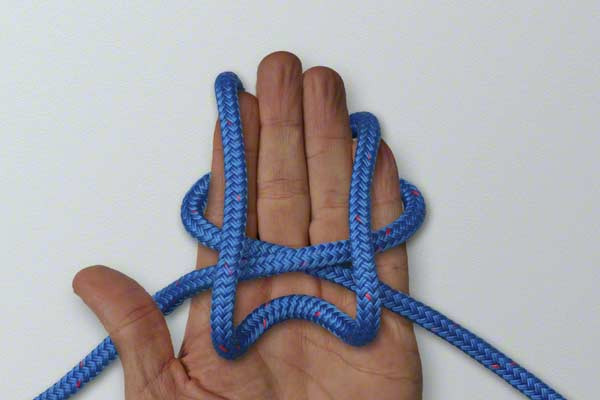
- Pick up the turn near your fingertips.
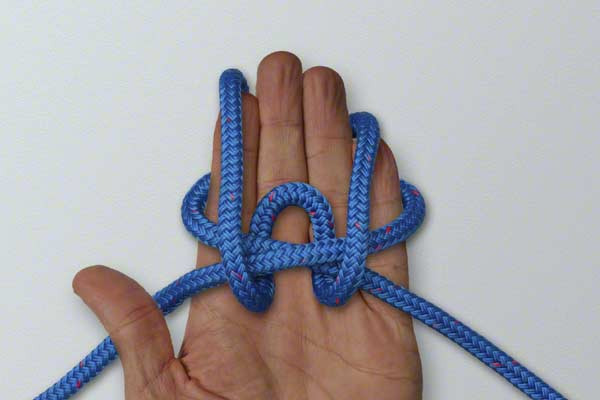
- Wrap it around the other two turns.
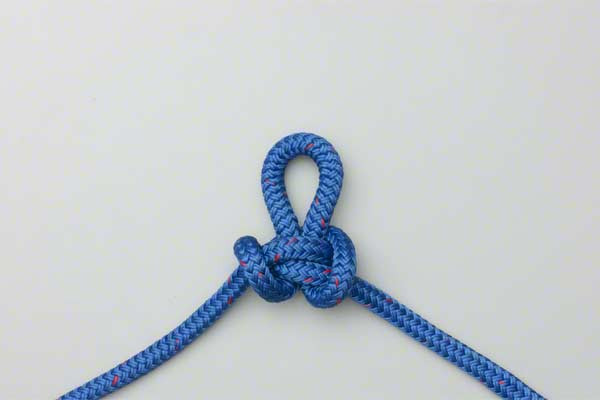
- Slide the knot off your hand and tighten by pulling on the loop and the ends.
Expert Tip: Once the knot is off your hand, ensure the "wings" of the butterfly are symmetrical and that the strands do not cross over each other in a messy fashion. This is known as "dressing" the knot.

Common Mistakes to Avoid
Even seasoned professionals can make mistakes when tired or working in low-light conditions. When practicing outdoor rope techniques, keep an eye out for these common errors:
1. Crossing the Strands Incorrectly
If the strands cross in the wrong direction during the wrapping phase, you may end up with a "False Butterfly." This knot looks similar but can slip or fail under high tension. Always visually inspect the "X" pattern formed in the center of the knot.
2. Failing to "Dress and Set"
A knot is not finished until it is dressed (organized so strands are parallel and not crossing) and set (tightened). A loose Alpine Butterfly can deform when suddenly loaded. Always pull firmly on all three ends (the loop and both standing parts) to seat the fibers.
3. Using the Wrong Rope Material
Avoid tying the Alpine Butterfly in extremely slick, high-modulus polyethylene (HMPE) ropes like Dyneema or Spectra without specialized training. These materials have very low friction, and the knot may slip at lower-than-expected loads compared to nylon or polyester.
4. Ignoring the Loop Size
Ensure the loop is large enough for your carabiner or attachment point but not so large that it becomes a snag hazard. For most applications, a loop about the size of your palm is sufficient.
Related Knots and Splicing
Understanding how the Alpine Butterfly Loop relates to other rope knots will deepen your technical knowledge. Here are a few related knots often used in conjunction with it:
- Figure-Eight Loop: A robust, easy-to-identify loop tied at the end of a rope, primarily used for tying into a climbing harness.
- Bowline Knot: Known as the "King of Knots," it creates a fixed loop at the end of a rope that is exceptionally easy to untie after being loaded.
- Clove Hitch: A quick, adjustable hitch used to secure a rope to a cylindrical object like a carabiner, post, or tree limb.
- Prusik Knot: A friction hitch used to grab a larger rope; often clipped into an Alpine Butterfly during hauling or ascending operations.
Physics of the Butterfly: Why It Works
From an engineering perspective, the Alpine Butterfly is fascinating. When you load the two standing ends (the "straight" part of the rope), the knot actually tightens upon itself. The internal friction created by the wraps prevents the loop from shrinking or slipping.
Unlike the Overhand Loop, which can "jam" so tightly that it must be cut off the rope after a heavy fall, the Alpine Butterfly maintains a specific geometry that allows you to "break" the knot (loosen it) by pushing the outer wings toward the center. This makes it the preferred choice for rescue scenarios where gear must be recovered quickly and ropes reused.
Final Words
The Alpine Butterfly Loop is a masterpiece of knot geometry. It is an indispensable tool for anyone serious about outdoor rope techniques. Its ability to handle multidirectional loads, isolate rope damage, and remain easy to untie makes it superior to almost any other mid-line loop.
As with all life-safety skills, reading about the knot is only the first step. To truly master the Alpine Butterfly Loop knot, you must practice it until it becomes muscle memory. Tie it in the dark, tie it with gloves on, and tie it until you can recognize a correctly dressed knot at a glance.
Whether you are rigging a complex hauling system or simply securing gear in the back of a truck, the Alpine Butterfly will serve you with reliability and strength. Stay safe, keep practicing, and always double-check your knots before putting them to the test.