
In the world of rope knots, few stoppers hold as much prestige and functional reliability as the Ashley Stopper Knot. Developed and popularized by the legendary Clifford W. Ashley—the author of the seminal work The Ashley Book of Knots—this knot was born out of a necessity for a bulkier, more secure terminal knot that would not easily jam or slip through an eyelet.
Unlike the standard overhand knot or the figure-eight, the Ashley Stopper Knot provides a well-balanced, three-lobed footprint that ensures the rope remains firmly seated against a hole or block. Whether you are a sailor, an arborist, or a search-and-rescue professional, mastering this specific outdoor rope technique is essential for ensuring safety and efficiency in the field.
Throughout this guide, we will explore the technical nuances of this knot, the materials best suited for its construction, and the precise methodology for tying it correctly every time.
Alternative Names: Oysterman’s Stopper Knot, ABOK #526.
What Is an Ashley Stopper Knot?
The Ashley Stopper Knot is a specialized terminal knot designed to increase the diameter of a rope’s end to prevent it from unreeving through a block, deadeye, or any narrow passage. It is technically classified as a "multi-strand" stopper because of how the loops interact to create a symmetrical, clover-like shape.
Practical Uses and Applications
- Sailing and Marine Use: Primarily used to prevent sheets and halyards from disappearing into blocks or pulleys. Its bulky nature makes it superior to the common figure-eight knot in high-load marine environments.
- Arboriculture: Climbers use it as a safety "backup" knot at the end of a climbing line to ensure the rope cannot accidentally pass through a friction hitch or mechanical device.
- General Utility: It is an excellent choice for creating a hand-hold on a rope or for securing the end of a drawstring in heavy-duty outdoor gear.
- Search and Rescue: Its stability under load makes it a reliable choice for technical rigging where a secure, non-jamming terminal point is required.
One of the defining characteristics of the Ashley Stopper Knot is its resistance to "capsizing" or deforming under extreme tension. While simpler knots might pull through or become impossible to untie after being loaded, the Ashley remains stable and relatively easy to inspect visually.
Materials and Tools Needed
To tie a secure Ashley Stopper Knot, the choice of material is just as important as the technique itself. Different fibers and constructions react differently to the internal friction of the knot.
Recommended Rope Types
- Nylon (Polyamide): Excellent for this knot due to its elasticity and high friction. A nylon rope allows the knot to "settle" and grip itself firmly.
- Polyester (Dacron): Ideal for marine environments. It has low stretch and high UV resistance, making the Ashley Stopper Knot a permanent fixture on sailboat lines.
- Natural Fibers (Manila/Cotton): While less common in modern technical use, the Ashley Stopper holds exceptionally well in natural fibers because the coarse texture of the rope prevents the loops from sliding.
- Kernmantle Ropes: For climbers and rescue workers, static or dynamic kernmantle ropes work well, though the knot must be "dressed" (straightened) with extra care to ensure all three lobes are even.
Considerations for Diameter
The bulk of the knot is directly proportional to the diameter of the rope. If you are using a thin paracord, the knot will be compact. If you are using a 1/2-inch yacht braid, the resulting stopper will be significant enough to block large pulleys.
How to Tie Ashley Stopper Knot?
Following the exact technical specifications for this knot is vital for its structural integrity. Use the following steps to ensure a perfect tie every time.
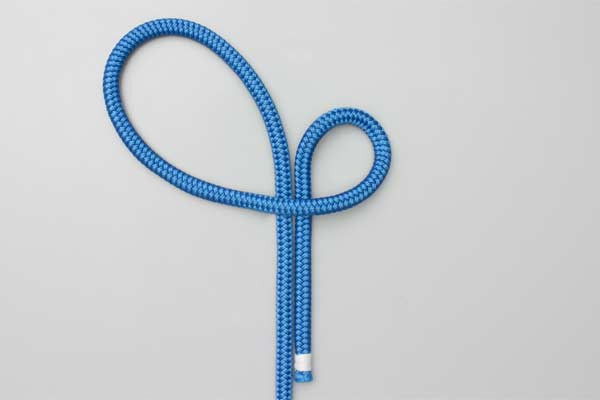
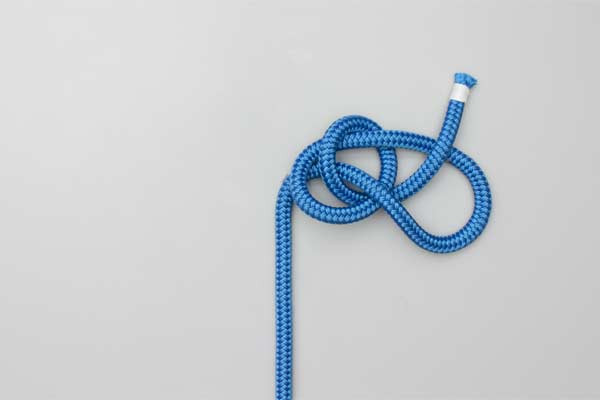
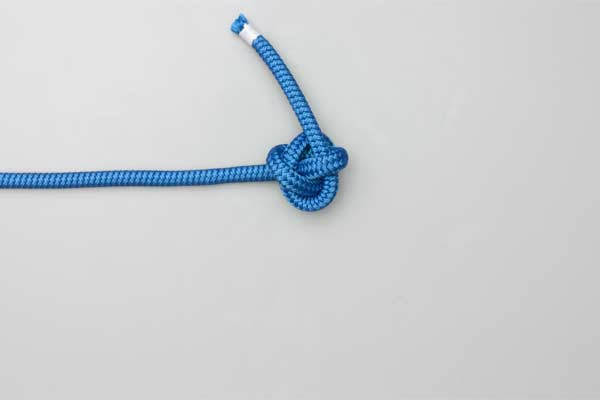
- Make a bight and fold it into two loops.
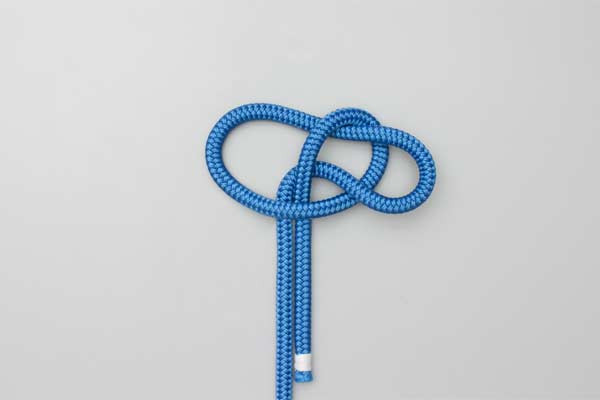
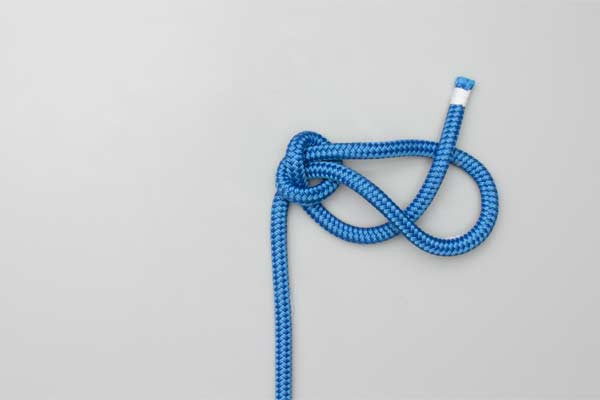
- Pass the loop in the standing end through the other loop and then tuck the tail through it.
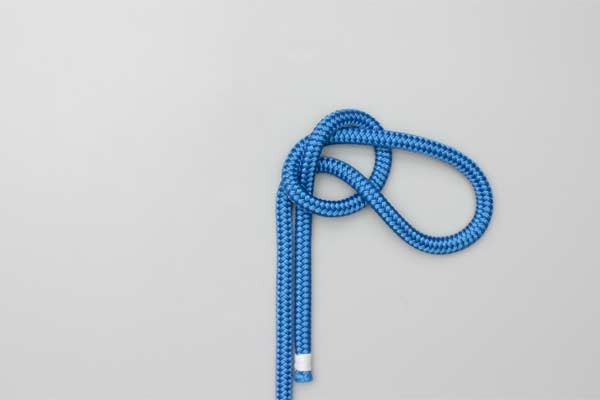
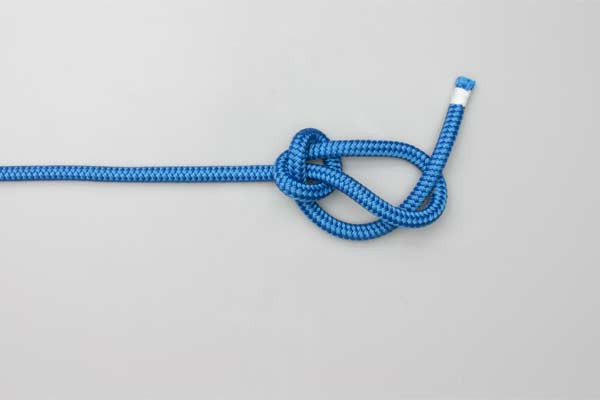
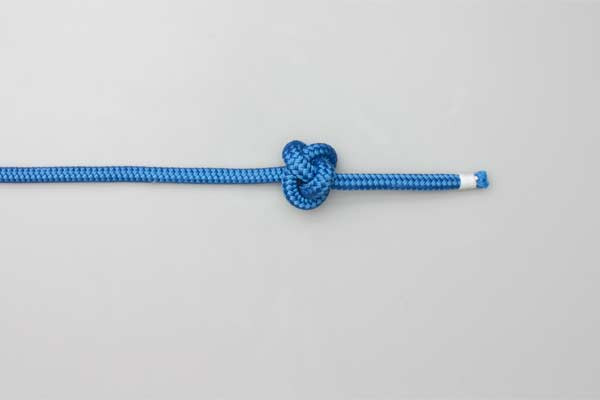
- Tighten the Half Knot first.
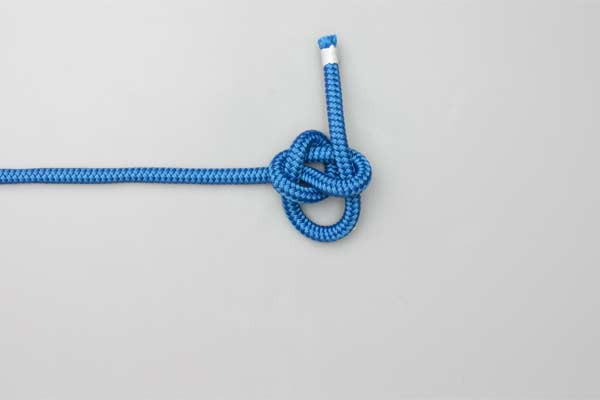
- Then pull the tail tight and finally the standing end.
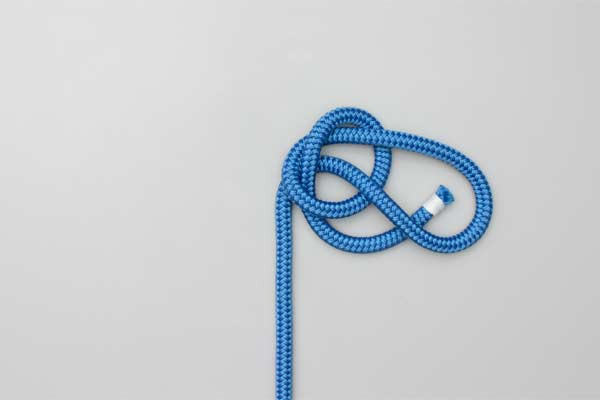
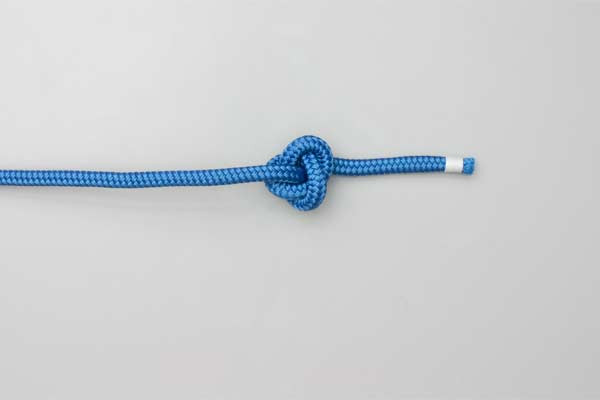
- The underside of the knot shows three separate lobes.

Common Mistakes to Avoid
Even seasoned professionals can make errors when tying rope knots. To ensure the Ashley Stopper Knot performs to its maximum potential, avoid these common pitfalls:
1. Incorrect Tightening Sequence
As noted in the instructions, you must tighten the Half Knot first. If you pull the standing end or the tail before the internal half-knot is seated, the knot may become asymmetrical. This reduces its surface area and may allow it to slip through the very opening it is meant to block.
2. Failure to "Dress" the Knot
A "dressed" knot is one where all the strands are parallel and not crossing over each other unnecessarily. For the Ashley Stopper Knot, you should be able to clearly see the three separate lobes on the underside. If the knot looks like a jumbled mess, untie it and start over.
3. Using Incompatible Rope Materials
Extremely "slick" synthetic ropes, such as those made from HMPE (Dyneema or Spectra), can be problematic for stopper knots. Because these fibers have a very low coefficient of friction, the Ashley Stopper Knot might slip under extreme high-tension pulses. In these cases, consider an extra tuck or a different termination method.
4. Leaving the Tail Too Short
In outdoor rope techniques, safety is paramount. Always leave at least two to three inches of "tail" (the working end) protruding from the knot. This ensures that if the knot settles or tightens further under load, the end won’t be sucked back into the knot’s core.
Related Knots and Splicing
To broaden your expertise in rope knots, it is helpful to understand how the Ashley Stopper compares to other common terminations.
- Figure-Eight Knot: A standard stopper knot that is easy to tie but can jam under heavy loads and is less bulky than the Ashley.
- Stevedore Knot: An evolution of the figure-eight with an extra twist, providing more bulk and making it easier to untie after being strained.
- Overhand Knot: The simplest stopper; however, it is prone to jamming and is often too small to stop a rope from passing through a block.
- Monkey’s Fist: A decorative and functional heavy stopper used for throwing lines, involving multiple wraps around a central core.
- Double Overhand Knot: A more secure version of the simple overhand, often used as a backup knot in climbing and search and rescue.
Technical Insights: Why the Three Lobes Matter
The instruction source emphasizes that the underside of the knot shows three separate lobes. This is not just an aesthetic detail; it is the secret to the knot’s mechanical advantage.
When a rope is pulled against a flat surface (like the face of a pulley), a two-lobed knot (like a simple overhand) can often tilt or "capsize," allowing it to wedge itself into the hole. The Ashley Stopper Knot, with its tripod-like base of three lobes, distributes the force evenly across the surface. This prevents the knot from tilting and ensures it remains on the outside of the hardware.
Furthermore, the internal "Half Knot" mentioned in the steps acts as a secondary locking mechanism. By tightening this first, you create a solid core that prevents the rest of the knot from collapsing inward when the standing end is under extreme tension.
Final Words
The Ashley Stopper Knot is a masterclass in functional knot design. It balances bulk, security, and ease of inspection, making it a "gold standard" in outdoor rope techniques. Whether you are securing a line on a sailing vessel or ensuring a safety line remains in place during a hike, the Ashley Stopper provides a level of reliability that simpler knots cannot match.
By following the precise steps—tightening the half-knot first and ensuring the three-lobed base is visible—you can trust this knot to hold firm in the most demanding conditions. Practice with different rope types to feel how the knot settles, and soon it will become a permanent part of your technical rigging repertoire.
Mastering the Ashley Stopper Knot is more than just learning a way to end a rope; it is about adopting a professional standard of safety and efficiency in all your outdoor pursuits.[/content]