
In the world of angling and technical outdoor skills, the connection between your line and your tool is the most critical link in the chain. Among the vast library of rope knots and fishing-specific bends, the Rapala Knot stands as a gold standard for performance. Originally popularized by the legendary Rapala lure company, this knot was specifically designed to allow lures to swim with their intended natural action.
Whether you are a professional angler or an enthusiast practicing outdoor rope techniques, understanding the mechanics of a non-slip loop knot is essential. Unlike standard terminal knots that cinch tight against the eyelet of a hook or lure, the Rapala Knot creates a fixed loop. This allows the lure to vibrate, wobble, and dart without the restrictive friction of a tight knot.
In this guide, we will explore the technical nuances of the Rapala Knot, its practical applications, the materials required to tie it successfully, and a definitive step-by-step tutorial.
Alternative Names for the Rapala Knot
- The Rapala Loop
- Lure Loop Knot
- Non-Slip Loop Knot (Variant)
- The Finnish Loop
What Is a Rapala Knot?
The Rapala Knot is a specialized non-slip loop knot designed to be tied directly to the eye of a fishing lure. Its primary purpose is to provide a secure connection while maintaining a permanent loop that does not "strangle" the lure’s attachment point.
Practical Uses and Benefits
- Maximum Lure Action: Many lures, particularly crankbaits and topwater plugs, rely on a specific side-to-side "walk" or "vibration." A standard clinch knot can dampen this movement. The Rapala Knot provides the freedom of movement necessary for the lure to perform as designed.
- Strength and Reliability: When tied correctly, the Rapala Knot maintains a high percentage of the line’s original breaking strength. It is remarkably stable under the sudden tension of a strike.
- Versatility in Line Types: While optimized for monofilament and fluorocarbon, the principles of the knot—combining an overhand foundation with a series of wraps—are fundamental to many rope knots used in survival and utility contexts.
- Outdoor Applications: Beyond fishing, this knot can be used in lightweight outdoor rope techniques where a fixed, non-clinching loop is needed at the end of a cord, such as attaching guy lines to small plastic hardware or creating a pivot point in a mechanical advantage system.
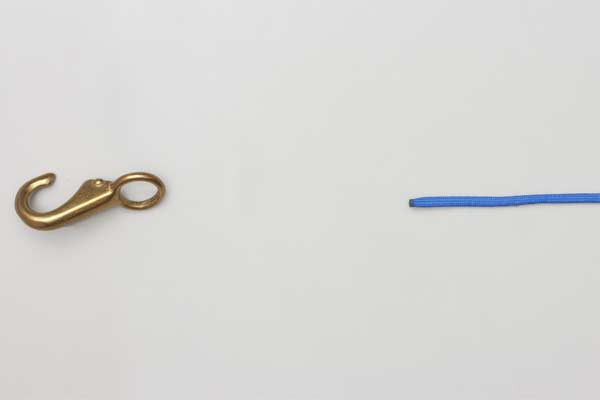
Materials and Tools Needed
To tie a perfect Rapala Knot, you need more than just a piece of line. Understanding the properties of your materials is key to knot integrity.
Recommended Lines
- Monofilament: This is the ideal material for the Rapala Knot. Its natural elasticity allows the knot to "seat" perfectly without becoming brittle.
- Fluorocarbon: A popular choice for its invisibility. However, fluorocarbon is susceptible to heat damage from friction. Extra care must be taken during the tightening phase.
- Braided Line: While the Rapala Knot can be used with braid, many experts recommend adding extra wraps (five or more) to prevent the slick fibers from slipping through the overhand knot.
Essential Tools
- Line Cutters or Scissors: A clean cut on the tag end is vital to prevent fraying.
- Lubricant: This can be as simple as water or saliva. Lubrication reduces friction-induced heat, which can weaken the line by up to 50%.
- The Lure or Eyelet: For practice, any small metal ring or specialized fishing lure will suffice.
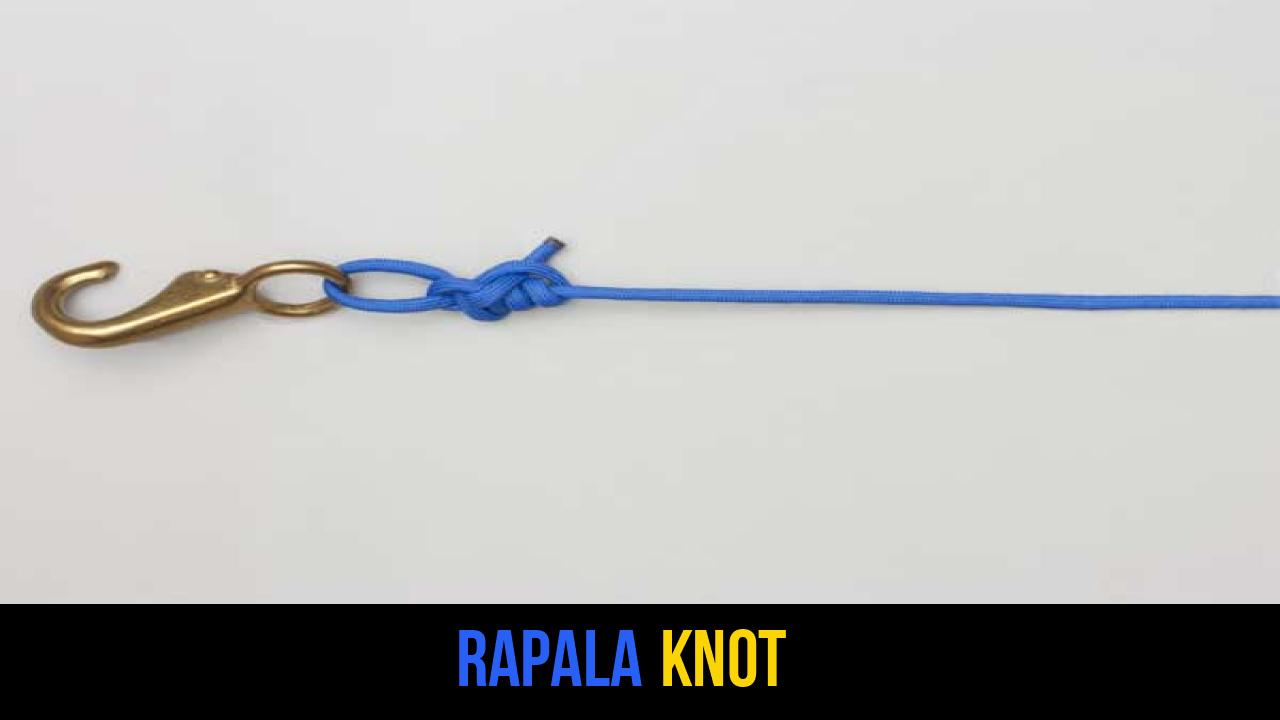
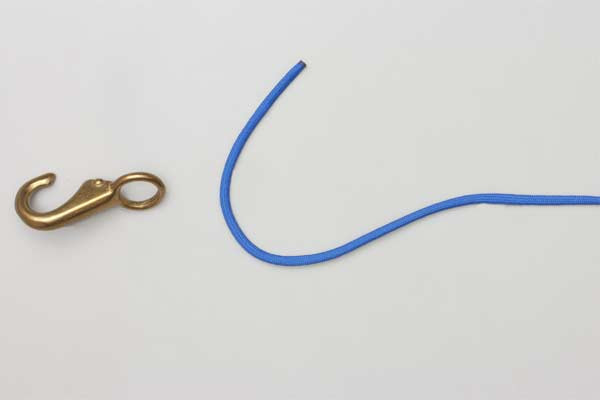
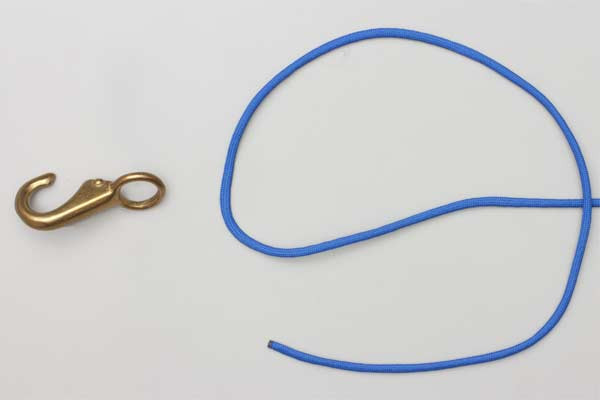
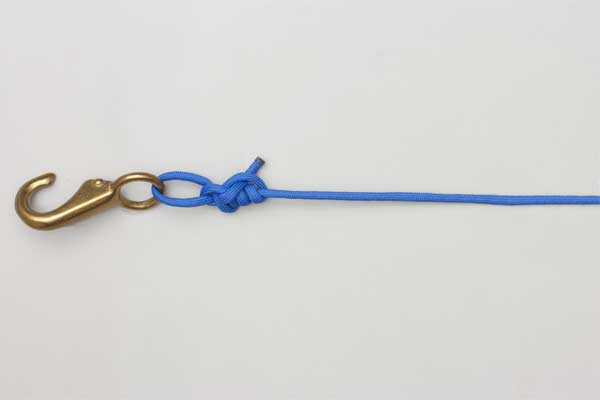
How to Tie a Rapala Knot?
The following instructions represent the definitive method for securing this knot. Precision in the early stages ensures the loop remains open and the knot remains strong.
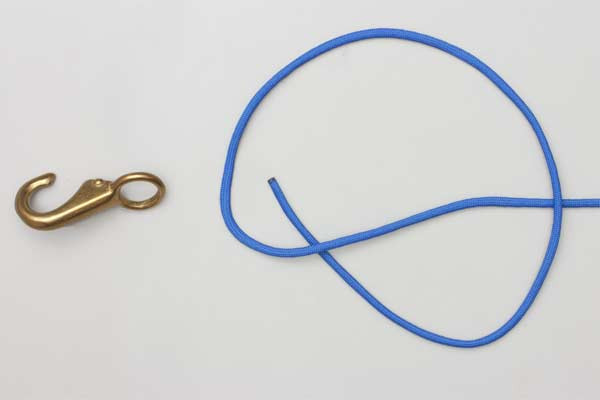
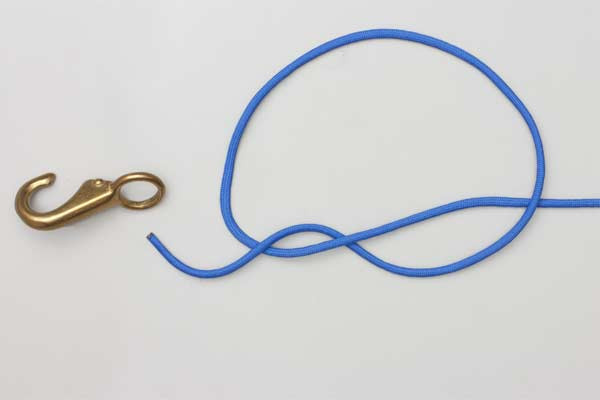
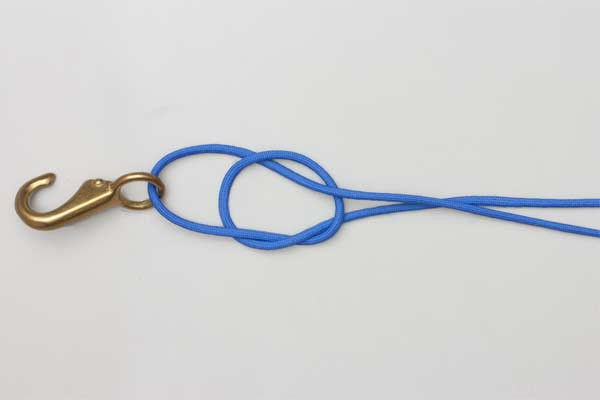
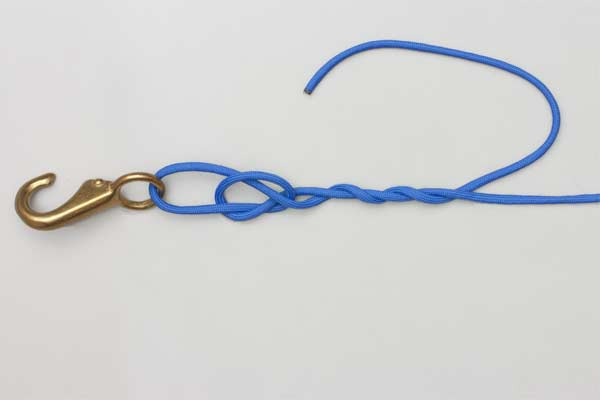
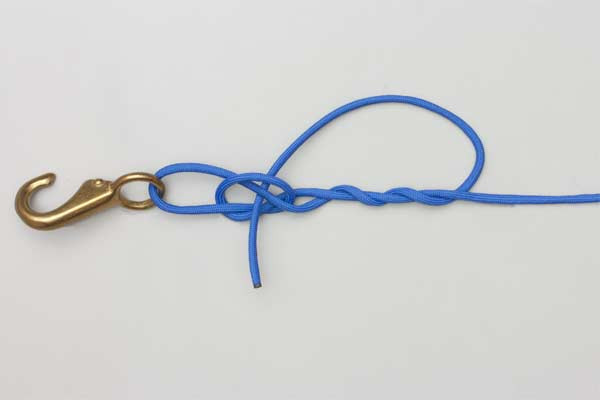
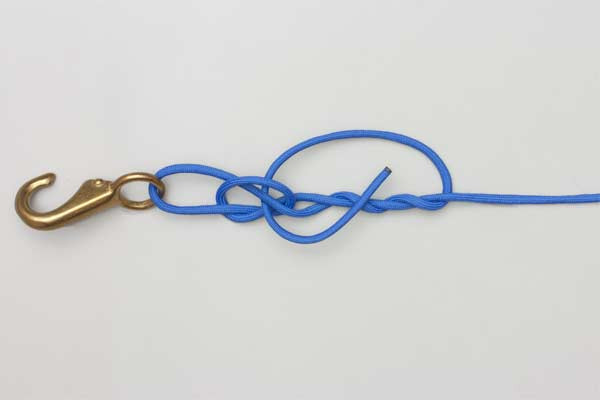
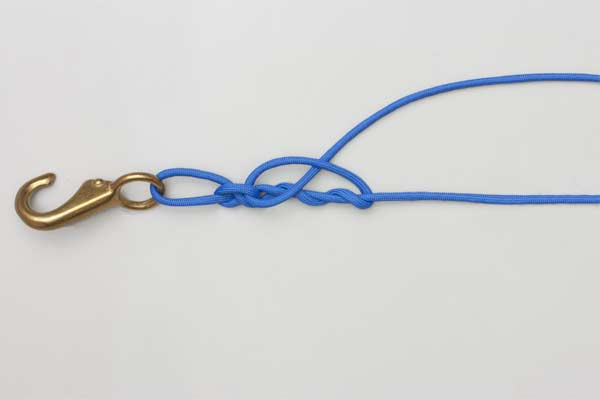
- Form an overhand knot in the line.
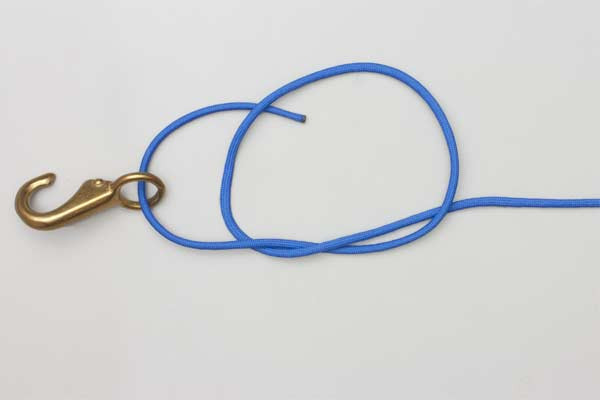
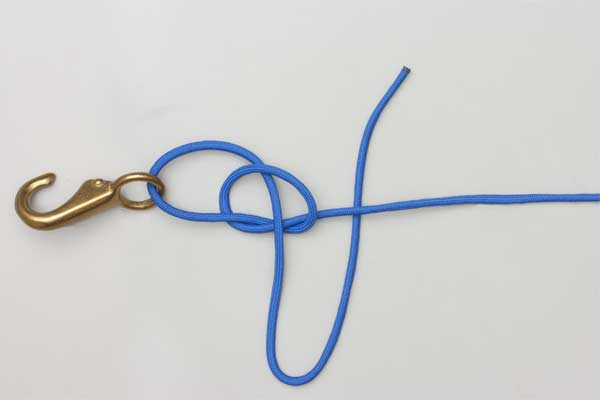
- Pass the tag end through the eye and back through the overhand knot.
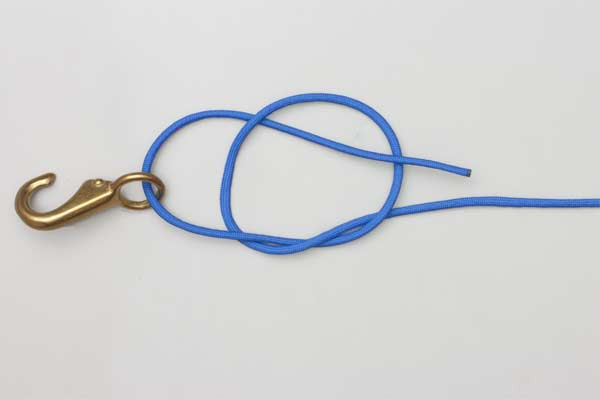
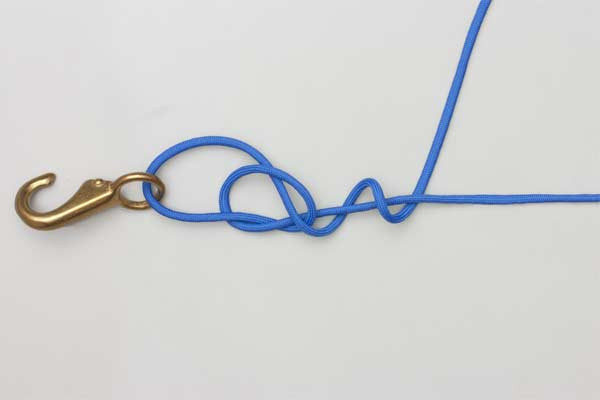
- Wrap the end three times around the standing end.
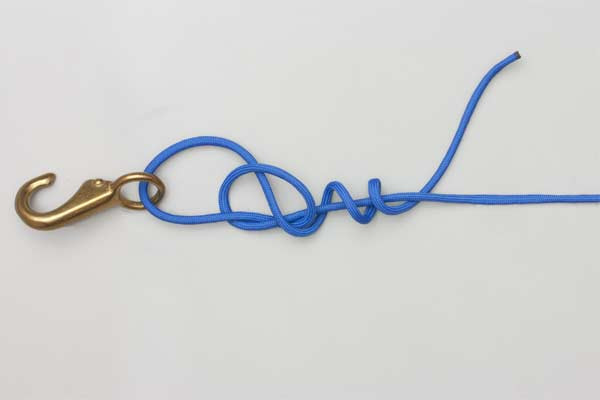
- Pass the end back through the overhand knot and then through the loop just formed.
- Lubricate and tighten the knot.
- Trim the end.

Common Mistakes to Avoid
Even seasoned professionals can make errors when tying technical rope knots. To ensure your Rapala Knot never fails, watch out for these common pitfalls:
1. Neglecting Lubrication
The most common cause of knot failure is "burning" the line. As you pull the wraps tight, the line rubs against itself. Without lubrication (water or saliva), this friction creates heat that creates a weak spot in the polymer. Always lubricate and tighten as the final step.
2. Incorrect Loop Size
If the initial overhand knot is placed too far from the lure, the resulting loop will be excessively large. This can lead to the lure tangling with the line during a cast. Conversely, a loop that is too small might still restrict the lure’s movement. Aim for a loop roughly 1/2 inch to 1 inch in length.
3. Insufficient Wraps
The instruction source specifies to wrap the end three times. For standard monofilament (10lb–20lb test), three wraps provide the perfect balance of bulk and security. Using fewer than three wraps can cause the knot to slip under heavy loads.
4. Failing to Seat the Knot Simultaneously
When tightening, it is important to pull the tag end, the standing end, and the lure side together. This ensures the overhand knot seats firmly against the wraps, creating the "non-slip" characteristic.
Related Knots and Splicing
Expanding your knowledge of outdoor rope techniques involves understanding how different knots compare to the Rapala Knot. Here are a few related configurations:
- Non-Slip Mono Loop: A very similar loop knot often used for heavier saltwater leaders where maximum knot strength is the priority.
- Perfection Loop: A classic loop knot used primarily at the end of fly fishing leaders; it is exceptionally slim and stays perfectly in line with the standing end.
- The Bowline: One of the most famous rope knots in history, creating a fixed loop that is easy to untie even after being under a heavy load.
- Figure Eight Loop: A staple in climbing and rescue, this knot is incredibly secure and easy to inspect visually for safety.
- Palomar Knot: While not a loop knot, it is often cited alongside the Rapala Knot as one of the strongest connections for terminal tackle and lures.
The Science of the "Non-Slip" Loop
Why does the Rapala Knot work so well? The secret lies in the overhand knot foundation. By passing the tag end back through the overhand knot and then through the secondary loop, you create a series of directional changes. When tension is applied to the standing end, the overhand knot cinches down on the wraps, effectively locking them in place.
In mechanical terms, this creates a "stopper" effect. The more tension applied, the tighter the overhand knot grips the wraps. Because the loop itself is not part of the cinching mechanism, it remains open, providing that crucial "free-swinging" action for your lure. This is a principle found in many advanced outdoor rope techniques where a fixed eye is required in a line that might experience fluctuating tension.
Final Words
The Rapala Knot is more than just a fishing tool; it is a masterclass in knot geometry and functional design. By mastering this knot, you ensure that your gear operates at its peak potential, giving your lures the lifelike movement required to trigger strikes from the most elusive fish.
In a broader sense, practicing the Rapala Knot enhances your overall proficiency with rope knots and outdoor rope techniques. It teaches the importance of sequence, the necessity of lubrication, and the value of a non-slip loop. Whether you are on the water or in the woods, the ability to tie a secure, reliable loop is a skill that will serve you for a lifetime.
Remember: Form the overhand knot, wrap three times, lubricate, and tighten. With these steps, you are ready for any adventure.
