
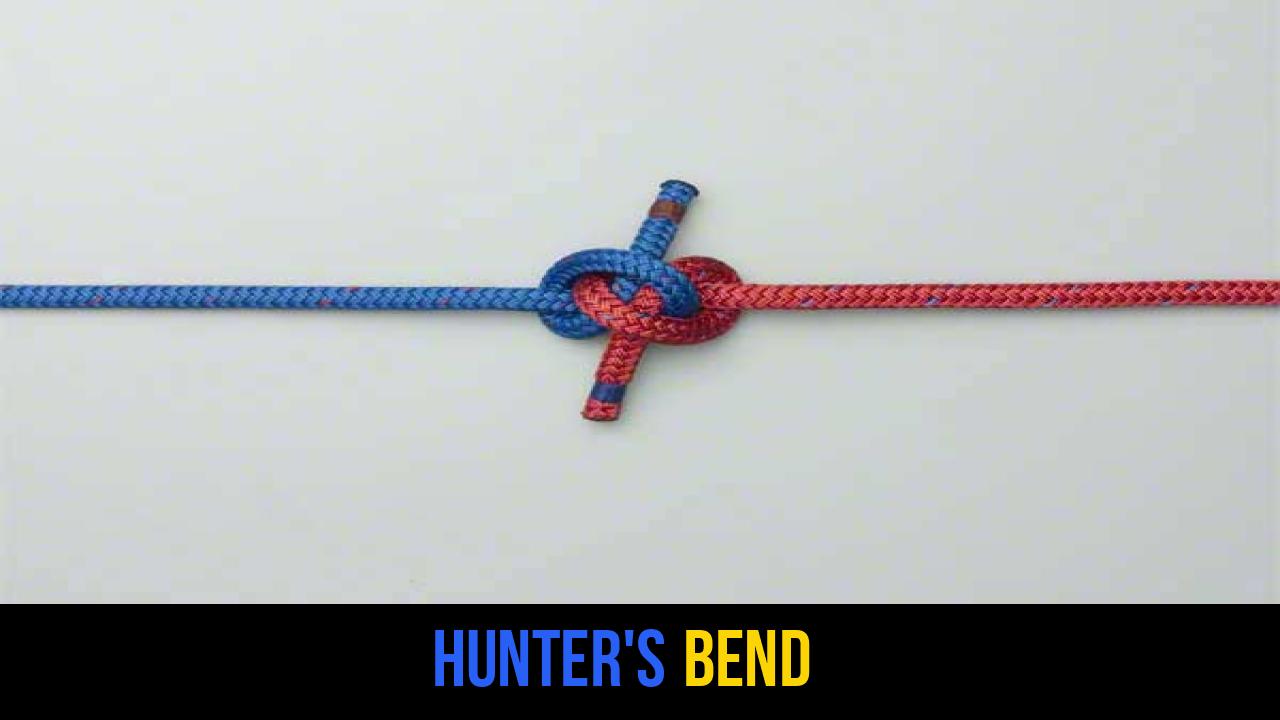
In the world of rope knots, few joins offer the balance of simplicity and security quite like the Hunter’s Bend. Whether you are an avid hiker, a nautical enthusiast, or a professional rigger, understanding how to securely join two lines together is a fundamental skill. The Hunter’s Bend is a relatively modern addition to the pantheon of outdoor rope techniques, having gained international prominence only in the late 20th century.
Unlike traditional knots that have been used for millennia, the Hunter’s Bend was famously "discovered" in the 1970s, bringing a fresh perspective to how we perceive friction and knot stability. It belongs to the family of "bends"—knots specifically designed to join two rope ends together. For those who require a knot that is both easy to inspect and resistant to slipping under heavy loads, this knot is often a preferred choice over the more common Sheet Bend or the bulkier Fisherman’s Knot.
Alternative Names: Riggers’ Bend, Hunter’s Knot.
What Is a Hunter’s Bend?
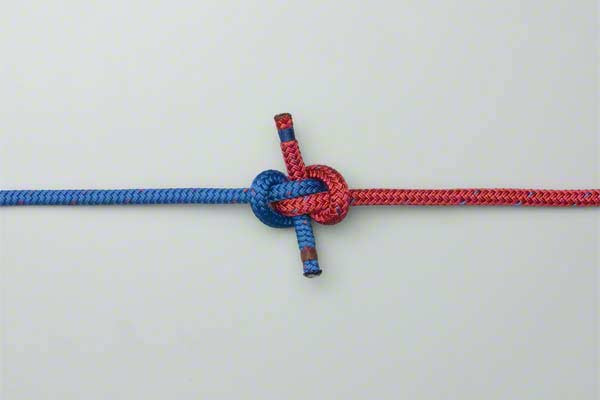
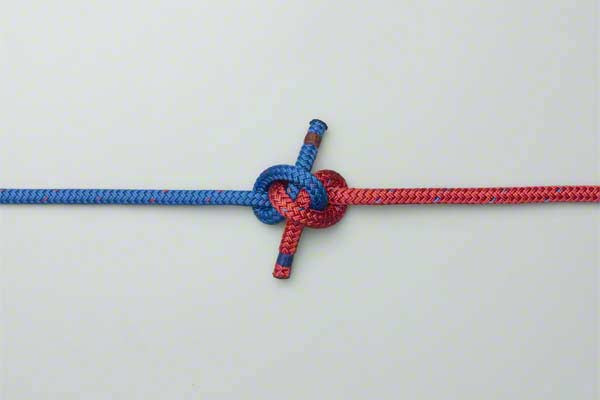
The Hunter’s Bend is a method of joining two ropes of similar diameter. It is characterized by its symmetrical appearance and its ability to remain stable even when subjected to significant tension. Technically, it consists of two interlocking overhand knots. Its structural integrity comes from the way the working ends are tucked through the center of the knot, creating a self-locking mechanism that tightens as the load increases.
History and Discovery
While many knots have murky origins lost to time, the Hunter’s Bend has a distinct "origin story." It was brought to public attention by Dr. Edward Hunter in 1978 after he used it for years to repair broken shoelaces. However, it was later discovered that a man named Phil Smith had also described the knot years earlier in a publication for the Guild of Knot Tyers, where he referred to it as the Riggers’ Bend. Regardless of the name, the knot became an overnight sensation in the knot-tying community due to its efficiency.
Practical Uses
The Hunter’s Bend is highly versatile and used in various scenarios, including:
- General Utility: Joining two lengths of clothesline or utility cord.
- Camping: Extending guy lines for tents or tarps when a single rope is too short.
- Sailing: While not as common as the Bowline or Sheet Bend, it is used for non-critical joins in rigging.
- Search and Rescue: Used in training scenarios to demonstrate secure rope-joining techniques that are easy to verify visually.
Materials and Tools Needed
To master the Hunter’s Bend knot, you don’t need specialized equipment, but choosing the right materials will help you understand its mechanics more effectively.
Rope Types
- Synthetic Ropes: Nylon and polypropylene ropes work well with this bend. The knot handles the "slickness" of synthetic fibers better than many other bends.
- Natural Fibers: Manila or cotton ropes provide excellent grip. The Hunter’s Bend is exceptionally secure in natural fibers because the surface friction complements the knot’s geometry.
- Static vs. Dynamic: While the knot is stable, it is primarily used in static applications. For high-impact climbing scenarios, specialized knots like the Triple Fisherman’s are generally preferred for life-safety applications.
Considerations
- Diameter: For the best results, use two ropes of equal or very similar diameter. If the ropes differ significantly in thickness, the knot may become asymmetrical and lose its security.
- Visibility: When practicing, using two different colored ropes can help you visualize how the bights interlock and where the working ends are threaded.
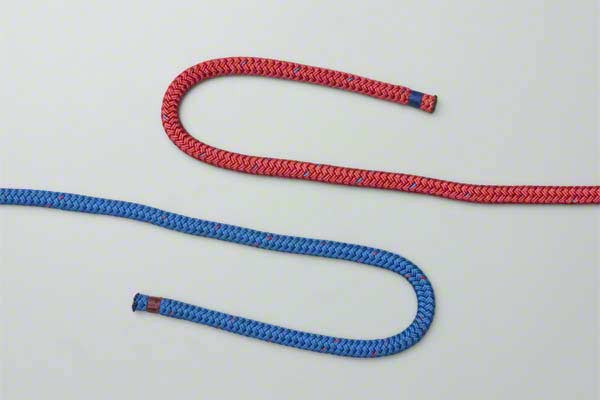
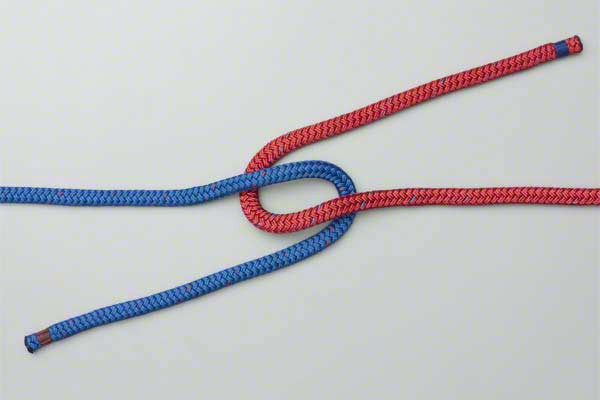
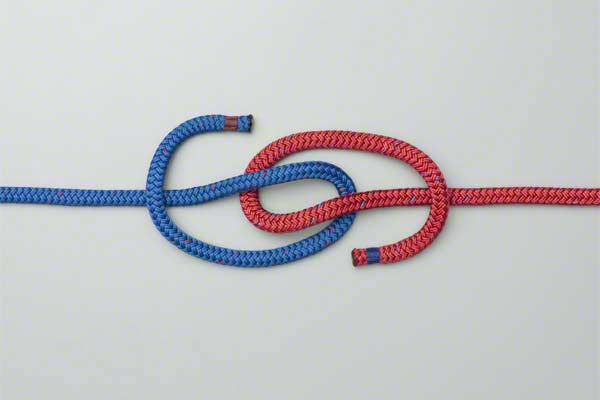
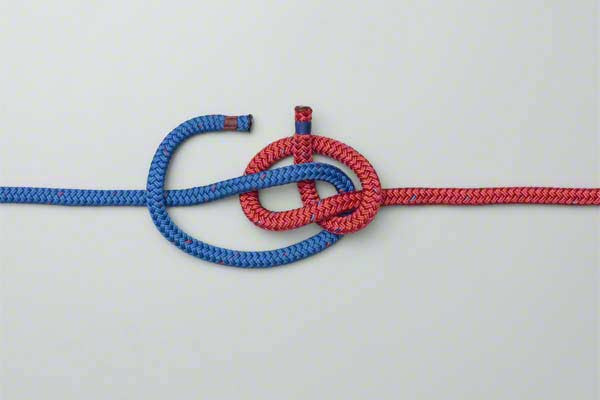
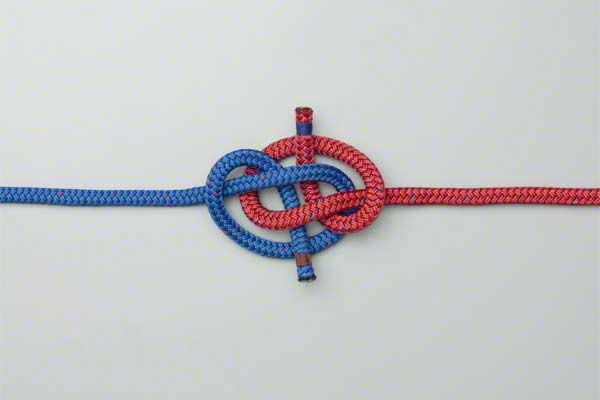
How to Tie Hunter’s Bend?
Follow these precise steps to ensure a secure and properly dressed Hunter’s Bend. Consistency in these outdoor rope techniques is key to safety and reliability.
- Form a bight in each rope.
- Interlock the two bights.
- Pass each end over itself and over the other rope.
- Thread each rope across the middle under both ropes and then above itself.
- Pull tight to form the finished bend.
Common Mistakes to Avoid
Even seasoned professionals can make errors when tying the Hunter’s Bend knot. To ensure your knot holds under pressure, watch out for these common pitfalls:
1. Incorrect Interlocking
The most frequent mistake occurs during step two. If the bights are not interlocked correctly (one passing through the other in the right orientation), the resulting knot will not be a Hunter’s Bend but a less stable variation. Always ensure the "loop" of one bight is correctly positioned against the "loop" of the second.
2. Failure to "Dress" the Knot
"Dressing" a knot refers to the process of tidying it up before applying a full load. If the strands are crossed or overlapping awkwardly, the knot may slip or jam. After threading the ends, pull all four ends (the two working ends and the two standing parts) simultaneously to seat the knot firmly.
3. Using Mismatched Diameters
The Hunter’s Bend relies on the two ropes pushing against each other with equal force. If one rope is much thinner than the other, it can "slice" through the knot or fail to provide enough friction to hold the thicker rope. For disparate diameters, consider using a Sheet Bend or a Zeppelin Bend.
4. Short Tails
Always leave enough "tail" (the working end) protruding from the finished knot. If the tails are too short, they may be sucked back into the knot under extreme tension, leading to total failure. A good rule of thumb is to leave a tail at least five times the diameter of the rope.
Related Knots and Splicing
Understanding the Hunter’s Bend is a gateway to learning other essential rope knots. Here are a few related techniques:
- Zeppelin Bend: Often considered the "gold standard" of bends, the Zeppelin is similar to the Hunter’s but even more secure and easier to untie after heavy loading. It is formed by interlocking two "6" and "9" shaped loops.
- Sheet Bend: A fundamental knot used to join ropes of unequal diameters. It is faster to tie than the Hunter’s Bend but less secure in synthetic materials.
- Alpine Butterfly Bend: A variation of the Alpine Butterfly Loop used to join two ropes. It is incredibly strong and used frequently in mountaineering and arboriculture.
- Ashley’s Bend: Developed by Clifford Ashley, this bend is secure and stable, though it can be slightly more difficult to untie once it has been jammed under a heavy load.
Final Words
The Hunter’s Bend is a testament to the fact that even in a field as ancient as knot-tying, there is always room for innovation. Its discovery changed how riggers and outdoor enthusiasts approach the challenge of joining two lines. By mastering this knot, you add a reliable, symmetrical, and highly secure tool to your repertoire of outdoor rope techniques.
Remember that while the Hunter’s Bend knot is exceptionally sturdy, no knot is a substitute for regular inspection and proper rope maintenance. Practice tying it with various materials until the movements become second nature. Whether you are securing gear on a roof rack or extending a line in the backcountry, the Hunter’s Bend provides the peace of mind that comes with a job well done and a knot well tied.
