
In the world of outdoor rope techniques, few knots are as indispensable as the friction hitch. Among these, the Adjustable Hitch stands out as a masterpiece of functional utility. Whether you are tensioning a rain fly in a torrential downpour, securing a load in the bed of a truck, or setting up a temporary clothesline at a campsite, the ability to adjust the length of a rope without untying the knot is a critical skill.
The Adjustable Hitch knot is a member of the "slide-and-grip" family. Its primary function is to remain stationary when under tension but slide easily along the standing part of the rope when the tension is released. This duality makes it a favorite among arborists, sailors, and survivalists alike. Understanding the nuances of this knot—and how it evolves from an Awning Hitch to a Midshipman’s Hitch—is a hallmark of a true rope specialist.
Alternative names for the Adjustable Hitch include: The Taut-Line Hitch (often used interchangeably, though variations exist), the Midshipman’s Hitch (a specific stage of the knot), and the Awning Hitch (the foundation of the knot).
What Is an Adjustable Hitch?
The Adjustable Hitch is a friction hitch used to create an adjustable loop in a rope. Unlike a fixed loop (such as a Bowline), the loop created by an Adjustable Hitch can be expanded or contracted by sliding the knot along the standing part of the rope. Once tension is applied to the loop, the internal friction of the coils "bites" into the standing part, locking the knot firmly in place.
Practical Applications
- Camping and Backpacking: It is the gold standard for securing tent guy lines. As the fabric of a tent stretches due to moisture or wind, the Adjustable Hitch allows for quick re-tensioning.
- Boating and Sailing: Used for securing fenders to rails or adjusting the tension on an awning (hence the name "Awning Hitch").
- Arboriculture: Climbers and tree surgeons use variations of this hitch to manage work positioning.
- Home Utility: Ideal for tying down Christmas trees on car roofs or creating adjustable supports for young trees in a garden.
Materials and Tools Needed
To master the Adjustable Hitch knot, you need to understand how different materials interact with the knot’s geometry.
Rope Types
- Nylon: Excellent for this knot because of its slight elasticity and "grip." However, it can lose some friction when wet.
- Polyester: Often preferred for outdoor use because it resists UV degradation and does not stretch as much as nylon, keeping the tension consistent.
- Kernmantle Ropes: High-quality outdoor ropes with a core and a sheath. These provide excellent surface area for the hitch to "bite."
- Natural Fibers (Manila/Hemp): These offer immense grip but are less "adjustable" because the fibers tend to bind together over time.
Considerations
- Diameter: The knot works best when the rope diameter is between 4mm and 12mm. Extremely thin cords may jam, while very thick ropes may be too bulky to "set" properly.
- Surface Texture: Avoid using very "slick" ropes like Dyneema or Spectra without specialized training, as the knot may slip under heavy loads.
How to Tie Adjustable Hitch?
Tying the Adjustable Hitch is a progressive process. By following these steps exactly, you will see how the knot transforms from a simple wrap into a secure, load-bearing hitch.
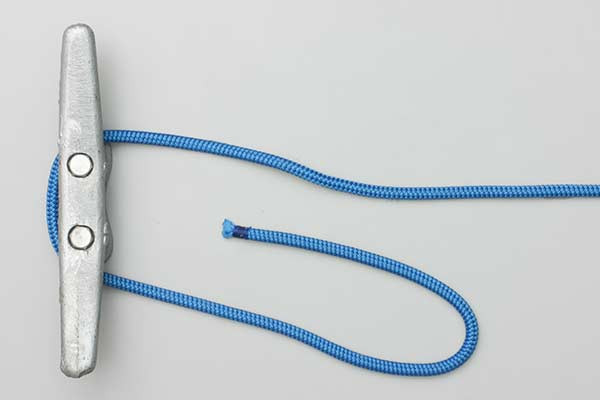
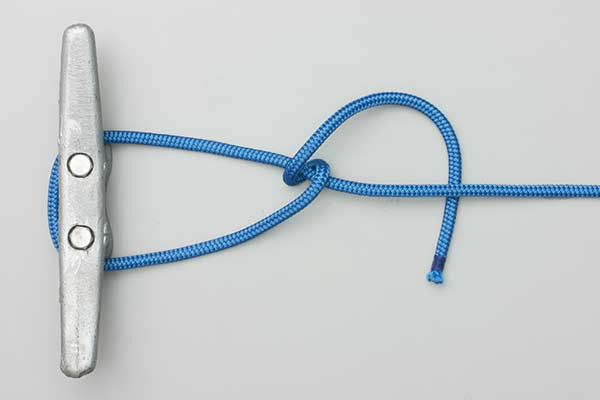
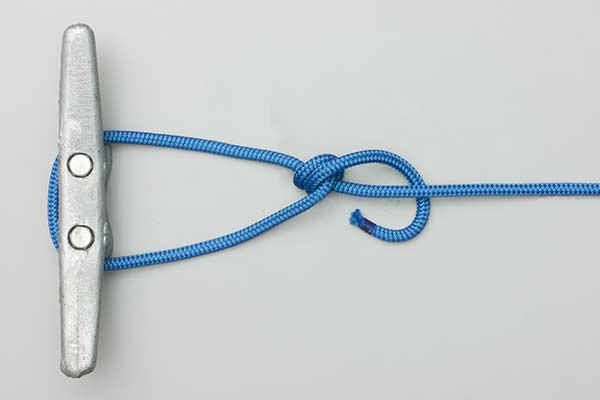
- Pass the tail end around the standing end.
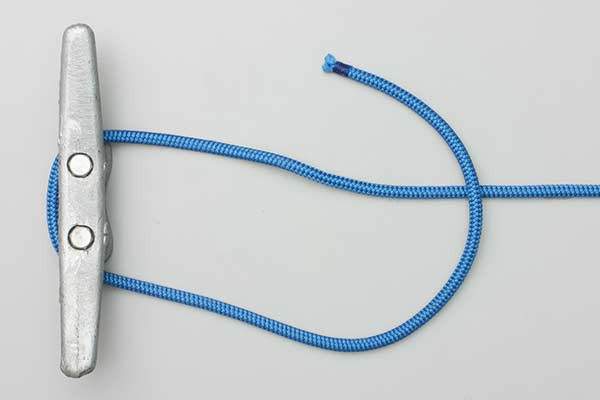
- Pass it around again.
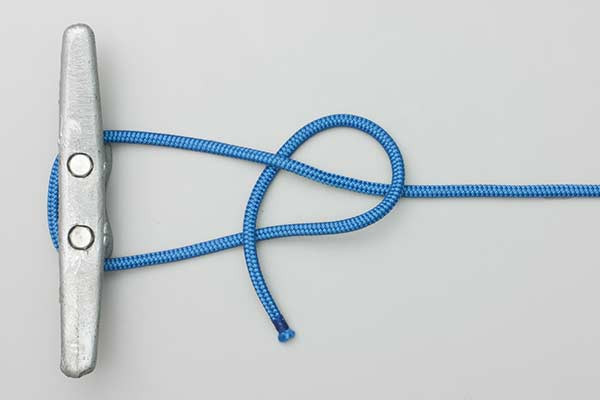
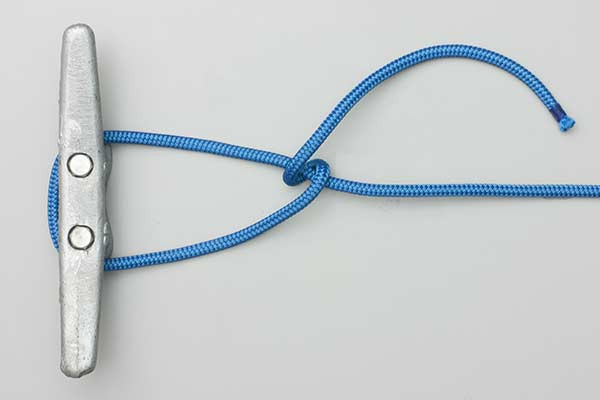
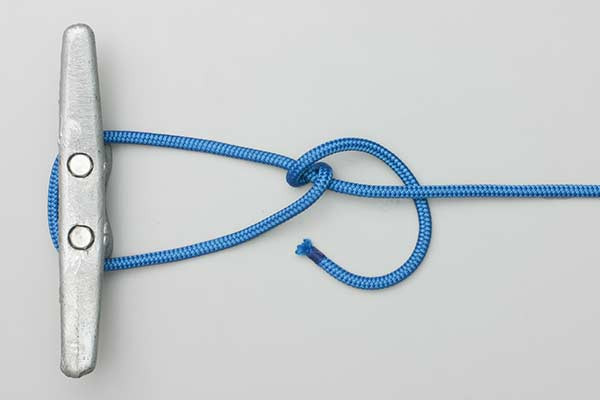
- Tuck it in beside the first turn and pull it up tight to form an Awning Hitch.
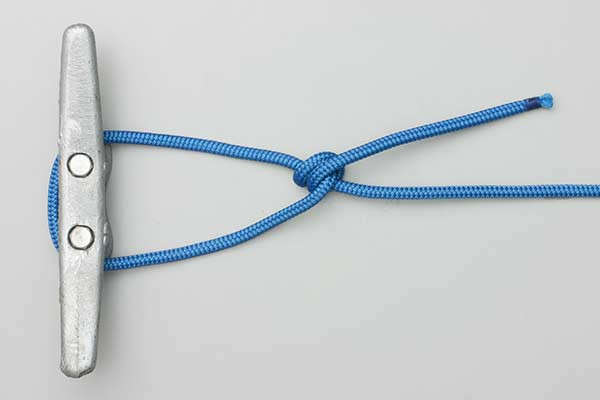
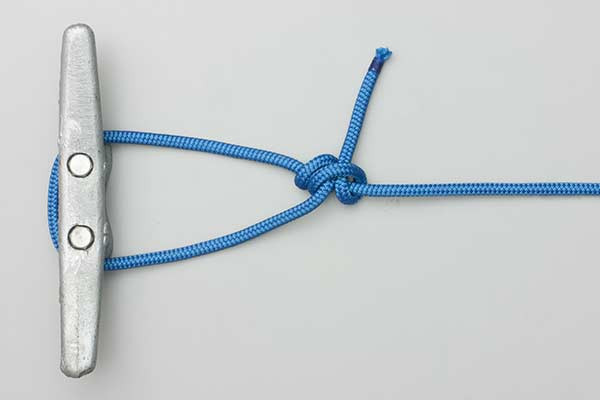
- Continue around and tie a half hitch to make the Midshipman’s Hitch.
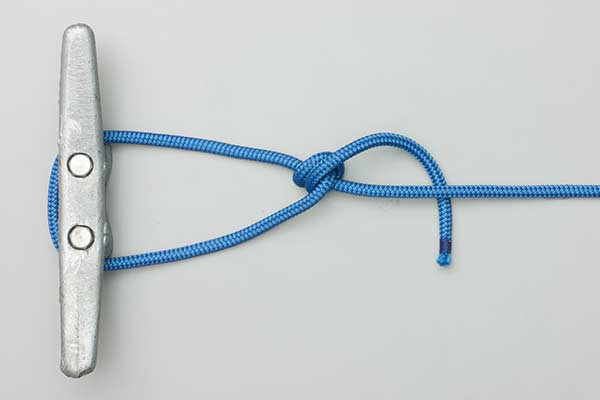
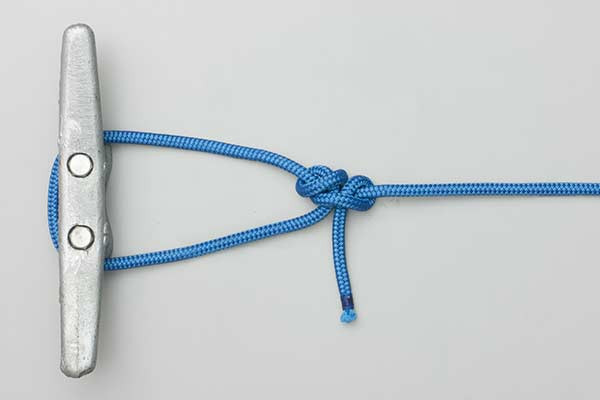
- A Half Hitch in the reverse direction makes an Adjustable Hitch.
Common Mistakes to Avoid
Even seasoned professionals can make errors when tying rope knots under pressure. Here are the most common pitfalls to watch for:
1. Failure to "Dress" the Knot
"Dressing" a knot means tidying the turns so they lie flat and parallel. If the turns of the Adjustable Hitch overlap haphazardly, the friction will be inconsistent, and the knot may slip or jam.
2. Incorrect Direction of the Final Half Hitch
The final step is crucial. If the final half hitch is tied in the same direction as the previous turns rather than the "reverse direction" as specified, the knot becomes a standard Taut-Line Hitch. While similar, the reversed half hitch of the Adjustable Hitch provides an extra layer of security against "capsizing" under heavy loads.
3. Insufficient Tensioning
Before trusting the knot with a load, you must "set" it by pulling the knot tight against the standing part. If the internal coils (the Awning Hitch portion) are loose, the knot will slide even when you want it to grip.
4. Using the Wrong Rope for the Job
Never use a friction hitch on a rope that is significantly thicker than the object it is tied around, or on a rope that is too "slick" (like certain high-tech plastic-coated lines).
Related Knots and Splicing
Understanding how the Adjustable Hitch relates to other outdoor rope techniques enhances your versatility in the field.
- Taut-Line Hitch: A variation where the final half hitch follows the same direction as the internal turns; it is widely used but slightly less secure than the Midshipman’s version.
- Rolling Hitch: Designed specifically to attach a rope to a pole or another rope, utilizing similar friction principles to prevent longitudinal sliding.
- Prusik Knot: A friction hitch that wraps entirely around a main line, used primarily in climbing for ascending a rope or in rescue systems.
- Blake’s Hitch: A specialized friction hitch used by arborists that does not "bind," allowing for smoother movement during tree climbing.
- Clove Hitch: A quick-to-tie hitch used to secure a rope to a post, though it lacks the adjustability and security of the Adjustable Hitch.
Final Words
The Adjustable Hitch is more than just a knot; it is a mechanical advantage tool that every outdoor enthusiast should have in their repertoire. By mastering the progression from the Awning Hitch to the Midshipman’s Hitch, and finally to the Adjustable Hitch, you gain total control over rope tension in any environment.
Whether you are an arborist working at height or a camper securing a tarp against the wind, the reliability of your rope knots determines your success and safety. Practice this knot with various rope types until the "reverse direction" half hitch becomes second nature. With this skill, you’ll be prepared for any situation that requires a firm grip and an adjustable touch.