
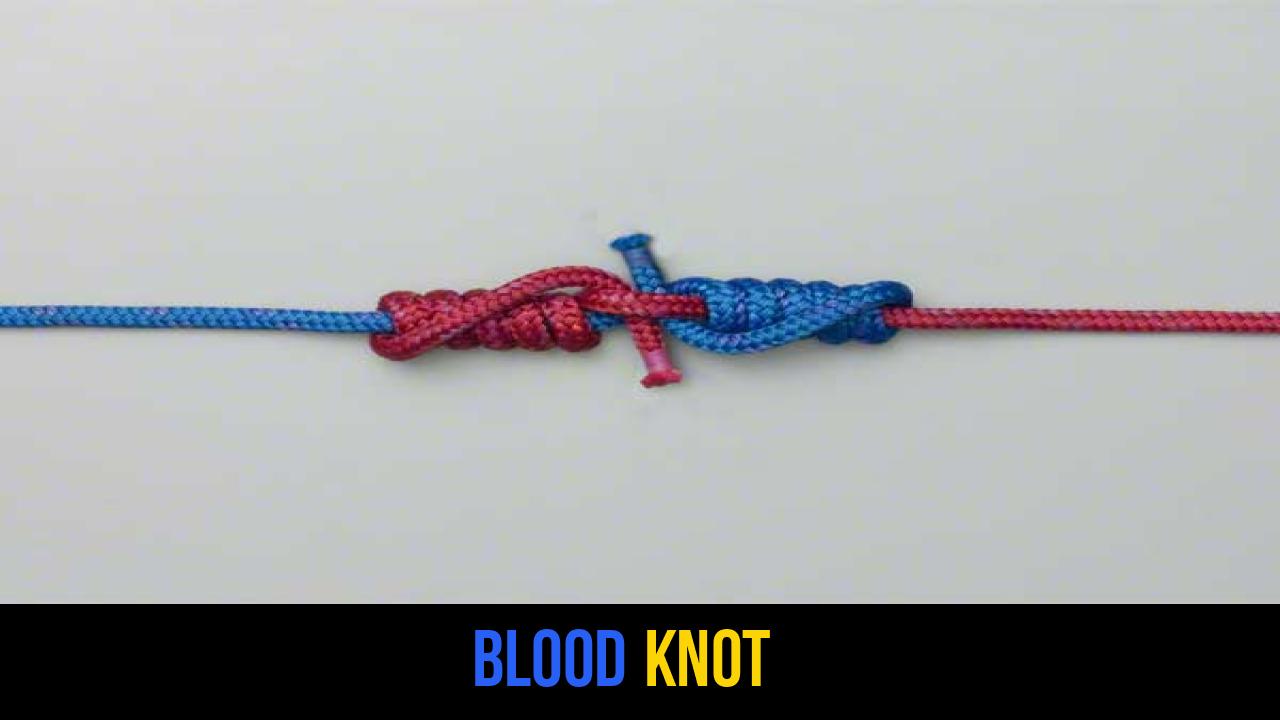
In the world of rope knots and outdoor rope techniques, few connections are as revered and essential as the Blood Knot. Whether you are a seasoned fly fisherman meticulously crafting a tapered leader or a technical outdoor enthusiast needing to join two lines of similar diameter, the Blood Knot stands as a gold standard for reliability, symmetry, and strength.
Understanding how to secure two lines together effectively is a foundational skill in various disciplines, from arboriculture to marine activities. However, the Blood Knot is unique because of its slim profile, which allows it to pass through rod guides or tight spaces with minimal resistance. In this comprehensive guide, we will explore the nuances of this knot, its applications, and provide the exact technical steps required to master it.
Alternative names for the Blood Knot include: Barrel Knot, Vicuna Knot, and sometimes mistakenly referred to as a Double Half-Blood Knot.
What Is a Blood Knot?
The Blood Knot is technically classified as a "bend," which is a category of rope knots used specifically to join two separate lines together. Its primary characteristic is its barrel-like shape, created by multiple wraps of two lines around each other, which are then secured by tucking the tag ends back through the center.
Practical Uses and Applications
The most common application for the Blood Knot is in the world of angling, specifically fly fishing. When an angler needs to build a leader—the nearly invisible line between the thick fly line and the fly—they often need to join segments of monofilament or fluorocarbon of slightly different thicknesses. The Blood Knot provides a high-strength connection (often retaining 85-90% of the line’s original breaking strength) while remaining slim enough not to catch on the water’s surface or the rod’s eyelets.
Beyond fishing, the Blood Knot is utilized in:
- Outdoor rope techniques involving lightweight cordage.
- Crafting and decorative knot work where a symmetrical join is required.
- Emergency repairs of thin lines where a bulky knot would be detrimental to the line’s function.
Materials and Tools Needed
To tie a successful Blood Knot, you need more than just two pieces of line. Understanding the physics of the materials involved is crucial for ensuring the knot doesn’t fail under tension.
1. Suitable Line Types
The Blood Knot performs best with lines of similar diameter. If the two lines differ by more than 0.05mm, the thinner line may "cut" through the thicker one, or the knot may become asymmetrical and slip.
- Monofilament: Highly flexible and has good "stretch," making it ideal for this knot.
- Fluorocarbon: Denser and more abrasion-resistant, but requires careful lubrication to prevent friction damage during tightening.
- Braided Lines: While possible, the Blood Knot is generally not recommended for slick braided lines unless they are coated, as they tend to slip.
2. Tools for Precision
- Sharp Scissors or Nippers: Essential for trimming the tag ends close to the "barrel" of the knot.
- Lubrication: Water or saliva is necessary when tightening rope knots in synthetic materials to reduce heat from friction.
- Measuring Tool: Useful for ensuring consistent wrap counts on both sides of the join.
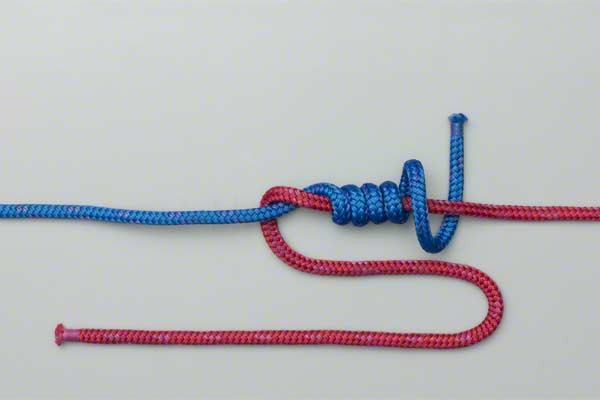
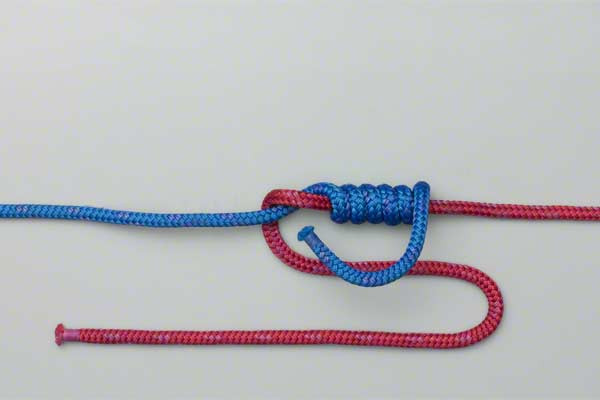
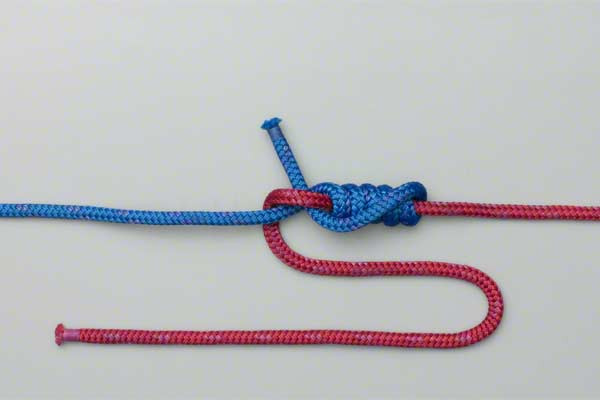
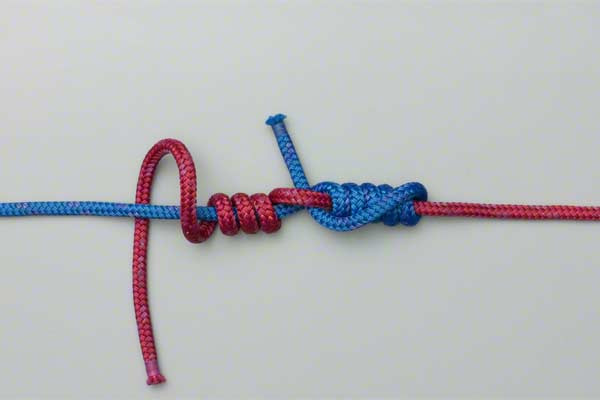
How to Tie a Blood Knot?
To ensure the highest level of security and performance, follow these instructions precisely. The following steps are the industry standard for creating a clean, professional-grade connection.
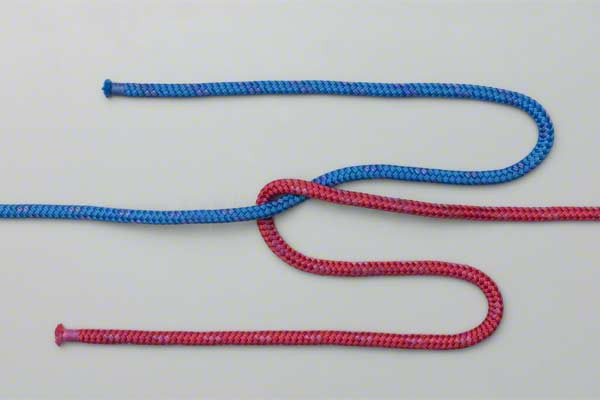
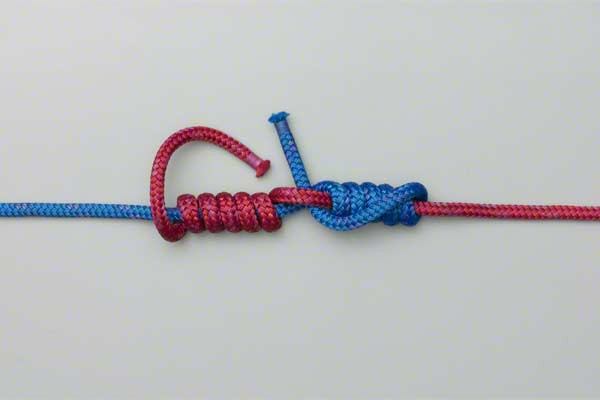
- Overlap the two lines to be joined.
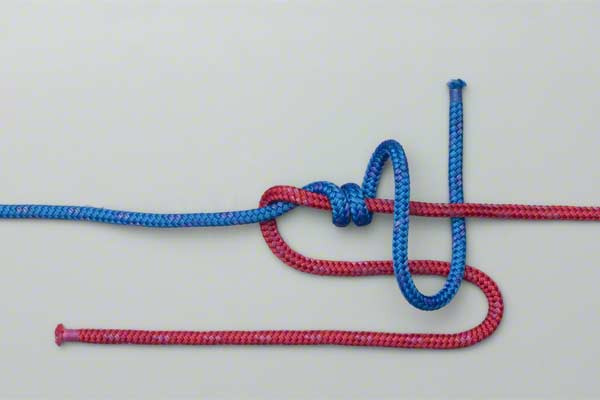
- Wrap one end around the other line about six times.
- Tuck the end back between the lines.
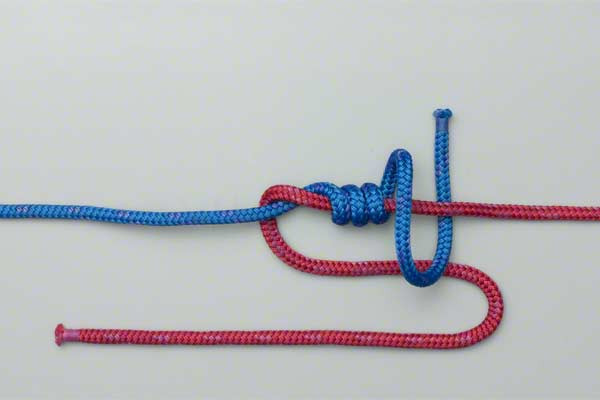
- Repeat the process with the other line, tucking the end back between the lines in the opposite direction.
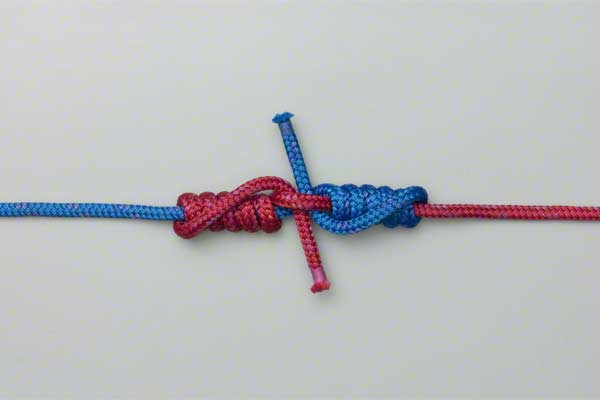
- Tighten and trim.
Note: In nylon tightening this knot alters the appearance.


Common Mistakes to Avoid
Even for those experienced in outdoor rope techniques, the Blood Knot can be finicky. Small errors during the tying process can lead to significant drops in knot strength.
1. Inconsistent Wrap Counts
The instruction source suggests wrapping "about six times." It is vital that both sides have a similar number of wraps. If you wrap one side six times and the other only three, the knot will be unbalanced, leading to an asymmetrical "barrel" that is more likely to fail under a sudden shock load.
2. Failure to Lubricate
This is the most common cause of knot failure in nylon and fluorocarbon. As you pull the two standing lines to seat the knot, the wraps slide against each other. This creates intense localized heat, which "burns" or weakens the plastic polymer. Always wet the knot with water or saliva before the final pull.
3. Tucking Ends in the Same Direction
One of the most critical steps is tucking the ends back through the center gap in opposite directions. If both tag ends go through the same way, the knot will not lock against itself properly and will likely pull apart when tension is applied.
4. Not Trimming Close Enough
Because the Blood Knot is prized for its slim profile, leaving long tag ends defeats its purpose. Use a sharp pair of nippers to trim the ends as close to the barrel as possible without nicking the main line.
Related Knots and Splicing
To become a true expert in rope knots, it is helpful to understand the alternatives to the Blood Knot and when to use them.
- Surgeon’s Knot: A much easier knot to tie than the Blood Knot, particularly in cold weather or low light. It is created by making a double overhand knot with doubled-over lines. It is stronger for mismatched diameters but significantly bulkier.
- Albright Special: This is the go-to knot for joining lines of vastly different diameters, such as a thick shock leader to a thin main line. It involves looping the thicker line and wrapping the thinner line around it.
- Double Uni Knot: A versatile and very strong alternative for joining two lines. It consists of two sliding knots that jam against each other. It is often preferred for slick braided lines where a Blood Knot might slip.
- Nail Knot: Used primarily to attach a leader to a fly line. It requires a small tool (or a nail) to pass the tag end under a series of wraps, creating a smooth, permanent-tapered connection.
Final Words
Mastering the Blood Knot is a rite of passage for many outdoor enthusiasts. While it requires a bit more dexterity than a simple Surgeon’s Knot, the result is a sophisticated, high-performance join that is unrivaled in its sleekness and efficiency.
Remember the technical nuance mentioned in the instructions: in nylon tightening this knot alters the appearance. As the wraps compress, the knot transforms from a loose collection of coils into a tight, spiraled barrel. This visual change is your indicator that the knot has seated correctly. By practicing these outdoor rope techniques and paying close attention to the symmetry of your wraps, you ensure that your gear remains a reliable extension of your skill in the field. Whether you are on the riverbank or deep in the wilderness, the Blood Knot is a tool that, once mastered, will never let you down.
