
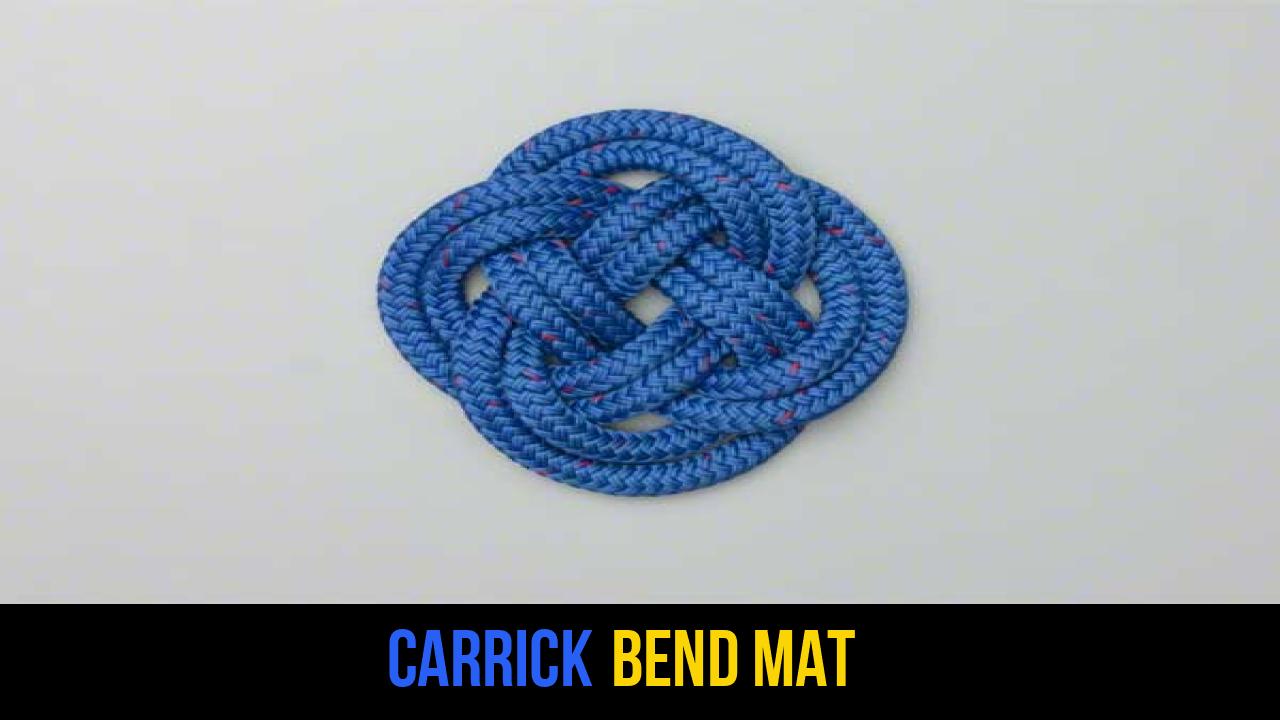
In the world of rope knots and marlingspike seamanship, few patterns are as visually striking and historically significant as the Carrick Bend Mat. Originally developed by sailors to create flat, durable surfaces on the decks of ships, this knot represents a perfect marriage between utility and aesthetic beauty. Whether you are an outdoor enthusiast looking to protect your gear or a DIY hobbyist interested in nautical decor, mastering this weave is a rewarding challenge.
The Carrick Bend Mat is essentially a flat, decorative version of the traditional Carrick Bend, one of the strongest and most reliable ways to join two heavy hawsers. When transitioned into a mat, the knot takes on a symmetrical, almost Celtic appearance that serves as a testament to the intricate outdoor rope techniques perfected over centuries. This guide will walk you through the history, the materials required, and the precise steps to create your own professional-grade rope mat.
Alternative Names: Josephine Mat, Sailor’s Mat, Flat Carrick Knot, Ornamental Carrick Weave.
What Is a Carrick Bend Mat?
The Carrick Bend Mat is a flat, ornamental knot formed by weaving a single length of rope into a symmetrical, interwoven pattern. Unlike a standard bend used to join two lines, the mat version is designed to lie flat against a surface.
Practical and Decorative Uses
Historically, these mats were used on wooden decks to prevent heavy blocks or hardware from scarring the wood. Today, its applications have expanded into various fields:
- Nautical Decor: Used as coasters, place mats, or even large-scale area rugs when tied with heavy-duty manila rope.
- Outdoor Gear Protection: In outdoor rope techniques, a Carrick Bend Mat can be placed under heavy equipment or metal containers to provide a buffer against abrasive surfaces.
- Marine Safety: Because it lies flat, it provides excellent traction and does not create a significant trip hazard on moving vessels.
- Aesthetic Crafting: It is a popular choice for wall hangings and decorative displays in maritime-themed spaces.
The beauty of the Carrick Bend Mat knot lies in its symmetry. Because the weave follows a strict over-under sequence, the tension is distributed evenly across the entire structure, making it remarkably stable once tightened.
Materials and Tools Needed
To achieve a professional finish, selecting the right materials is paramount. The appearance of your rope knots depends heavily on the "hand" (the feel and flexibility) of the line you choose.
Recommended Rope Types
- Natural Fiber (Manila or Sisal): These provide a traditional, rugged look. They are excellent for outdoor use as they handle UV exposure well and offer a high-friction surface.
- Cotton Rope: Best for indoor decorative items like coasters. It is soft to the touch and takes dyes very well.
- Synthetic Rope (Nylon or Polyester): These are highly durable and resistant to rot. However, they can be slippery, making it harder to maintain the shape during the initial weaving process.
- Paracord: Perfect for practice or for creating small items like keychains or zipper pulls.
Essential Tools
- A Flat Working Surface: You will need a table or floor space where you can lay the rope out without it being disturbed.
- Adhesive Tape: Use this to whip the ends of the rope to prevent fraying during the weave.
- A Fid or Marlingspike: While not strictly necessary for beginners, these tools help in "dressing" the knot and pulling the rope through tight gaps during the doubling phase.
- Measuring Tape: To ensure your mat reaches the desired diameter.
How to Tie Carrick Bend Mat?
To ensure the integrity of the weave, follow these instructions precisely. The secret to a perfect Carrick Bend Mat is maintaining consistent tension throughout the process.
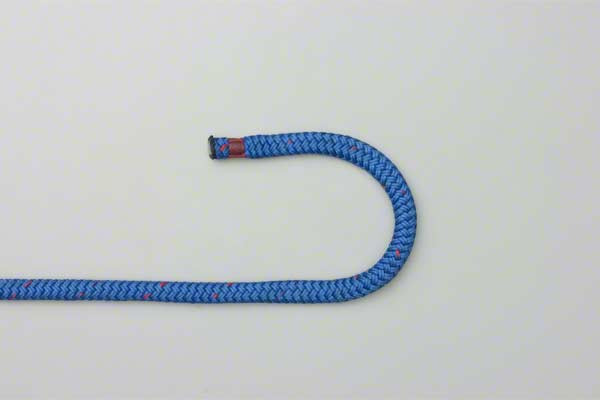
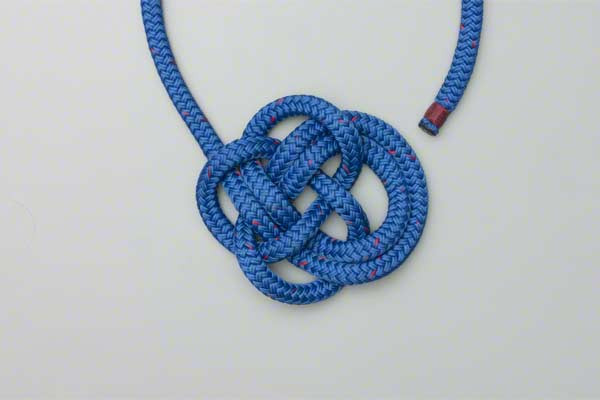
- Form a loop and then lay the rope across it.
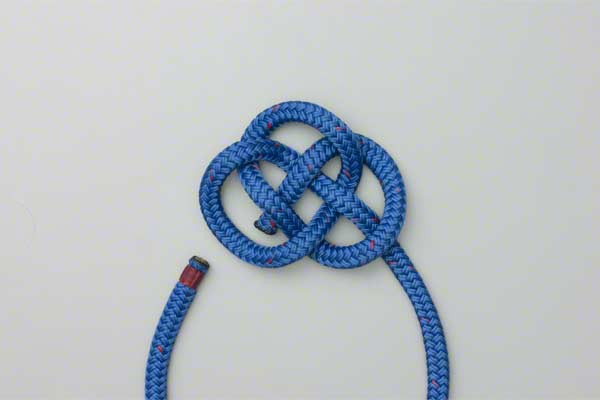
- Pass the end of the rope across the loop using an alternating over and under sequence.
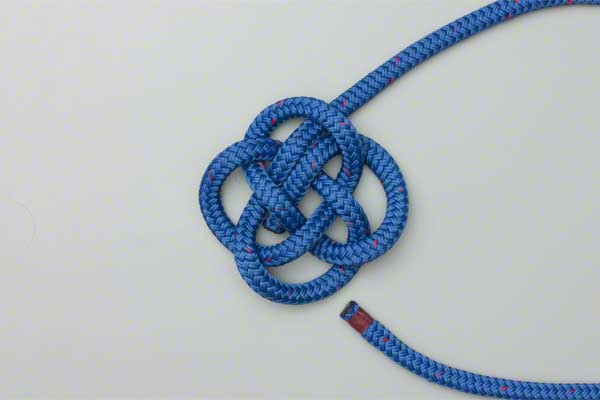
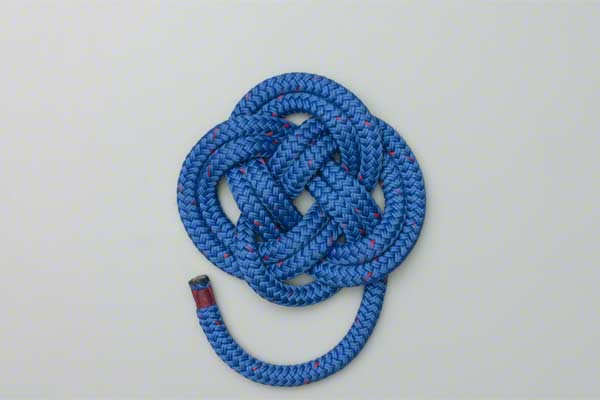
- Follow the same path around again still using the over and under sequence.
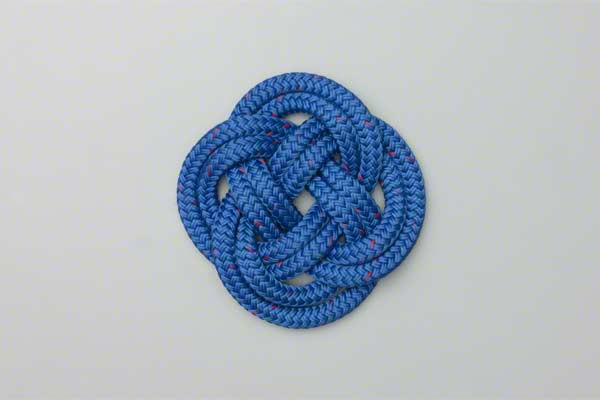
- Tuck the end in and secure it.
Technical Tips for Success
While the steps above are the foundation, applying technical expertise will elevate your work from a basic knot to a professional piece of gear.
Dressing the Knot
"Dressing" refers to the process of arranging the rope so that all parts are neatly aligned and the pattern is clear. After you follow the same path around again, take the time to ensure that the parallel lines of rope do not overlap or cross each other. They should sit side-by-side like the tracks of a railway.
Managing Tension
One of the most common mistakes in outdoor rope techniques is pulling the knot too tight too early. Keep the weave relatively loose while you are following the path for the second or third time. Once the entire pattern is laid out, you can slowly work the slack out of the knot, starting from the center and moving toward the ends.
Securing the Ends
To tuck the end in and secure it, you have several options depending on the material. For natural fibers, you can use a small needle and twine to "seize" the ends to the underside of the mat. For synthetic ropes, a careful application of heat to melt the ends together (cauterizing) is often sufficient to prevent the mat from unraveling.


Common Mistakes to Avoid
Even experienced knot-tiers can encounter issues with the Carrick Bend Mat knot. Being aware of these pitfalls will save you time and material.
- Breaking the Over-Under Sequence: The structural integrity of the mat relies entirely on the alternating sequence. If you go "over" when you should have gone "under," the mat will lose its symmetry and may fall apart when lifted.
- Inconsistent Rope Width: Ensure you are using a consistent diameter throughout. Mixing rope sizes within a single mat will cause warping and prevent it from lying flat.
- Insufficient Tail Length: Always start with more rope than you think you need. "Following the path" (doubling or tripling the knot) consumes a surprising amount of line. A general rule of thumb is to have at least 10 times the desired diameter of the finished mat in rope length.
- Ignoring the Lay: If using twisted rope, pay attention to the "lay" or twist. Forcing the rope against its natural twist can cause the mat to hockle or bunch up.
Related Knots and Splicing
Understanding the family of knots related to the Carrick Bend Mat will enhance your overall proficiency in rope knots.
- Carrick Bend: The fundamental knot used to join two heavy ropes together; it is famous for never jamming, even after bearing immense loads.
- Ocean Plait Mat: A more complex, elongated decorative mat that uses a similar weaving principle but results in a rectangular shape.
- Turk’s Head: A cylindrical decorative knot that can be tied around a pole or used as a neckerchief slide, sharing the over-under weaving DNA.
- Short Splice: A method of joining two ropes permanently by interweaving the strands, providing a stronger but bulkier connection than a bend.
Final Words
The Carrick Bend Mat is more than just a decorative piece; it is a functional tool that embodies the history of maritime craftsmanship. By mastering this knot, you gain a deeper appreciation for outdoor rope techniques and the meticulous nature of traditional seamanship.
Whether you are using it to protect your boat’s brightwork, creating a unique piece of home decor, or simply practicing your rope knots, the Carrick Bend Mat is a versatile skill to have in your repertoire. Remember that patience is key—take your time with the "over and under" sequence, ensure your paths are parallel, and you will produce a durable, beautiful mat that can last for years.
With practice, this weave becomes second nature, allowing you to scale the project from small coasters to large, impressive rugs. Keep experimenting with different materials and diameters to see how they transform this classic nautical pattern.
