
In the world of maritime operations, sailing, and general outdoor utility, few maneuvers are as fundamental yet critical as securing a line to a cleat. The Cleat Hitch (Halyard) is the gold standard for this task. Whether you are docking a multi-ton vessel, securing a halyard to keep a sail aloft, or simply tethering equipment in a high-wind environment, understanding the nuances of this knot is a non-negotiable skill for any serious outdoorsman or mariner.
The beauty of the Cleat Hitch (Halyard) lies in its simplicity and its physics. It relies on a series of wraps that distribute tension across the surface of the cleat, followed by a locking hitch that ensures the line won’t budge under load, yet remains easy to uncleat even when the rope is wet or under significant strain. Unlike other knots that might jam or "weld" themselves shut under extreme pressure, a properly executed Cleat Hitch remains reliable and manageable.
This guide will delve deep into the mechanics of the Cleat Hitch, providing you with the technical knowledge required to master it. We will explore the materials best suited for this knot and provide a strict, step-by-step instructional based on industry standards.
Also known as: Cleat Knot, Halyard Hitch, Boat Cleat Hitch, Deck Hitch, and Locking Cleat Hitch.
What Is a Cleat Hitch (Halyard)?
The Cleat Hitch (Halyard) is a specialized hitch used to fasten a rope to a horn cleat. In nautical terms, a "halyard" is a line used to hoist a sail, flag, or yard. Because halyards are under constant tension and are subject to the buffeting of the wind, the knot used to secure them must be exceptionally stable.
Practical Applications
While its primary home is on the deck of a boat, the Cleat Hitch (Halyard) is a versatile tool in various outdoor rope techniques:
- Boating and Sailing: Securing dock lines to wharf cleats or halyards to mast cleats.
- Camping: Tensioning guy lines for large canvas tents or tarps using portable cleats.
- Workshops: Organizing overhead storage systems where lines need to be secured and released quickly.
- Flagpoles: The standard knot used to secure the rope on a flagpole to ensure the flag remains at the desired height.
The primary advantage of this knot is that it does not rely on a complex weave of friction that can jam. Instead, it uses the "figure-eight" pattern to create a mechanical advantage, making it a staple in professional rigging.
Materials and Tools Needed
To execute a perfect Cleat Hitch (Halyard) knot, you must consider the relationship between the diameter of the rope and the size of the cleat. Using a rope that is too thick for the cleat will prevent the locking hitch from seating properly, while a rope that is too thin may slip.
1. The Rope
For maritime and outdoor use, the following rope types are recommended:
- Nylon (Three-Strand or Braided): Excellent for dock lines because it has "stretch," which absorbs the shock of waves.
- Polyester (Dacron): Preferred for halyards because it has very low stretch, ensuring the sail stays tight.
- Polypropylene: A budget-friendly option that floats, though it is less resistant to UV damage and has a lower breaking strength.
2. The Cleat
A standard horn cleat is required. These are typically made of stainless steel, galvanized iron, aluminum, or high-impact plastic. Ensure the cleat is bolted securely to a stable surface, as the Cleat Hitch is only as strong as the hardware it is tied to.
3. Considerations
- Rope Condition: Ensure your rope is free of "frays" or "hockles" (kinks).
- Cleat Size: Ideally, the cleat should be about 1 inch in length for every 1/16 inch of rope diameter.
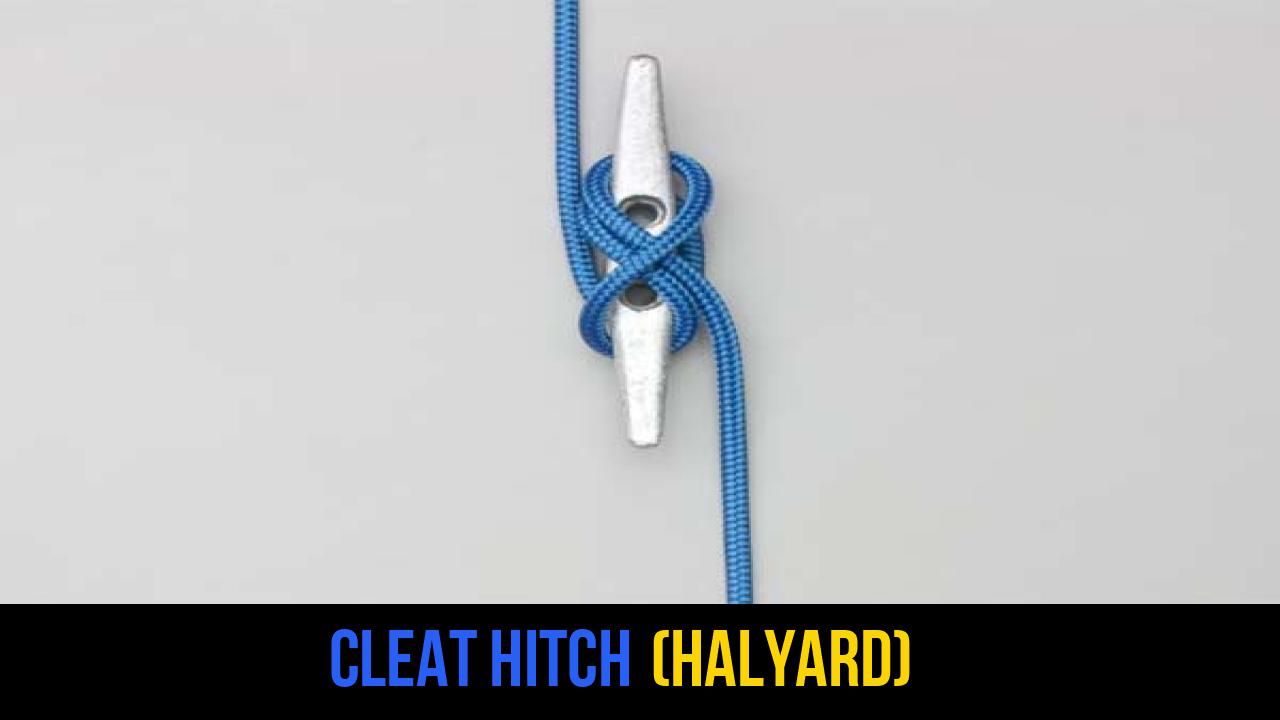
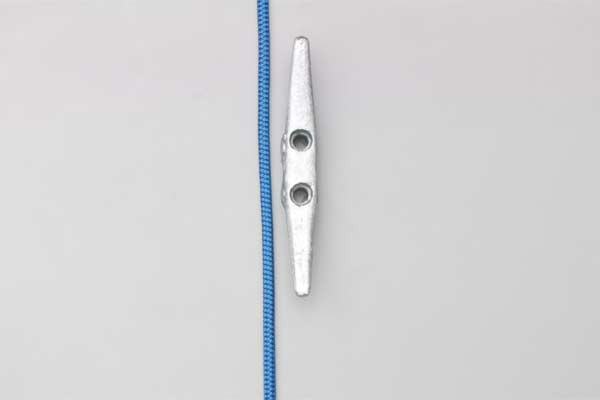
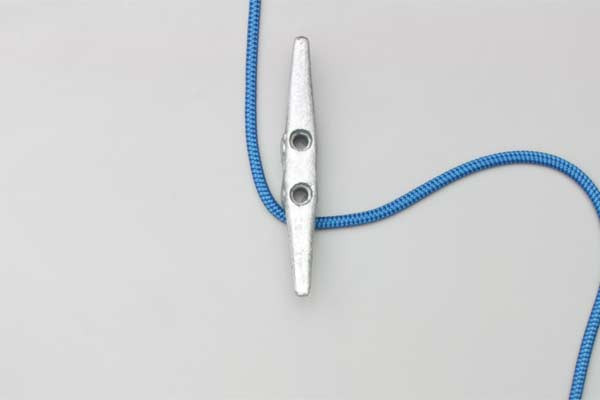
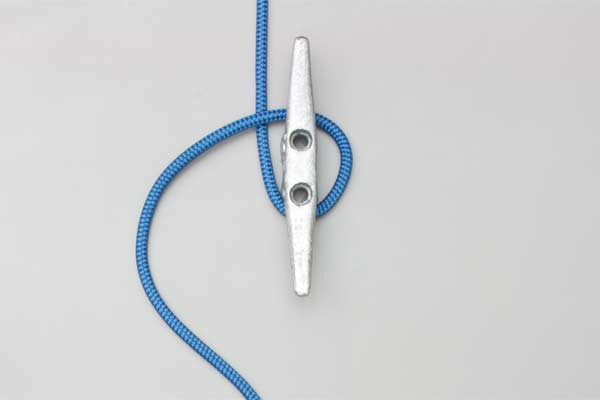
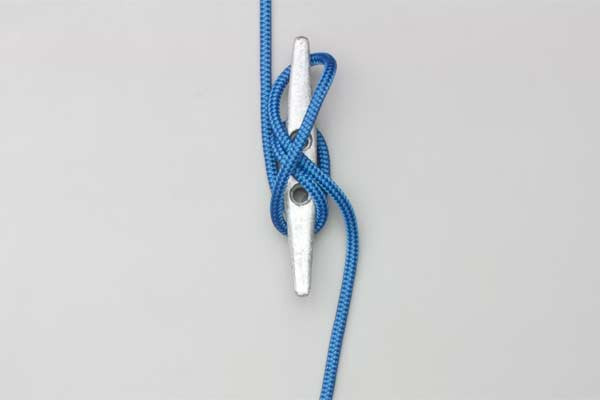
How to Tie Cleat Hitch (Halyard)?
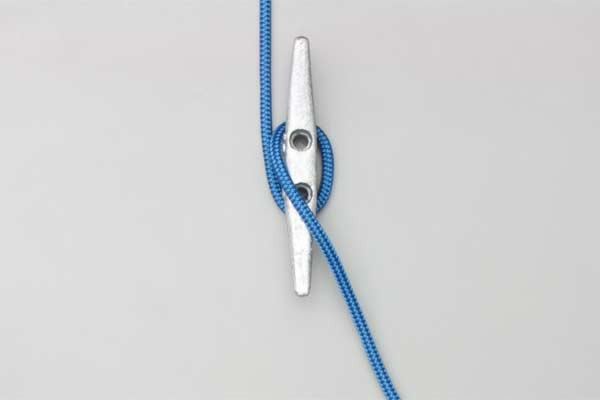
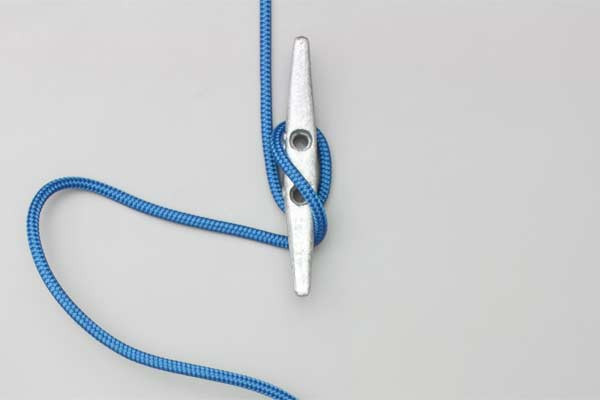
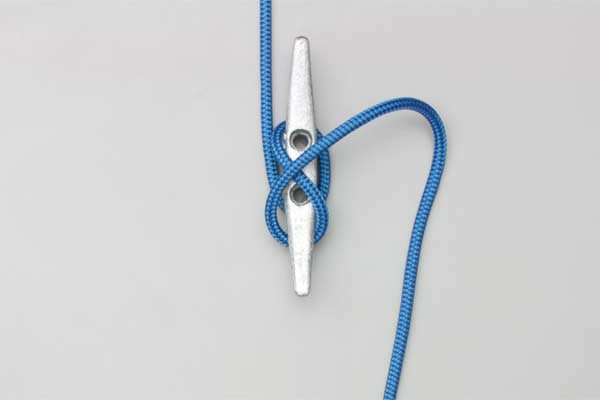
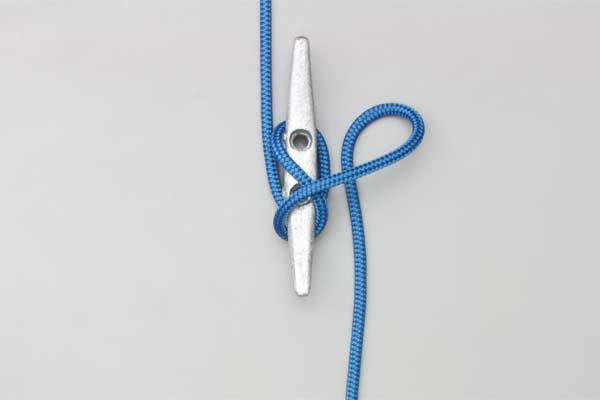
To ensure safety and reliability, follow these instructions exactly. This method ensures the rope is distributed evenly across the horns of the cleat, providing maximum friction and a secure lock.
- Pass the rope around the bottom horn and on around over the top.
- Continue down across the middle, and then up across again.
- Twist a loop in the rope and hook it on the cleat as a Half Hitch.

Common Mistakes to Avoid
Even seasoned sailors can occasionally make errors when tying the Cleat Hitch (Halyard). Avoiding these common pitfalls will ensure your boat or gear remains secure.
The "Over-Wrapping" Error
Many beginners believe that more wraps mean more security. This is a fallacy. If you wrap the rope around the cleat too many times before performing the final half hitch, you create unnecessary bulk. This can prevent the locking hitch from gripping the underlying ropes, causing the whole knot to slip or become a tangled mess if the line needs to be released in an emergency.
The Direction of the Half Hitch
The final step—the Half Hitch—must be oriented so that the tail of the rope ends up pointing in the opposite direction of the incoming line. If the tail is tucked under the wrong way, the knot is not "self-locking" and can shake loose under the vibration of a running engine or shifting winds.
Avoiding "The Jam"
Never start the knot by going over the top horn first if the line is coming from an angle. Always lead the rope to the horn furthest away from the source of tension first. This creates a better angle of approach and prevents the rope from binding against itself in a way that makes it impossible to untie.
Related Knots and Splicing
Expanding your knowledge of rope knots and outdoor rope techniques involves understanding how different hitches and loops complement the Cleat Hitch.
- The Bowline: Often called the "King of Knots," the Bowline creates a fixed loop at the end of a rope that will not slip or bind under load. It is the perfect companion to the Cleat Hitch when you need to loop a line around a piling before securing the other end to a cleat.
- The Clove Hitch: A simple and fast knot used to secure a rope to a cylindrical object like a rail or a post. While not as secure as a Cleat Hitch for long-term mooring, it is excellent for temporary attachments.
- The Figure-Eight Stopper: This knot is tied at the very end of a halyard or line to prevent it from slipping through a pulley or a fairlead. It is an essential safety knot in any rigging system.
- Eye Splice: For a permanent solution, an eye splice is woven into the end of a three-strand rope. This creates a permanent loop that is significantly stronger than any knot, allowing you to quickly drop a loop over a cleat horn.
Final Words
The Cleat Hitch (Halyard) is more than just a way to tie a rope; it is a fundamental component of maritime safety and outdoor efficiency. By mastering the three simple steps of passing the rope around the horns, crossing the middle, and securing it with a twisted half hitch, you gain the ability to secure heavy loads with confidence.
In professional settings, the speed and accuracy with which you tie this knot can be the difference between a secure vessel and a costly accident. We encourage you to practice this knot with different rope diameters and materials until the motion becomes second nature. Remember: a good knot is not one that stays tied forever, but one that stays tied as long as you need it to and comes apart easily when you are ready.
Whether you are a weekend sailor, a technical rigger, or an outdoor enthusiast, the Cleat Hitch (Halyard) is an indispensable addition to your knot-tying repertoire. Stay safe, keep your lines taut, and always double-check your hitches!
