
In the world of modern rope knots and outdoor rope techniques, the advent of high-modulus polyethylene (HMPE) fibers like Dyneema and Spectra has revolutionized what we expect from our gear. These materials are incredibly strong, lightweight, and resistant to environmental degradation. However, they possess a physical characteristic that poses a significant challenge to traditional marlinespike seamanship: they are incredibly slippery.
Standard knots that have served sailors and climbers for centuries, such as the Figure-Eight or the Bowline, can slip or even completely untie themselves when used with these advanced synthetics. This is where the EStar Stopper knot comes into play. Developed specifically to address the low-friction nature of high-tech fibers, the EStar Stopper provides a level of security that traditional stoppers simply cannot match.
Whether you are a professional sailor, an arborist, or an outdoor enthusiast working with high-performance cordage, understanding the mechanics and application of the EStar Stopper is a critical skill.
Alternative Names: E-Star Stopper, Starzinger Stopper, Modified Buntline Stopper.
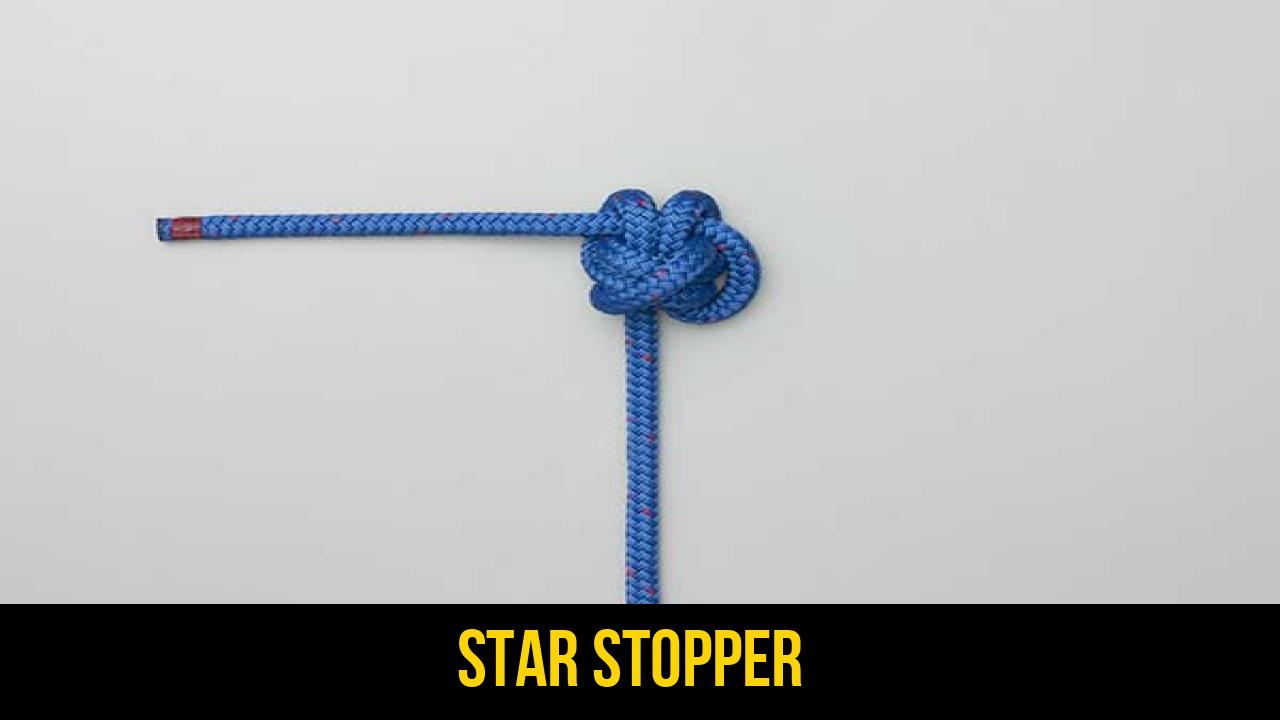
What Is an EStar Stopper?
The EStar Stopper is a specialized terminal knot designed to prevent a line from running through a block, fairlead, or clutch. Unlike a standard stopper knot which relies on simple bulk, the EStar Stopper incorporates a self-locking mechanism based on the geometry of the Buntline Hitch.
The Problem of "Creep" and Friction
Traditional rope knots rely on internal friction—the rope rubbing against itself—to hold fast under load. High-modulus fibers have a very low coefficient of friction. Under high tension, the fibers can "creep," causing the knot to slowly deform or the tail to be sucked into the knot body.
Practical Uses
The EStar Stopper is primarily used in:
- Performance Sailing: Securing halyards and control lines made of Dyneema.
- Arboriculture: Terminating high-strength friction hitches or throw lines.
- Search and Rescue: Creating secure points in technical rope systems using specialized cordage.
- Industrial Rigging: Where high-strength synthetic slings require a non-slip termination.
By essentially "locking" the tail through a series of turns and a final pass through the knot’s core, the EStar Stopper ensures that even the slickest rope remains firmly seated.
Materials and Tools Needed
Before you begin practicing your outdoor rope techniques, it is essential to have the right materials. While the EStar Stopper knot can be tied in any rope, its true value is realized in specific types of cordage.
Recommended Ropes
- Dyneema/Spectra (HMPE): This is the primary use case. The knot is designed for single-braid or core-dependent high-modulus ropes.
- Technora/Vectran: Other high-performance liquid crystal polymers that exhibit low stretch and low friction.
- Polyester Double Braid: Good for practice, as it holds its shape well, though the knot will be significantly bulkier.
Tools and Considerations
- Marlinespike or Fid: While not strictly necessary for tying, a small tool can help in "dressing" (neatening) the knot and tightening the internal turns.
- Tail Length: Because the EStar Stopper involves several wraps and a "re-threading" step, you will need a longer tail than you would for a simple overhand knot. Aim for at least 6–8 inches of working end to ensure you have enough material to complete the steps comfortably.
- Heat Sealing: Ensure the end of your rope is properly whipped or heat-sealed to prevent fraying while you navigate the tight turns of the knot.
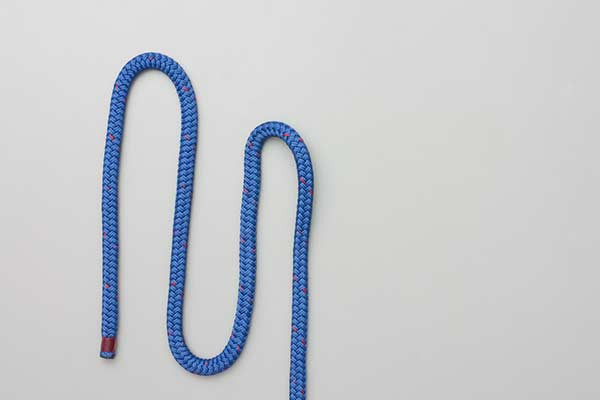
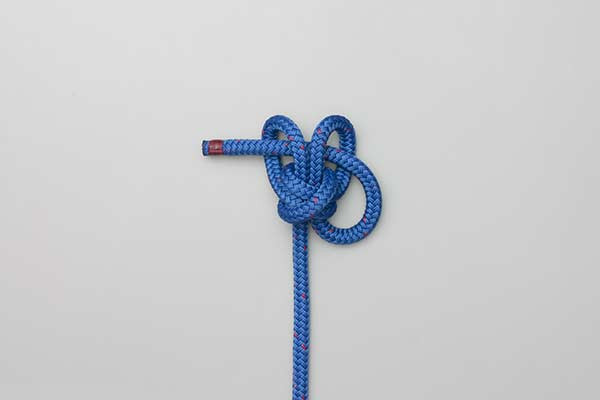
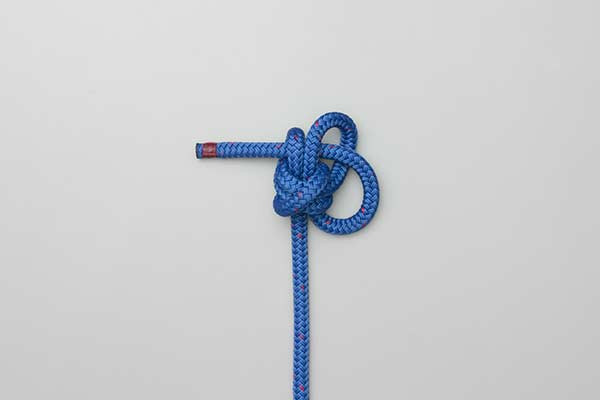
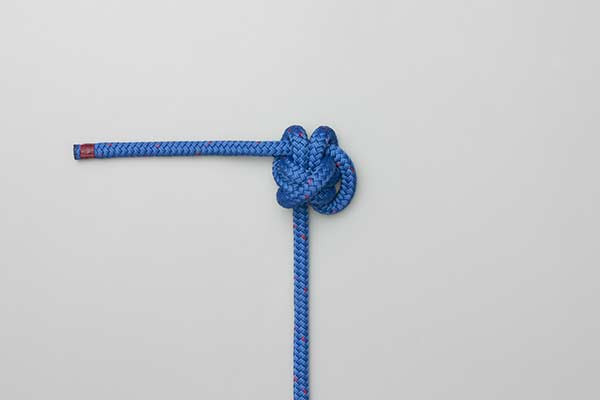
How to Tie EStar Stopper?
To ensure the security and performance of this knot, follow these instructions precisely. The sequence of tightening is just as important as the path of the rope.
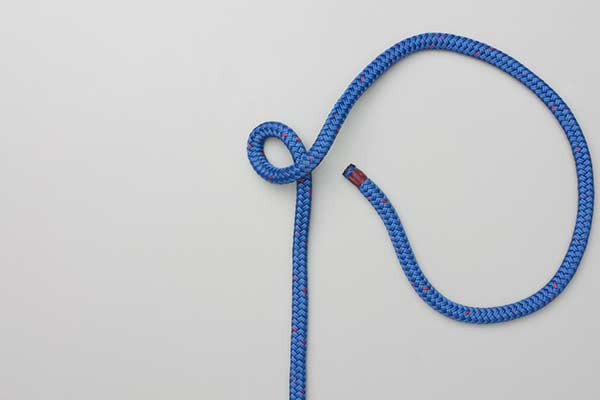
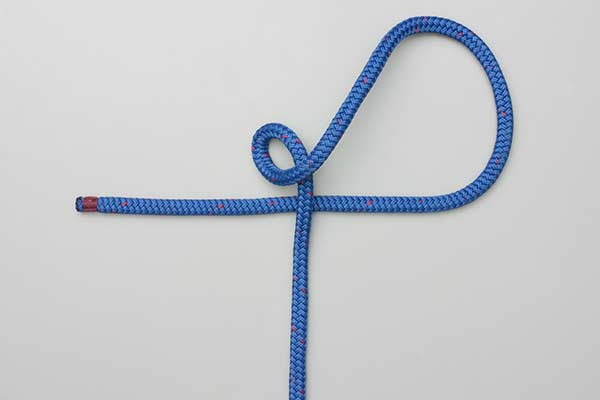
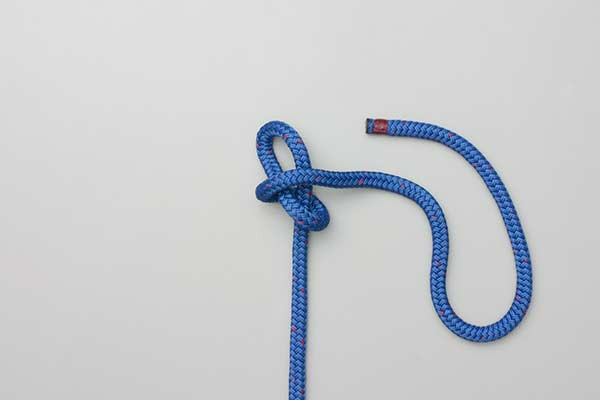
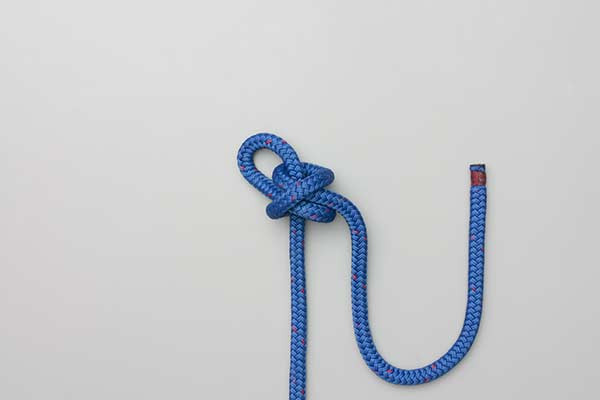
- Wrap the Tail End around the Standing End and on around itself.
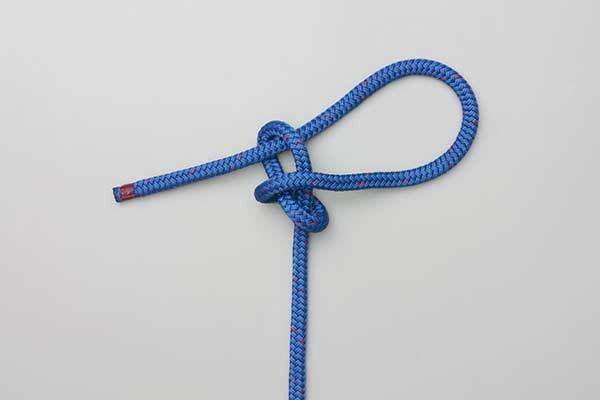
- Continue around the Standing End and then under itself to make a Buntline Hitch.
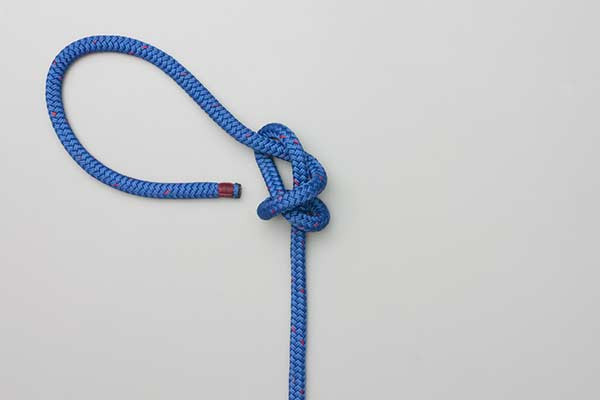
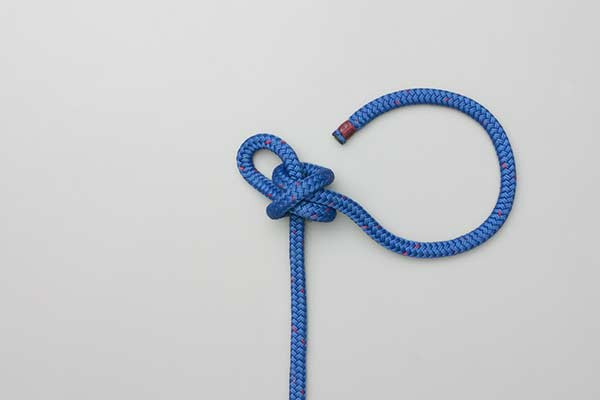
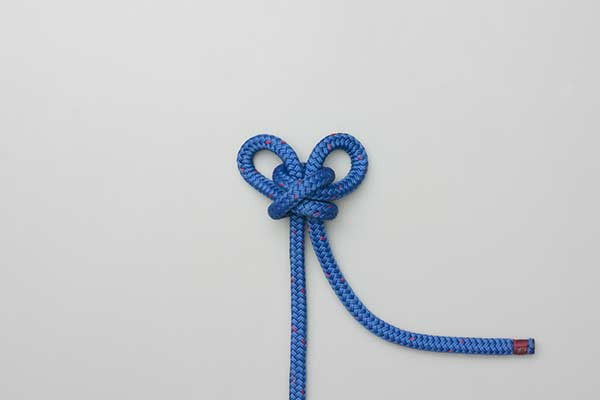
- Pass the Tail End through the Buntline Hitch and then across through the two loops that were created.
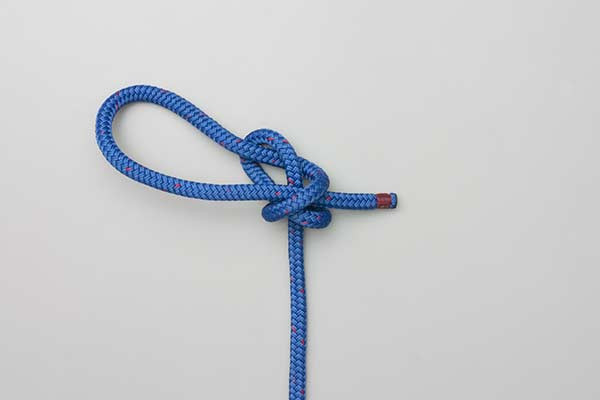
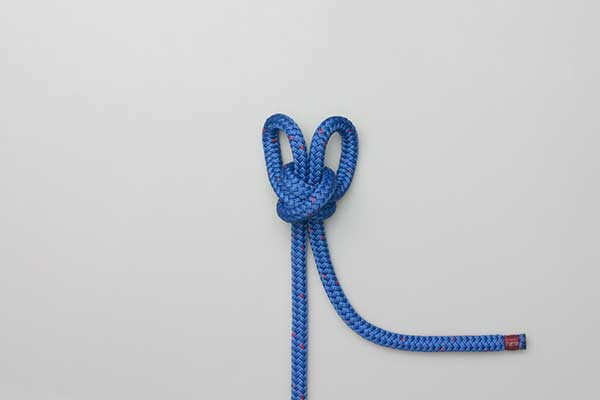
- Tighten the Buntline, the Standing End and, finally, the Tail End.
Common Mistakes to Avoid
Even for experienced riggers, the EStar Stopper knot requires attention to detail. Because it is a more complex structure than a standard stopper, errors in "dressing" the knot can lead to reduced effectiveness.
1. Improper Tightening Sequence
As noted in the instructions, the sequence of tightening is vital. If you pull the tail end first, you may distort the Buntline Hitch foundation before the final loops are secured. Always tighten the Buntline structure first to set the geometry, then the standing end to take up the slack, and finally the tail to lock everything in place.
2. Insufficient Tail Length
High-modulus ropes are prone to a small amount of "settling" when first loaded. If your tail is too short after the final pass through the two loops, the knot could potentially "swallow" the tail under extreme tension. Always leave at least two rope diameters of tail protruding from the finished knot.
3. Misidentifying the Two Loops
In Step 3, you must pass the tail through the "two loops that were created." Beginners often mistake the single turn of the Buntline for these loops. Ensure you can clearly see the two parallel wraps around the standing part before making your final pass.
4. Using the Wrong Rope Type
While the EStar Stopper is a "super knot" for Dyneema, using it on very thick, stiff, traditional nylon or polypropylene can result in a knot so bulky that it becomes impractical or impossible to tighten properly. Match the knot to the material.
Related Knots and Splicing
Understanding the EStar Stopper is part of a broader mastery of outdoor rope techniques. Here are several related knots and methods used in similar high-performance contexts.
The Buntline Hitch
The Buntline Hitch is the foundational element of the EStar Stopper. It is a simple, self-tightening hitch traditionally used to attach a line to a square sail. In modern rigging, it is prized because the harder you pull, the tighter it grips the object it is tied around.
The EStar Hitch
The EStar Hitch is the "hitch" version of the stopper. It uses the same logic—a modified Buntline—to secure a high-modulus line to a shackle or ring. It is currently considered one of the most secure ways to tie Dyneema without resorting to a splice.
The Ashley Stopper Knot
Developed by Clifford Ashley, this is a beautiful, bulky stopper knot. While excellent for natural fibers and polyester, it lacks the "locking" mechanism of the EStar Stopper knot, making it less reliable for the ultra-slippery HMPE lines.
Figure-Eight Stopper
The most common stopper knot in climbing and general utility. It is easy to tie and identify but is notorious for slipping in high-tech fibers. It should generally be avoided when working with pure Dyneema or Spectra under high loads.
The Double Overhand Knot
A simple, secure stopper that provides more bulk than a single overhand. It is often used as a "backup" knot on the tail of a primary knot, though it lacks the sophisticated geometry of the EStar.
Final Words
The EStar Stopper represents the pinnacle of knot design for the modern era of synthetic fibers. As we move away from traditional ropes toward materials that are stronger than steel but as slippery as ice, the old rules of thumb for rope knots no longer apply.
By mastering the EStar Stopper, you are adding a vital tool to your repertoire of outdoor rope techniques. It provides peace of mind in high-stakes environments—whether you are reefing a sail in heavy weather or securing a load in an industrial setting. Remember that the strength of any knot is only as good as its execution; practice with different rope diameters until the "wrap, hitch, and pass" sequence becomes second nature.
In the world of technical rigging, security is paramount. The EStar Stopper knot delivers that security, ensuring that your lines stay exactly where you put them, no matter how much the conditions—or the materials—try to slip away.
