
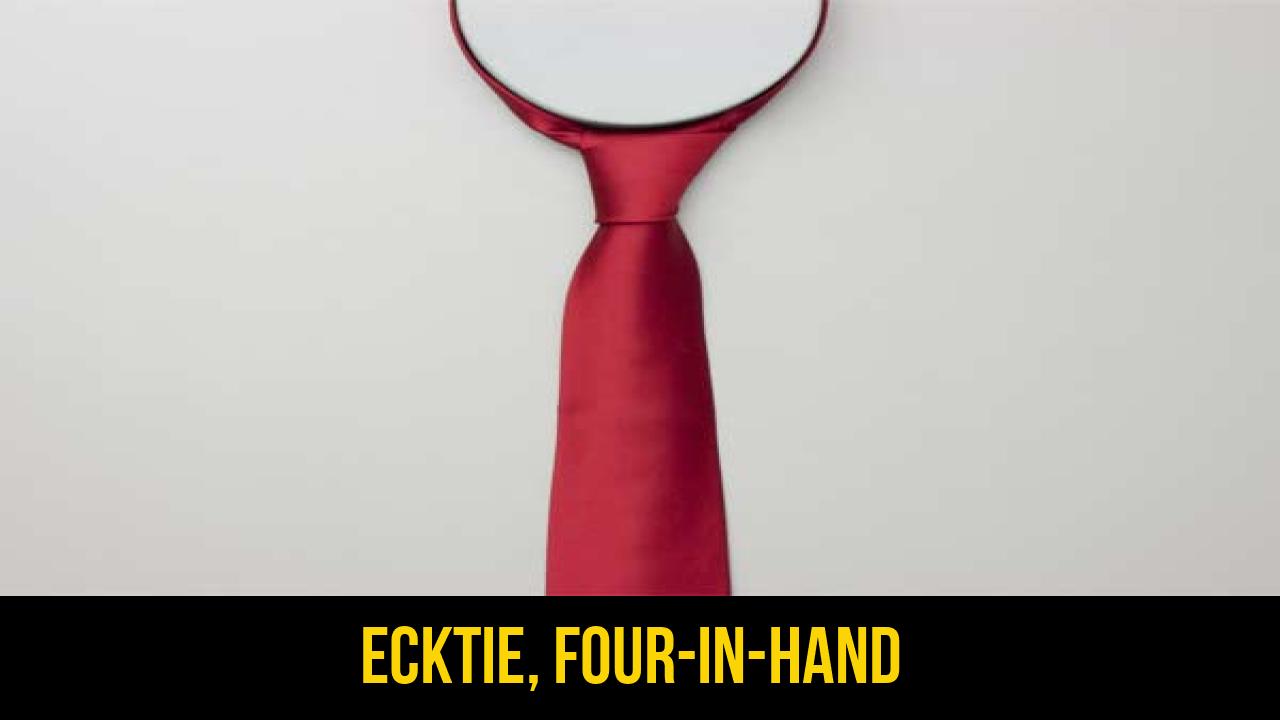
In the world of functional aesthetics and technical precision, few configurations are as iconic or as universally applicable as the Four-in-Hand. Whether you are preparing for a high-stakes corporate presentation or applying traditional rope knots in a scouting or ceremonial context, understanding the mechanics of this specific tie is essential. The Four-in-Hand knot is celebrated for its slender, slightly asymmetrical shape, making it the most versatile choice for various collar types and fabric thicknesses.
While often associated with sartorial elegance, the principles behind the Four-in-Hand mirror many outdoor rope techniques used in securing lines and creating adjustable hitches. Its slender profile and self-releasing nature have made it a staple in the repertoire of outdoor enthusiasts and professionals alike. This article provides a comprehensive deep dive into the history, materials, and technical execution of this classic knot.
Alternative Names: Simple Knot, Schoolboy Knot, Four-in-Hand.
What Is a Necktie, Four-in-Hand?
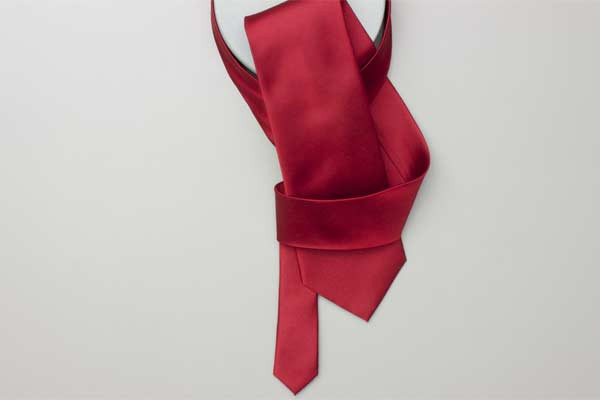
The Four-in-Hand knot is a method of tying a necktie that results in a narrow, discrete, and slightly lopsided knot. It is technically classified as a slip knot variation that cinches around the neck of a garment. Historically, the name is believed to have originated from the Four-in-Hand Club in London, or from the way coachmen used to tie their scarves while driving a "four-in-hand" (a carriage drawn by four horses).
Practical Uses and Versatility
The primary appeal of the Necktie, Four-in-Hand lies in its simplicity and the minimal amount of length it requires from the material.
- Formal and Business Settings: Due to its narrow shape, it is perfect for standard button-down collars and narrow spread collars.
- Uniforms and Scouting: Many technical outdoor organizations and youth scouting groups utilize this knot for ceremonial scarves and formal uniforms because it is easy to teach and quick to execute.
- Heavy Fabrics: Unlike the Windsor or Half-Windsor, the Four-in-Hand does not become overly bulky when used with thick wool or knitted materials, making it a favorite for winter attire.
In terms of outdoor rope techniques, the mechanics of passing one end around a stationary "standing part" to create a friction-based cinch is a foundational skill. While the Four-in-Hand is specific to neckwear, the muscle memory developed here translates effectively to various utility hitches used in the field.
Materials and Tools Needed
To achieve a perfect Four-in-Hand knot, the choice of material is just as important as the technique itself. As a technical gear specialist, I recommend considering the following:
1. The Necktie Material
- Silk: Offers the smoothest "run" when pulling the knot tight. It creates a crisp, professional dimple.
- Polyester/Microfiber: Durable and resistant to creasing, ideal for frequent use in outdoor or travel environments.
- Wool/Knit: Provides a more rugged, textured look. The Four-in-Hand is the only knot recommended for these thicker materials to avoid a massive, unsightly bulge at the throat.
2. Supporting Tools
- A Mirror: Essential for beginners to track the "long end" vs. "short end" orientation.
- Collar Stays: To ensure the shirt collar remains rigid, allowing the knot to sit flush against the neck.
- Fabric Conditioner: For those using synthetic cords or ropes for practice, a light conditioner can reduce friction, making the final tightening smoother.
3. Rope Specifications (For Practice)
If practicing as part of outdoor rope techniques training, use a flat webbing or a soft-braid paracord to simulate the behavior of a tie. Avoid stiff climbing ropes for this specific exercise, as the knot’s geometry requires a certain degree of pliability.
How to Tie Necktie, Four-in-Hand?
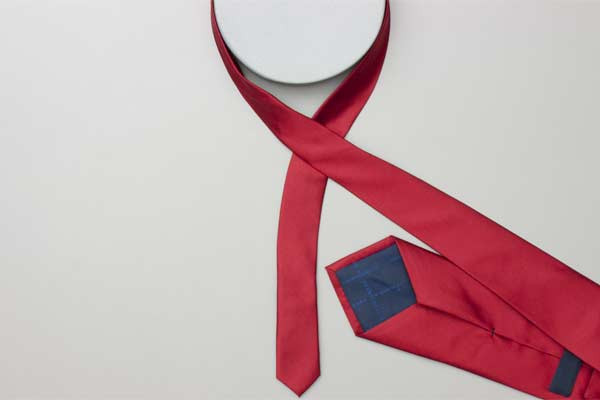
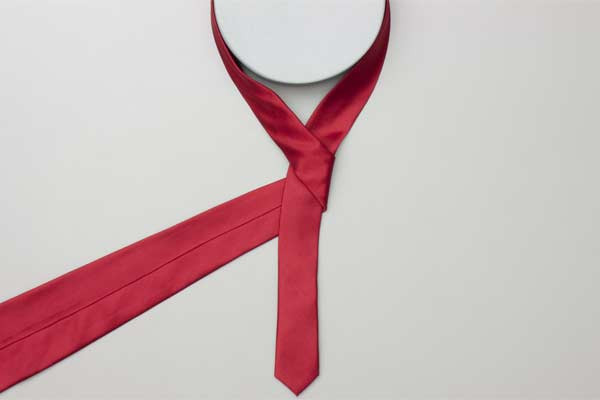
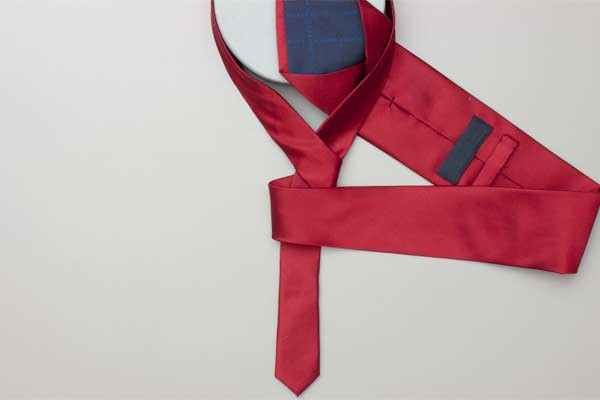
To ensure a perfect result, follow these instructions precisely. This method focuses on the traditional orientation where the "long end" does the work around the "short end."
- Pass the long end over the short, then behind, and then across in front again.
- Bring the long end up and forwards by the neck and down under itself.
- Pull the long end to tighten the knot, then the short end to make snug against the neck.


Common Mistakes to Avoid
Even a knot as straightforward as the Four-in-Hand can be executed poorly. Here are the technical pitfalls to watch out for:
- Incorrect Length Balance: If the long end is too short after the final pull, the tie will sit too high on the torso. Ideally, the tip of the tie should just touch the top of your belt buckle.
- Overtightening the First Wrap: If you pull the initial "across in front" wrap too tight, you will struggle to "bring the long end up and forwards" in the second step. Keep the wraps firm but accessible.
- The "Gap" Phenomenon: A common error is failing to pull the short end sufficiently at the end. This leaves a gap between the knot and the shirt button. Ensure the knot is snug against the neck to maintain a professional appearance.
- Neglecting the Dimple: While not strictly part of the structural tie, failing to pinch the fabric just below the knot as you tighten can result in a flat, lifeless look.
- Twisting the Fabric: Always ensure the "behind" pass remains flat. If the material twists, the knot will appear bulky and irregular rather than elegantly asymmetrical.
Safety and Maintenance
When using rope knots near the neck, always ensure the knot is easily reversible. The Four-in-Hand is a "quick-release" style knot; pulling the short end out of the structure should cause the knot to collapse instantly. If the knot jams, check for twists in the fabric or cord.
Related Knots and Splicing
Understanding the Four-in-Hand knot is often a gateway to more complex outdoor rope techniques. Here are a few related configurations:
- The Half-Windsor Knot: A medium-sized, symmetrical knot that requires more length and a slightly more complex wrapping sequence than the Four-in-Hand.
- The Pratt (Shelby) Knot: A unique "inside-out" knot that starts with the tie seams facing outward, resulting in a tidy, medium-sized finish.
- The Overhand Knot: The most basic of all rope knots, serving as the foundational movement for the first step of the Four-in-Hand.
- The Taut-Line Hitch: An outdoor utility knot that, like the Four-in-Hand, uses a sliding mechanism to adjust tension on a line under load.
- Splicing: Unlike knots, splicing involves weaving rope strands together to create a permanent loop, offering maximum strength for heavy-duty outdoor gear.
Final Words
The Necktie, Four-in-Hand is more than just a fashion statement; it is a masterclass in functional knot-tying. Its simplicity makes it the ideal starting point for beginners, while its reliability ensures it remains a favorite among professionals who value efficiency. By mastering the "pass over, behind, and across" technique, you develop the tactile awareness necessary for more advanced outdoor rope techniques.
Whether you are dressing for a formal event or practicing your rope knots for a survival kit, the Four-in-Hand stands as a testament to the enduring utility of a well-tied line. Remember to focus on the tension, respect the material, and always aim for that crisp, snug finish against the neck. With practice, this knot becomes second nature, providing a sharp, asymmetrical edge to your technical and professional repertoire.
