
In the world of precision cordage and technical outdoor gear maintenance, few techniques offer the reliability and exactness of the Surgical Tie Instrument. While the name itself suggests a clinical origin, the application of this technique has bridged the gap into numerous outdoor and technical fields. From fly fishing and delicate gear repair to intricate craftwork and survival scenarios, mastering the Surgical Tie Instrument knot is a hallmark of a true specialist.
The beauty of this technique lies in its efficiency. When working with short ends of cordage or in confined spaces where fingers might be too bulky to maneuver, the use of an instrument—such as forceps or needle-nose pliers—becomes a game-changer. This method allows for high-tension security without the need for significant "tail" length, making it one of the most resource-efficient rope knots in your repertoire.
Whether you are a scout, a seasoned climber looking to repair a harness cover, or a fly-fisherman securing a complex rig, understanding the mechanics of the instrument tie is vital. This guide will provide the technical background and the exact steps required to execute this knot perfectly every time.
Alternative Names: Instrument Tie, Forceps Knot, Hemostat Square Knot, Tool-Assisted Reef Knot.
What Is a Surgical Tie Instrument?
The Surgical Tie Instrument is a method of creating a secure Square (Reef) Knot using a mechanical tool as an extension of the hands. In technical outdoor applications, it is defined by its two-stage process: the creation of a first "throw" (the Half Knot) followed by a second "throw" in the opposite direction to lock the structure.
Practical Uses in the Field
- Fly Fishing: Securing fine tippets or repairing nets where dexterity is limited by cold weather or small materials.
- Gear Repair: Stitching together heavy-duty canvas or outdoor fabrics using high-tensile thread where manual gripping is difficult.
- Micro-Lashing: Creating small-scale structures or repairing precision instruments like binoculars or GPS mounts.
- Survival Scenarios: Utilizing multi-tool pliers to secure cordage when finger strength is compromised or when working with abrasive materials like wire-core rope.
The primary advantage of using an instrument is the ability to maintain constant tension. In outdoor rope techniques, maintaining tension during the "cinch" phase is what separates a knot that holds from one that slips.
Materials and Tools Needed
To perform the Surgical Tie Instrument knot effectively, you must select the right combination of tools and cordage. Not all materials respond the same way to instrument pressure.
Recommended Cordage
- Monofilament or Fluorocarbon: Ideal for fishing and low-visibility repairs.
- Braided Mason Line: Excellent for practicing the technique due to its high visibility and grip.
- Paracord (Inner Strands): The inner guts of 550 cord are perfect for high-strength, small-scale ties.
- Technical Thread: Kevlar or waxed polyester threads used in heavy-duty gear repair.
Essential Tools
- Forceps or Hemostats: The gold standard for this knot. Their locking mechanism allows you to "pick up" the end of the rope with absolute security.
- Needle-Nose Pliers: A common substitute found in most outdoor multi-tools.
- Tweezers: Suitable for very fine work, though they lack the locking power of forceps.
Environmental Considerations
When practicing outdoor rope techniques, always consider the "lubricity" of your rope. Synthetic ropes like nylon are slippery; therefore, the Surgical Tie Instrument requires firm, even pressure to ensure the Square Knot seats correctly.
How to Tie Surgical Tie Instrument?
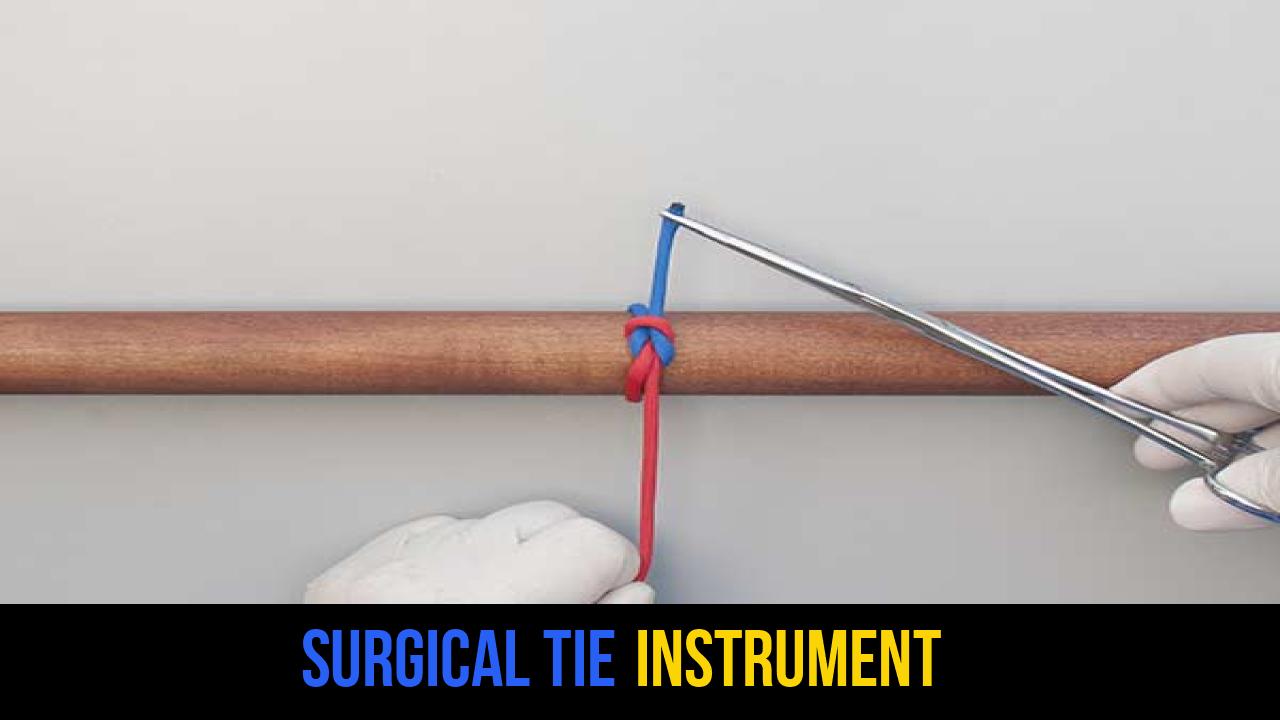
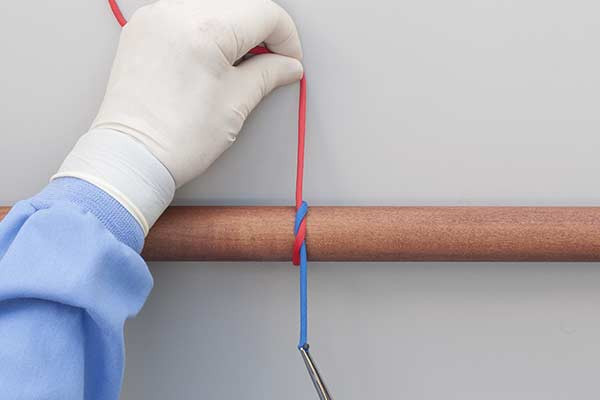
Following the professional standards for this technique, use the following steps to complete the knot. Ensure your forceps are clean and your cordage is free of kinks before beginning.
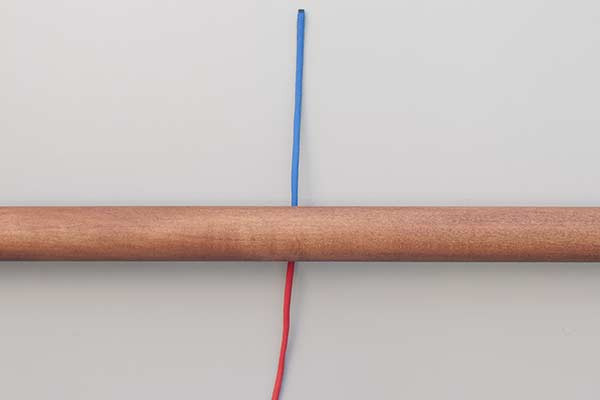
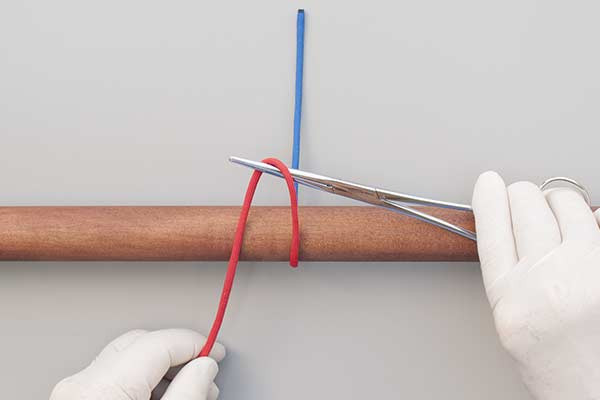
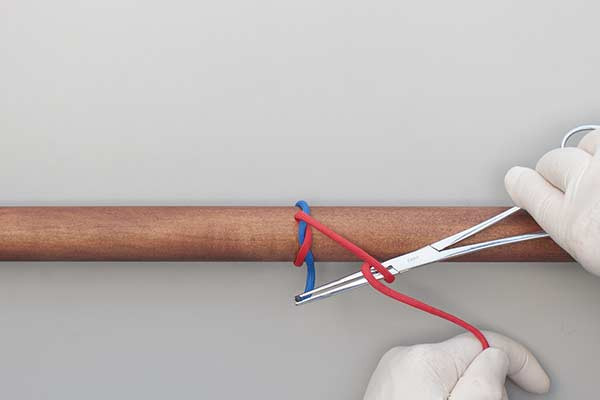
- With the short end away from you, position the forceps. Ensure you have enough length on the "long end" to wrap comfortably.
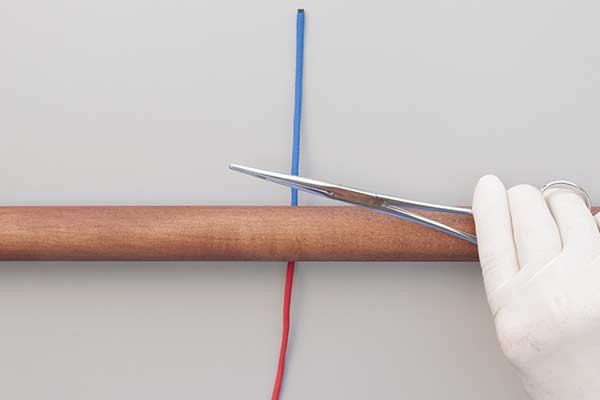
- Wrap the long end over the forceps, and then under. This creates the initial loop around the instrument, which will form the basis of your first throw.
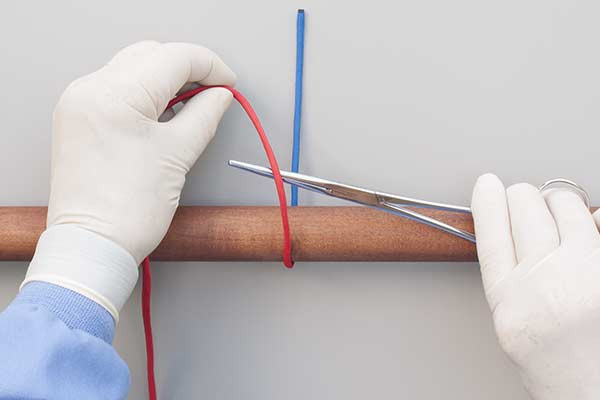
- Pick up the end and pull tight to make the Half Knot. Use the tip of the forceps to grasp the short end and pull it through the loop you just created.
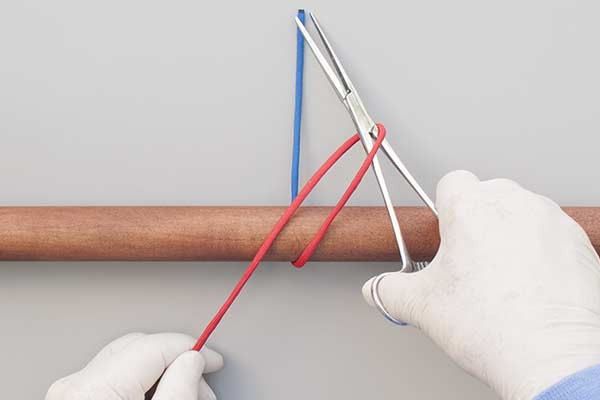
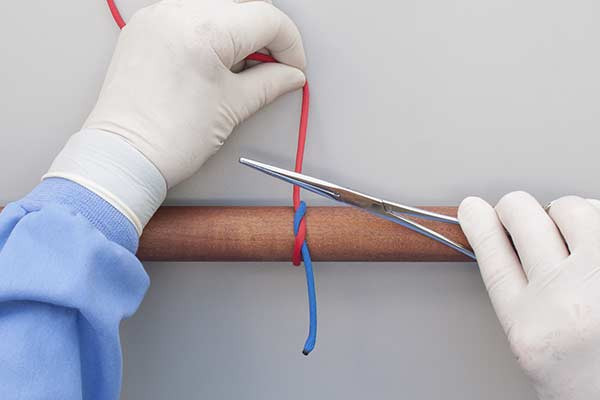
- Position the forceps again and wrap the long end across them. To ensure a true Square Knot, pay attention to the direction of this wrap relative to your first one.
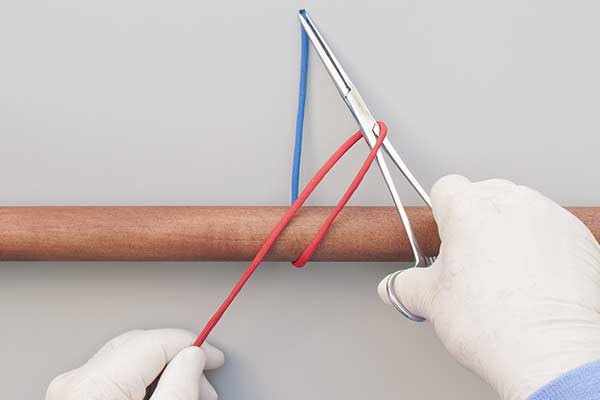
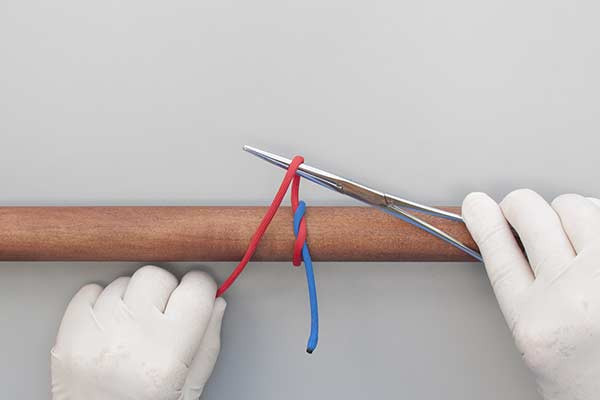
- Pick up the short end. Use the forceps to securely grab the lead.
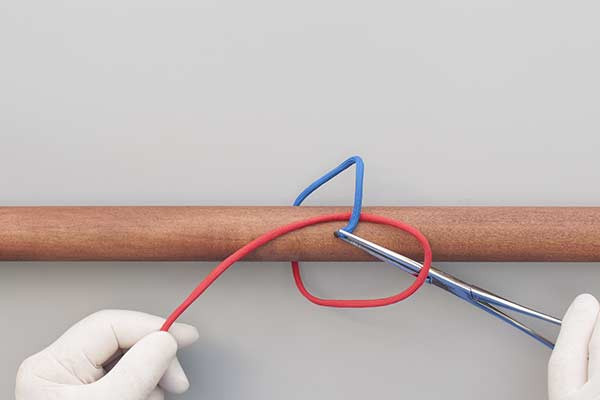
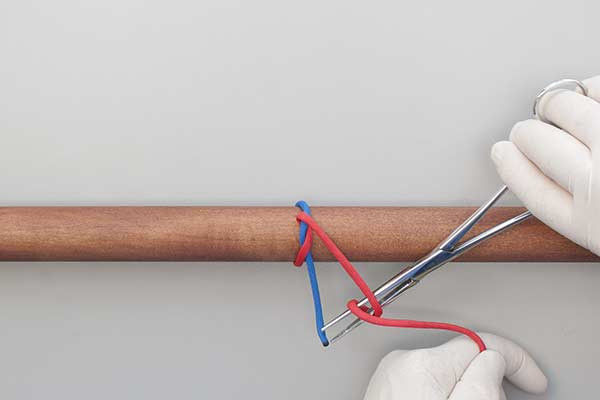
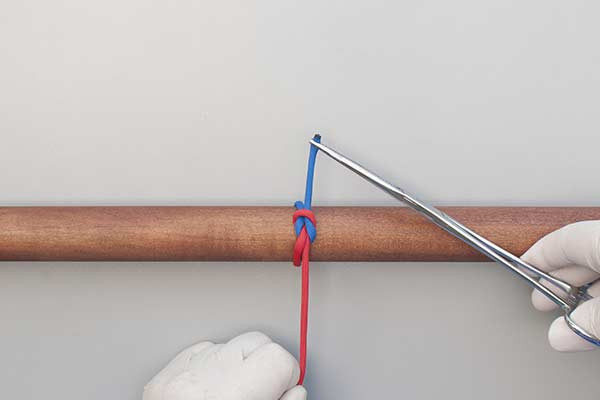
- Pull tight to complete the Square (Reef) Knot. Ensure both ends are pulled with equal tension to seat the knot firmly against the surface.

Common Mistakes to Avoid
Even for those experienced in rope knots, the transition to using an instrument can introduce specific errors.
- Creating a "Granny Knot": This is the most common mistake. If you wrap the long end in the same direction for both steps, the knot will be unbalanced and prone to slipping. Always ensure the second wrap is the "mirror" of the first to form a true Square Knot.
- Excessive Force: Because forceps provide significant mechanical advantage, it is easy to snap fine lines. Apply steady, firm pressure rather than a sharp jerk.
- Improper Tool Placement: If you position the forceps too far from the knot’s base, you will create a "loose" tie that lacks structural integrity. Keep the tool close to the work surface.
- Ignoring Tail Length: While this knot is great for short ends, leaving a tail that is too short can lead to the knot "rolling" out under heavy vibration or load.
Safety Tips
When using metal instruments on synthetic rope knots, be mindful of sharp edges on the tool. Serrated forceps can occasionally fray delicate fibers. If you are working with critical load-bearing gear, always inspect the cordage for damage after the tie is complete.
Related Knots and Splicing
Expanding your knowledge of outdoor rope techniques involves understanding how different knots interact. Here are a few related techniques:
- The Surgeon’s Knot: A more robust version of the square knot that involves an extra twist in the first throw to increase friction and prevent slipping in synthetic lines.
- The Clove Hitch: A quick-release binding knot used to secure rope to cylindrical objects; it is often the starting point before more complex ties are applied.
- The Blood Knot: A primary technique used in the fishing world to join two sections of nylon line together with nearly 100% strength retention.
- The Bowline: Known as the "King of Knots," it creates a fixed loop at the end of a rope that will not slip or bind under load.
Final Words
The Surgical Tie Instrument is more than just a specialized skill; it is a vital tool for anyone who demands precision in their outdoor pursuits. By combining the mechanical advantage of forceps with the geometric reliability of the Square Knot, you gain the ability to perform high-stakes repairs and setups that manual tying simply cannot match.
Practice this technique with various materials—from paracord to fishing line—until the motion becomes second nature. In the field, the ability to tie a secure, tight knot in a cramped space can be the difference between a successful expedition and gear failure. Mastery of rope knots is a lifelong journey, and the instrument tie is one of the most sophisticated milestones on that path.
Whether you are maintaining your survival kit or fine-tuning your angling gear, the Surgical Tie Instrument knot ensures that your connections remain as professional and secure as the rest of your technical equipment.[/content]
