
In the world of pioneering and bushcraft, few skills are as foundational as the ability to join timber using only cordage. Among the various outdoor rope techniques, the Tripod Lashing stands out as a critical skill for anyone looking to build stable, weight-bearing structures. Whether you are constructing a camp kitchen, a signal tower, or a simple washstand, understanding how to secure three poles together is essential for structural integrity.
The Tripod Lashing knot (technically a lashing, though often referred to as a knot in casual conversation) is designed to create a “gyn” or a tripod. This three-legged structure is inherently stable on uneven ground, making it the preferred choice for wilderness survival and scouting projects. By mastering this technique, you move beyond simple knots and begin to understand the physics of tension and friction that allow ropes to hold massive weights.
Alternative Names: Gyn Lashing, Three-Pole Lashing, Shear Lashing (three-pole variation).
What Is a Tripod Lashing?
A Tripod Lashing is a method used to bind three poles together at a single point, allowing them to be spread out to form a stable tripod. Unlike a square lashing, which joins poles at right angles, or a diagonal lashing, which secures poles that might spring apart, the tripod lashing focuses on creating a pivot point that becomes rigid once the poles are deployed.
Practical Uses in the Field
The versatility of this lashing cannot be overstated. In a survival or camping scenario, you might use it for:
- Cooking Crane: Suspending a Dutch oven or kettle over a fire.
- Shelter Framework: Forming the peak of a teepee or a tripod-based lean-to.
- Equipment Storage: Creating a rack to keep gear off the damp ground.
- Water Filtration: Hanging a filtration bag or tripod-mounted basin.
- Pioneering Projects: Building the legs for bridges or observation platforms.
The beauty of the tripod is its self-leveling nature. While a four-legged table will wobble if one leg is short, a tripod will always find its footing, making it the king of rope knots for outdoor construction.
Materials and Tools Needed
To execute a professional-grade Tripod Lashing, you must select your materials carefully. The strength of your structure is only as good as the weakest link between your wood and your rope.
1. Selecting the Poles
For a standard tripod, you need three poles of roughly equal length and diameter.
- Wood Type: Hardwoods like oak or ash are incredibly strong but heavy. Softwoods like pine or cedar are lighter and easier to work with but may flex under heavy loads.
- Surface Texture: Ensure the bark is intact if you need extra grip, or peel it if you want a cleaner look. Avoid “punky” or rotten wood, as the lashing will crush the fibers and lose tension.
- Alignment: Lay the poles side-by-side on the ground. For this specific lashing, the poles should be parallel with a small gap between them (roughly the thickness of the rope) to allow for the weaving process.
2. Choosing the Right Rope
Not all cordage is created equal. For outdoor rope techniques, you generally have three choices:
- Manila Rope: The gold standard for pioneering. It has very little stretch and a natural “tooth” that grips the wood.
- Sisal: A cheaper alternative to Manila, though it is pricklier to handle and slightly less durable.
- Synthetic (Paracord/Nylon): While strong, synthetic ropes are often too slippery for lashings. If using 550 paracord, you must ensure your frapping turns are exceptionally tight to prevent the poles from sliding.
3. Essential Tools
- Gloves: To prevent rope burn when pulling frapping turns tight.
- Pocket Knife or Multi-tool: For trimming rope ends.
- Measuring Tape: To ensure your lashing is placed at the same height on all three poles.
How to Tie Tripod Lashing?
To ensure maximum stability and safety, follow these steps precisely. This method utilizes racking turns to weave the poles together, providing a flexible joint that tightens significantly once the tripod is stood up.
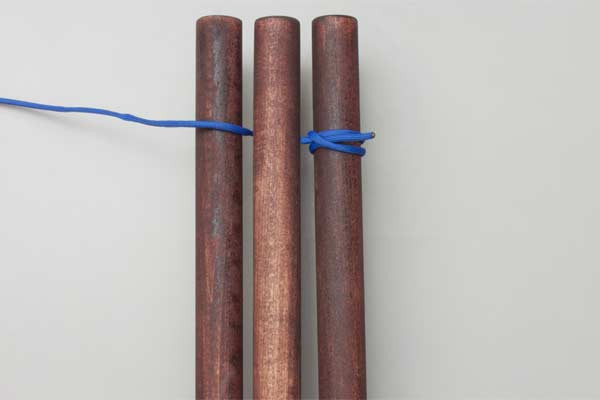
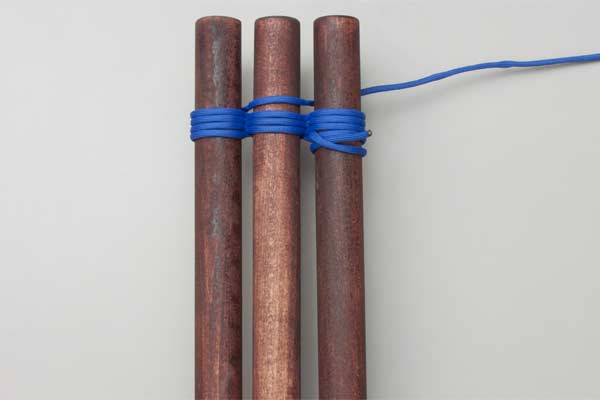
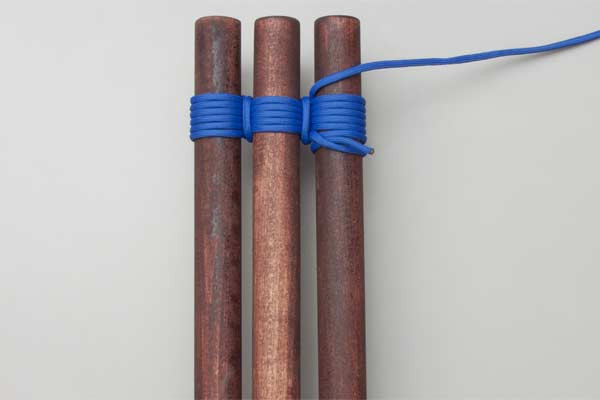
- Start with a Clove Hitch around one pole. This serves as your anchor. Ensure there is a long enough tail to tuck away later.
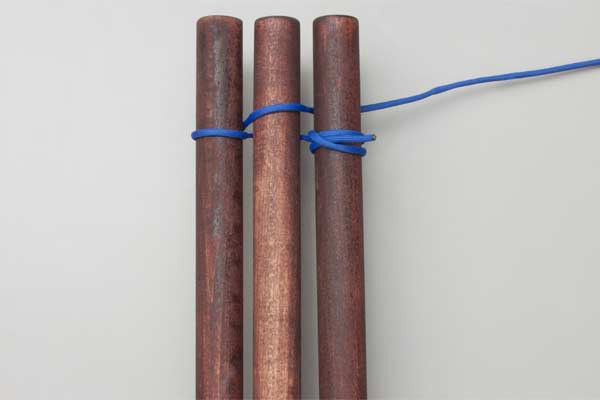
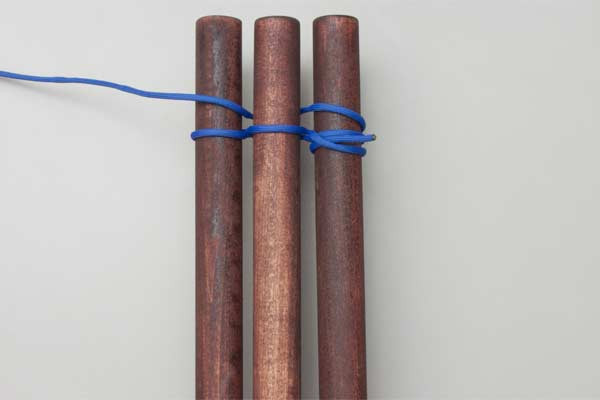
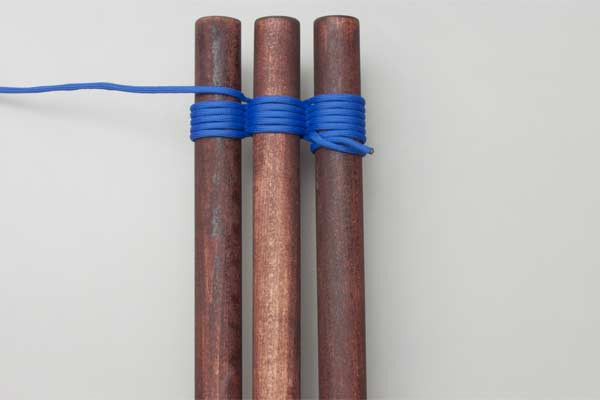
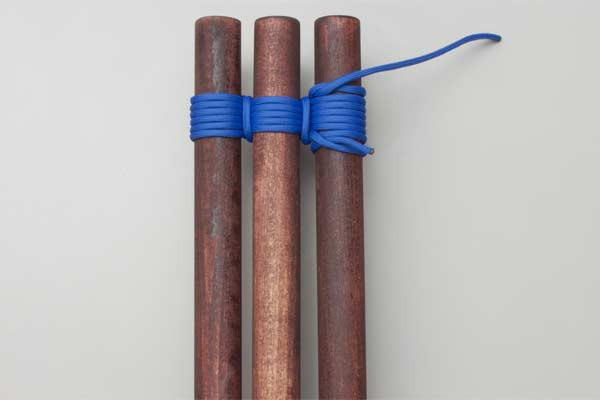
- Wrap about six racking turns around the three poles weaving in and out between them. These turns should be neat and laid side-by-side rather than overlapping. The “figure-eight” motion between the poles creates the necessary friction.
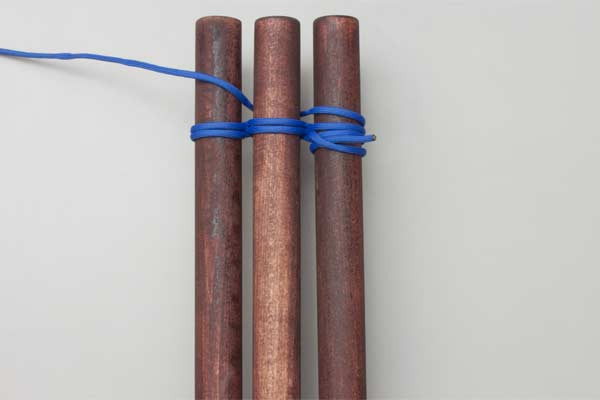
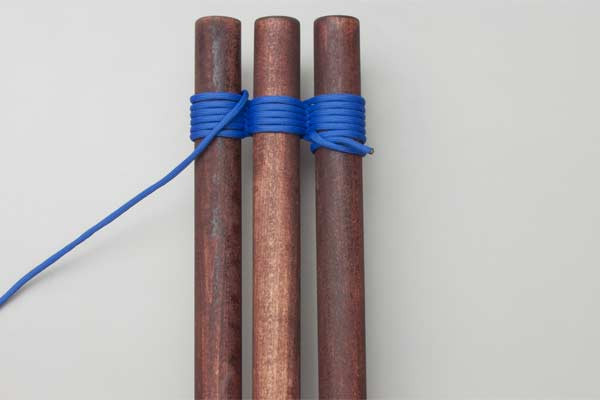
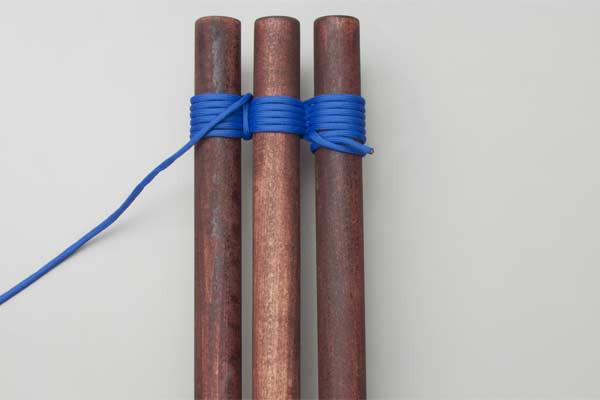
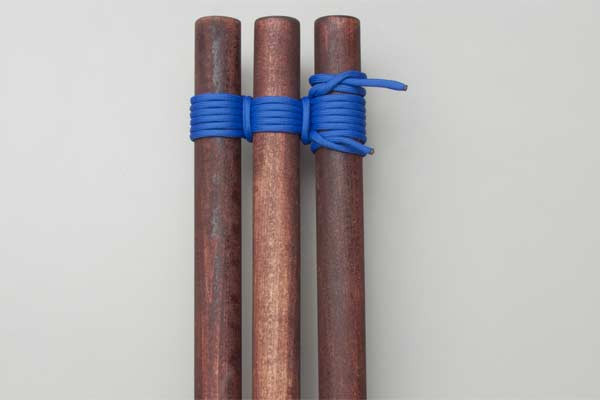
- Make two or three tight frapping turns in the two gaps. Frapping turns are the most important part; they go around the rope wraps themselves (between the poles), pulling the racking turns together and cinching the entire lashing tight.
- Finish with a Clove Hitch. Secure the end of the rope to the pole opposite where you started, or onto an adjacent pole, ensuring the knot is tight and won’t slip under load.
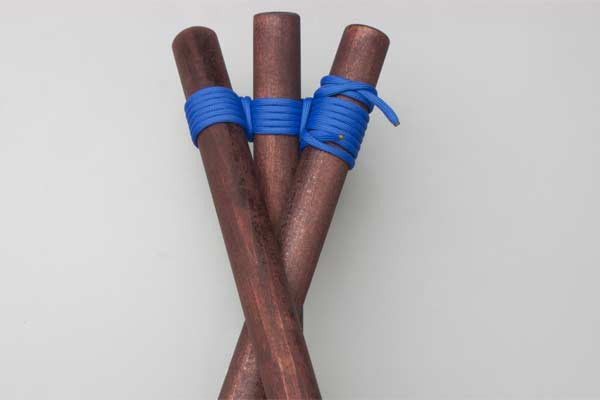
- Cross the two outside poles to form the tripod. Once the lashing is complete on the ground, lift the center pole while crossing the two outer poles underneath it. This movement “locks” the lashing and creates a rigid structure.


Common Mistakes to Avoid
Even experienced outdoorsmen can make errors that compromise the safety of a Tripod Lashing knot. Keep these tips in mind:
Loose Racking Turns
If the initial six racking turns are too loose, the poles will slide as soon as weight is applied. While you don’t want them so tight that you can’t perform the frapping, they should be firm and orderly.
Neglecting the Frapping
The frapping turns are what actually provide the structural “bite.” If you skip these or don’t pull them with your full body weight, the tripod will be “mushy.” Professional lashers often use a T-handle or a stick to get extra leverage when pulling frapping turns.
Incorrect Pole Spacing
When laying the poles out to begin, if they are touching too tightly, you won’t be able to weave the rope effectively. If they are too far apart, the racking turns will have too much “play.” A gap of about half an inch is usually ideal for 3/8-inch rope.
Safety First
Always test your tripod with a “dead weight” before placing expensive gear or yourself under it. Check the lashing daily, as natural fibers like Manila can shrink or expand depending on the humidity and temperature.
Related Knots and Splicing
Understanding the Tripod Lashing is part of a broader mastery of rope knots. Here are a few related techniques you should know:
- Square Lashing: Used to join two poles at a 90-degree angle. It is the most common lashing used in camp gadget construction.
- Shear Lashing: Similar to a tripod lashing but used for only two poles to create an “A-frame” structure.
- Round Lashing: Used to join two poles side-by-side to extend their length, often used for flagpoles.
- Clove Hitch: The foundational knot used to start and finish almost all lashings; it is secure but easy to untie after being under load.
- Taut-Line Hitch: A sliding hitch used on guy lines to adjust the tension of a tripod-supported shelter.
Final Words
The Tripod Lashing is a testament to the elegance of traditional outdoor rope techniques. By using nothing more than three sticks and a length of cord, you can create a structure capable of supporting hundreds of pounds. Whether you are a scout, a bushcraft enthusiast, or a professional guide, the ability to tie a secure Tripod Lashing knot is a hallmark of your expertise.
Remember, the key to a successful lashing lies in the tension of the frapping turns and the neatness of your racking. Practice this technique in a controlled environment before relying on it in the backcountry. With time and repetition, your lashings will become second nature, allowing you to build complex, reliable structures wherever your adventures take you.
