
In the world of outdoor rope techniques, few knots carry as much historical weight and practical reliability as the Anchor Hitch. Whether you are a seasoned sailor, an avid backcountry camper, or a professional rigger, mastering the art of the hitch is fundamental to safety and efficiency. A hitch is specifically designed to fasten a rope to an object—such as a ring, a post, or a spar—and the Anchor Hitch stands out as one of the most secure options available.
Knots are more than just loops and twists; they are the literal lifelines of outdoor exploration. A poorly tied knot can lead to equipment loss, or worse, physical injury. Conversely, a well-executed Anchor Hitch knot provides peace of mind, knowing that your gear is anchored by a mechanical advantage that tightens under load. This guide will delve deep into the mechanics, applications, and specific steps required to master this essential knot.
The Anchor Hitch is also widely known by several other names in various industries. These include:
- Fisherman’s Bend
- Anchor Bend
- The Fisherman’s Hitch
What Is an Anchor Hitch?
The Anchor Hitch is a specialized knot used primarily for attaching a rope to a ring or a similar cylindrical object. While its name suggests a maritime origin—specifically for attaching a cable to an anchor—its utility extends far beyond the deck of a ship.
In technical terms, the Anchor Hitch is a variation of the "Round Turn and Two Half Hitches," but with a critical modification: the first half hitch is tucked under the round turn. This small change significantly increases the knot’s security, making it much less likely to slip or "walk" when the rope is subjected to intermittent tension or heavy surging.
Practical Uses
- Marine Applications: As the name implies, it is the gold standard for securing an anchor line to an anchor ring. It is also used for securing mooring lines to buoys.
- Camping and Bushcraft: It is an excellent choice for securing a ridgeline for a tarp to a tree or a heavy-duty stake.
- Search and Rescue: Because of its high security and resistance to slipping, it is often used in hauling systems where a rope must be fixed to a solid anchor point.
- General Utility: From securing loads in a truck bed to hanging a heavy swing from a branch, the Anchor Hitch is a versatile tool in any gear specialist’s arsenal.
Materials and Tools Needed
Before you begin practicing your rope knots, it is essential to understand the materials you are working with. The performance of a knot is often dictated by the type of rope used.
Rope Types
- Nylon: Excellent for the Anchor Hitch due to its elasticity and strength. It absorbs shock loads well, which is common in anchoring scenarios.
- Polyester (Dacron): Offers less stretch than nylon and has superior UV resistance, making it ideal for long-term outdoor use.
- Polypropylene: Often used because it floats, though it is more prone to UV degradation and can be "slippery," requiring extra care when dressing the knot.
- Kernmantle: Common in climbing and rescue; the Anchor Hitch holds well on the smooth sheath of a static kernmantle rope.
Tools and Considerations
- The Anchor Point: You will need a solid ring, shackle, or post. Ensure the object is smooth to prevent abrasion on the rope.
- Gloves: When working with heavy loads or synthetic ropes that can cause "rope burn," a good pair of leather work gloves is recommended.
- Knife or Multi-tool: Always have a cutting tool handy in case a knot becomes jammed or an emergency release is required.
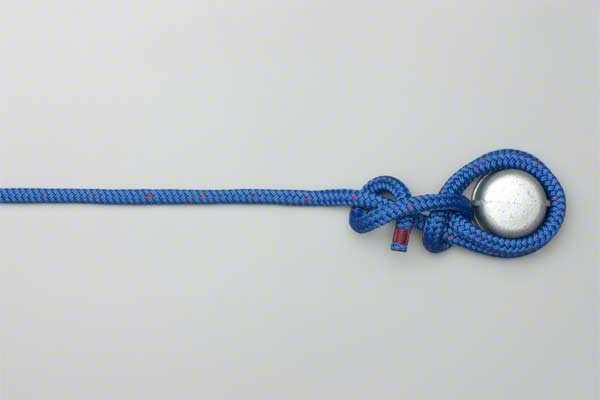
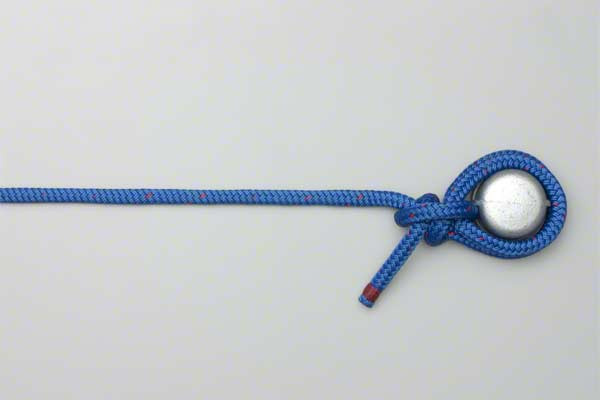
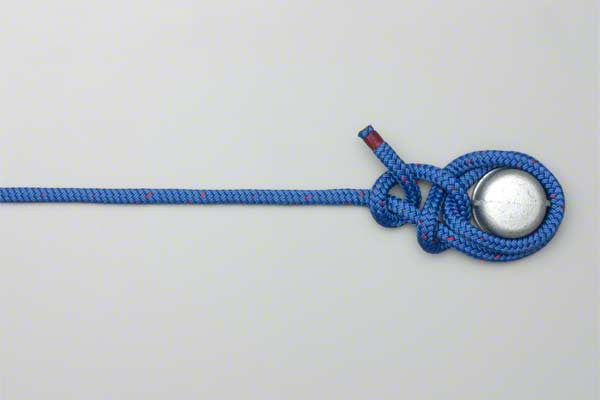
How to Tie Anchor Hitch?
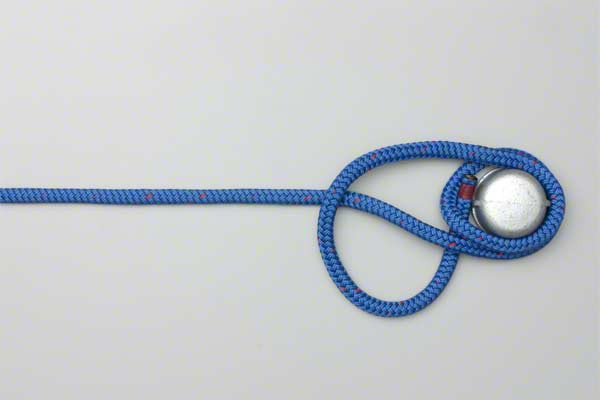
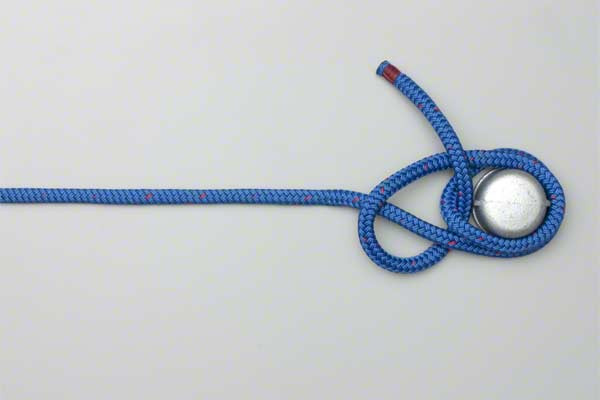
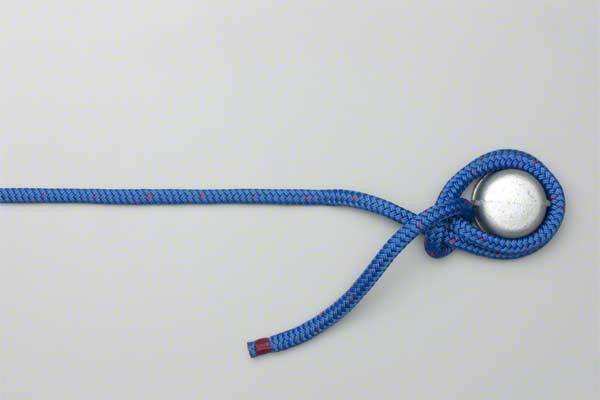
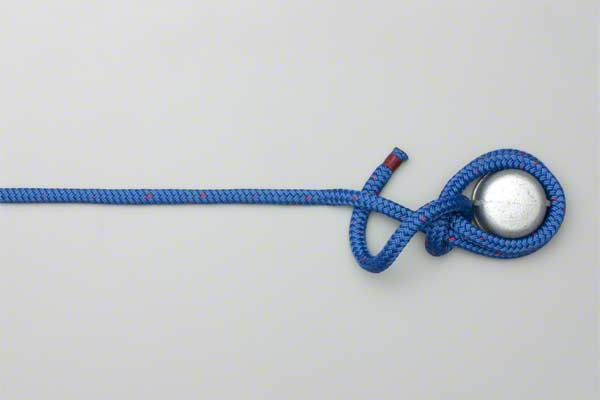
To ensure the highest level of security and performance, follow these technical instructions exactly. Precision in the initial turns is what separates a professional hitch from a dangerous error.
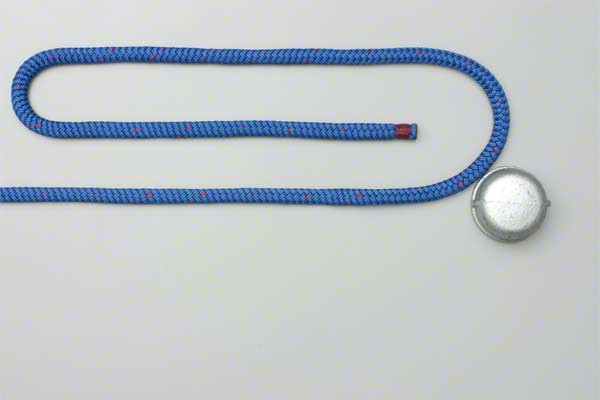
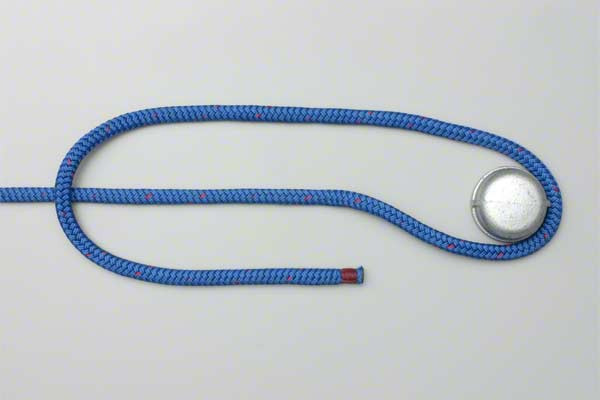
- Pass the tail twice around the post keeping the second turn slack.
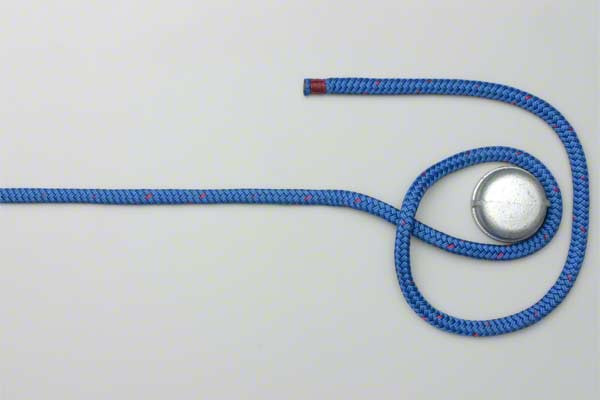
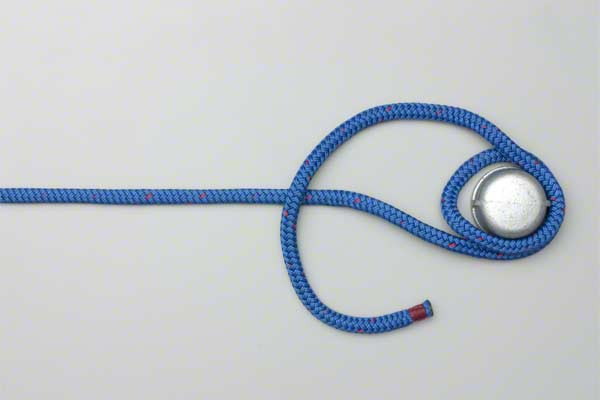
- Pass the tail over the standing end and under the original slack turn to tie the first Half Hitch.
- Continue around the standing end to tie the second Half Hitch and complete the knot.
Common Mistakes to Avoid
Even experienced outdoorsmen can make errors when tying the Anchor Hitch knot. Attention to detail is paramount for safety.
1. Forgetting the "Slack" Turn
The instruction to keep the second turn slack is vital. If this turn is too tight initially, you will struggle to pass the tail under it in the second step. This often leads to the knot being tied incorrectly as a standard Round Turn and Two Half Hitches, which is less secure for heavy-duty anchoring.
2. Crossing the Half Hitches
When tying the two half hitches around the standing end, ensure they are tied in the same direction. "Crossing" the hitches can create internal friction that weakens the rope’s integrity or makes the knot nearly impossible to untie after it has been loaded.
3. Lack of a "Tail" Length
Always ensure you leave enough "working end" (the tail) after the knot is finished. A common rule of thumb is to leave a tail at least five to seven times the diameter of the rope. If the knot settles or "creeps" under an extreme load, a short tail could pull through, causing the knot to fail.
4. Failing to "Dress" the Knot
"Dressing" a knot means straightening the turns so they lie parallel and snug. An undressed knot can deform under pressure, leading to unexpected slippage or reduced breaking strength of the rope.
Related Knots and Splicing
To become a true expert in outdoor rope techniques, it is helpful to understand how the Anchor Hitch relates to other common knots.
- Round Turn and Two Half Hitches: This is the simpler cousin of the Anchor Hitch. It is easier to untie but lacks the "tucked" security that makes the Anchor Hitch so reliable for permanent or heavy loads.
- The Bowline: Known as the "King of Knots," the Bowline creates a fixed loop. While secure, it can shake loose if not under constant tension, whereas the Anchor Hitch excels in variable tension environments.
- The Clove Hitch: A very fast way to secure a rope to a post. However, the Clove Hitch is notorious for slipping if the rope is rotated or if the tension is inconsistent. It should not be used for critical anchoring.
- The Buntline Hitch: A self-tightening hitch that is even more secure than the Anchor Hitch but can be extremely difficult to untie once it has been subjected to a heavy load. It is often used for attaching a line to a shackle.
Final Words
The Anchor Hitch is a masterclass in functional simplicity. By combining a round turn with strategically placed half hitches, it creates a connection that is both incredibly strong and remarkably resistant to the elements. Whether you are securing a boat in a storm or setting up a long-term basecamp, this knot provides the reliability that modern outdoor rope techniques demand.
Remember that proficiency comes with practice. Take a length of rope and a fixed object, and repeat the steps until the movement becomes muscle memory. In the field, conditions are rarely perfect—it may be dark, raining, or you may be exhausted. Having the ability to tie the Anchor Hitch knot perfectly every time is a hallmark of a true technical specialist. Stay safe, check your anchors twice, and enjoy the confidence that comes with superior knot-tying skills.