

In the realm of outdoor rope techniques, precision is often the difference between a secure fix and a gear failure. While many enthusiasts are familiar with common hitches and loops, there exists a specialized category of binding knots that offer unparalleled security. One such technique is the Constrictor Surg. Instrument knot.
Combining the mechanical advantage of the traditional constrictor knot with the mechanical precision of surgical instrument handling, this method is favored by those who need to apply high-tension binds in tight spaces or on small-diameter materials. Whether you are repairing a broken tent pole, securing a heavy-duty bundle, or performing delicate gear maintenance in the field, mastering the Constrictor Surg. Instrument technique elevates your proficiency in rope knots.
This method is particularly effective because it utilizes tools—such as forceps or hemostats—to maintain tension that fingers alone often cannot achieve. By the end of this guide, you will understand the mechanics, applications, and the exact process for executing this high-performance bind.
Alternative Names: Instrument-Assisted Constrictor, Forceps Constrictor, Surgeon’s Binding Knot, Modified Miller’s Knot.
What Is a Constrictor Surg. Instrument Knot?
The Constrictor Surg. Instrument is a binding knot designed to be permanent or semi-permanent. Unlike a clove hitch, which can slip or work loose if the tension is inconsistent, the constrictor knot features a "nipping" turn that locks the rope against itself. When tied using the Surg. Instrument method, the knot is applied with mechanical assistance to ensure the turns are perfectly seated and the tension is maximized.
Practical Applications
In the context of outdoor rope techniques, this knot serves several critical functions:
- Gear Repair: Fixing split wooden handles or securing ferrules on trekking poles.
- Whipping Rope Ends: Providing a permanent bind to prevent synthetic or natural fiber ropes from fraying.
- Hose Clamps: In emergency survival situations, it can be used to stop leaks in rubber tubing or hoses.
- Lashing: Acting as the primary starting or finishing bind for complex lashings in bushcraft.
- Bundle Security: Compressing sleeping bags or rolled gear more tightly than standard straps.
The "Surg. Instrument" aspect refers to the use of forceps or needle-nose pliers. This is a game-changer for technical specialists working with thin cords like micro-cord or 275-lb paracord, where manual dexterity is limited by the cord’s small surface area.
Materials and Tools Needed
To successfully execute the Constrictor Surg. Instrument knot, you must select the right materials. The effectiveness of a binding knot is heavily dependent on the friction between the cord and the object.
1. Recommended Cordage
- Paracord (550 or 275): The slight elasticity of nylon paracord allows the knot to "bite" into the object.
- Bank Line (Tarred Twine): Excellent for permanent binds due to the high-friction tar coating.
- Dyneema/Spectra: High strength, though their slipperiness requires extra care during the tightening phase.
- Suture or Monofilament: For ultra-fine technical repairs.
2. Tools
- Forceps or Hemostats: The primary tool for the "Surg. Instrument" technique. These allow you to reach under tight turns without loosening the knot.
- Cutting Tool: A sharp knife or specialized snips to clean up the ends.
- The "Vessel": In knot-tying terminology, the "vessel" is the object you are tying around (e.g., a pole, a bundle of sticks, or a coiled rope).
How to Tie Constrictor Surg. Instrument?
To ensure the highest level of security and professional application, follow these steps exactly as outlined. This technique focuses on using an instrument to facilitate the crossing and pulling of the cord.
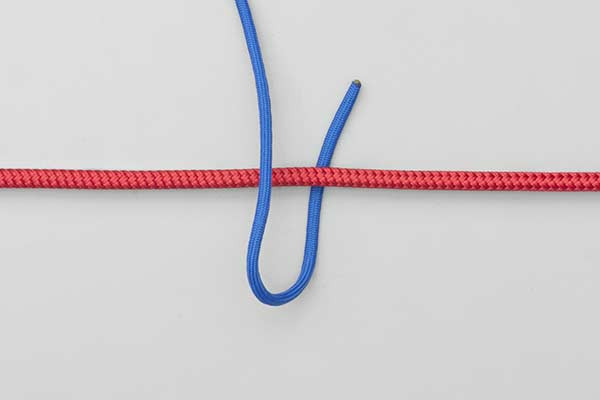
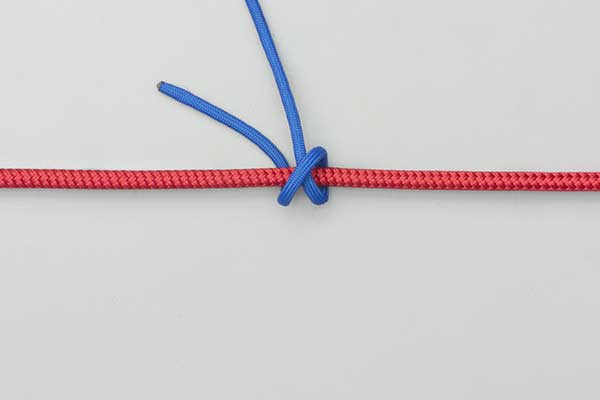
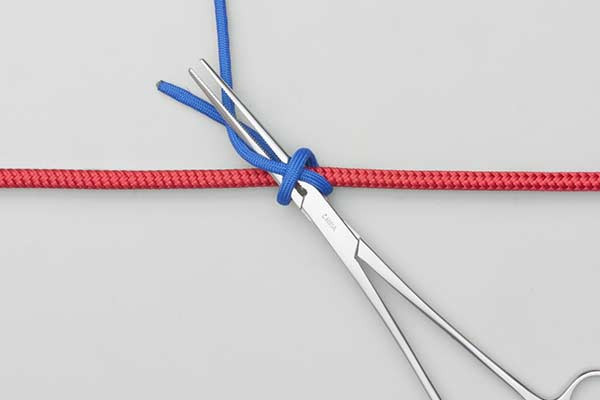
- Pass the suture twice around the vessel so that the second turn crosses over the first.
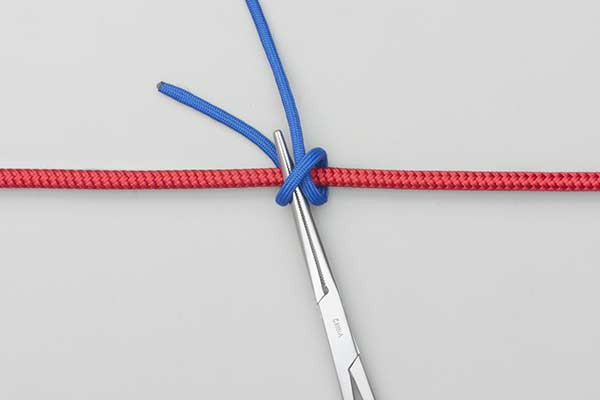
- Insert the forceps under the second turn.
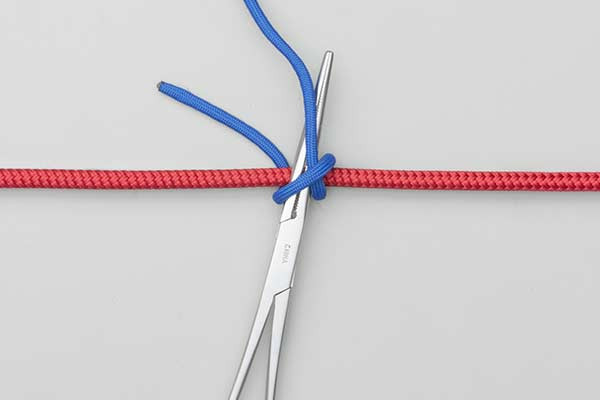
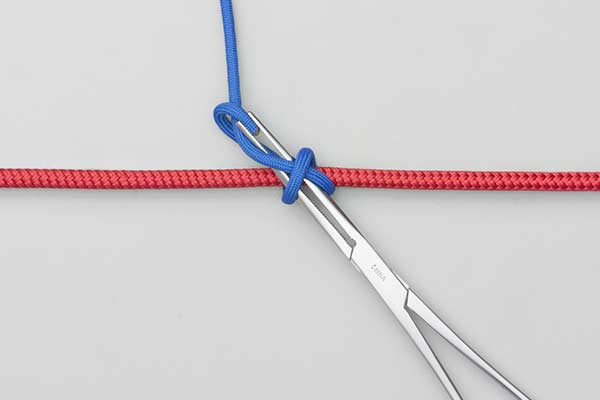
- Twist the forceps around the standing end to create the half knot.
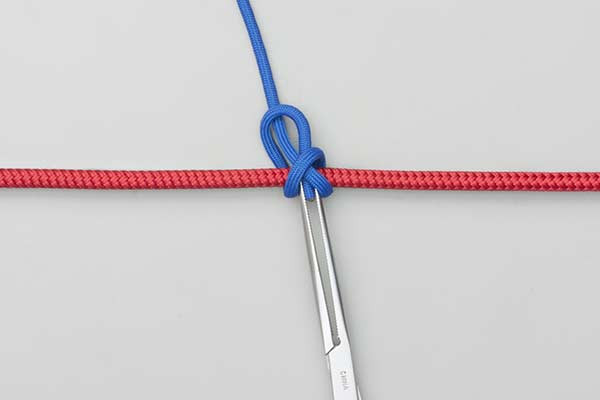
- Pick up the end with the forceps and draw it back through the knot.
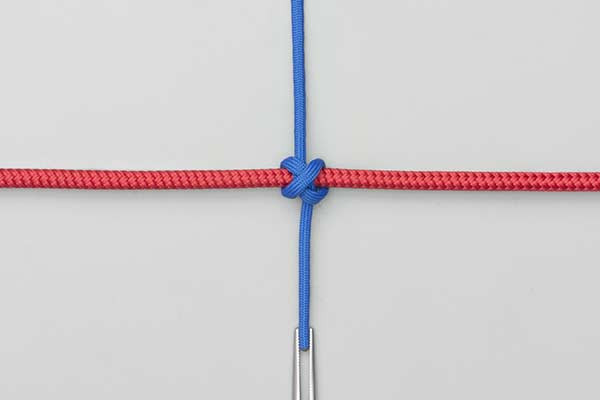
- Tighten and cut the ends.
Technical Breakdown of the Steps
While the instructions above are the gold standard for the Constrictor Surg. Instrument knot, understanding the why behind each step can help beginners master it faster.
- The Overriding Turn: In Step 1, crossing the second turn over the first creates the "bridge" that eventually traps the working end. This is the secret to the constrictor’s legendary grip.
- The Forceps Insertion: By inserting the forceps under the second turn in Step 2, you are preparing to create a path for the working end without having to manually hold the tension, which often leads to the knot collapsing.
- The Twist: Step 3 effectively creates a "simple knot" or half-hitch structure within the binding. This internal friction is what prevents the knot from ever coming undone.
- The Draw-Back: Using the forceps in Step 4 ensures that the working end is pulled through with maximum clearance, avoiding snags on the underlying material.


Common Mistakes to Avoid
Even seasoned experts in rope knots can encounter issues with the Constrictor Surg. Instrument if they rush the process.
- Improper Crossing: If the second turn does not cross over the first in Step 1, the knot will likely turn into a simple clove hitch. A clove hitch will fail under high-vibration or if the object shrinks (like drying wood).
- Slack in the Standing End: If the standing end is not kept taut while the forceps are twisting, the "half knot" will be sloppy, leading to a weak bind.
- Cutting Too Close: While the instructions say to "cut the ends," always leave a small 1/8th inch (3mm) tail in outdoor applications. Synthetic ropes can settle and "crawl" slightly when first under load.
- Using on Flat Surfaces: The Constrictor Surg. Instrument is designed for curved surfaces (vessels). Using it on a square box may result in the knot losing tension at the flat edges.
Related Knots and Splicing
Expanding your knowledge of outdoor rope techniques involves understanding how the Constrictor Surg. Instrument relates to other essential binds.
- Clove Hitch: A fundamental knot used to start many lashings. It is similar in appearance to the constrictor but lacks the locking turn, making it easier to untie but less secure.
- Miller’s Knot: Traditionally used for tying the tops of sacks. It is a variation of the binding knot family that provides a secure close but is slightly bulkier than the constrictor.
- Surgeon’s Knot: A modification of the reef knot (square knot) that adds an extra twist in the first throw. It is excellent for maintaining tension while the second half of the knot is being tied.
- Transom Knot: Used in bushcraft to join two poles at right angles. It uses a constrictor-like structure to ensure the cross-member does not wobble or slide.
Final Words: Why Precision Matters
The Constrictor Surg. Instrument knot is a testament to the evolution of rope knots. By integrating surgical precision with traditional binding mechanics, we create a tool that is indispensable for the modern outdoorsman, technician, and survivalist.
This knot is not intended for every situation—its primary drawback is that it is often so tight that it must be cut off rather than untied. However, when you need a "set it and forget it" solution for gear repair or heavy-duty binding, there is no better choice. Practice this technique with various cordages and tools until the movement of the forceps becomes second nature. In the field, the ability to execute a perfect Constrictor Surg. Instrument bind can save your gear and ensure the success of your expedition.
Whether you are whipping the end of a new climbing rope or fixing a structural component of your camp, remember: the strength of your setup is only as good as the knots that hold it together. Master the precision of the instrument tie, and you master your environment.
