
In the world of vertical exploration, whether you are an arborist tending to a canopy or a rescue professional navigating steep terrain, your safety and efficiency depend entirely on the integrity of your rope knots. Among the vast array of friction hitches used in modern outdoor rope techniques, the Distel Hitch stands out as a reliable, high-performance tool. Known for its consistent grip and ease of release, it has become a staple for climbers who require a "hitch-climbing" system that won’t bind up under heavy loads.
The Distel Hitch is a specialized friction hitch that belongs to the family of "closed-loop" hitches, typically tied using a dedicated eye-to-eye tail or lanyard. Its primary advantage is its predictability; unlike the traditional Prusik, the Distel is directional and tends to stay "set" in a way that allows for smoother movement during both ascent and descent. This article provides a comprehensive deep dive into the Distel Hitch, ensuring you have the technical knowledge to implement it safely in your rigging or climbing system.
Alternative Names: Distel Friction Hitch, Distel Knot, The Distel.
What Is a Distel Hitch?
The Distel Hitch is a friction hitch (also known as a slide-and-grip knot) that is used to attach a smaller diameter cord to a larger diameter host rope. In technical climbing, it serves as a mechanical advantage tool, allowing the climber to ascend the rope by sliding the knot upward and then "loading" it, at which point the knot bites into the host rope to hold the climber’s weight.
Practical Uses and Advantages
The Distel is favored in the arboricultural industry for several reasons:
- Consistent Friction: It provides a very stable level of friction that is less likely to "glaze" (melt due to heat) compared to other hitches if the correct cordage is used.
- Easy Release: Even after being heavily weighted, the Distel Hitch can be "broken" or released with a simple downward push on the top of the knot, making descents much more controlled.
- One-Way Action: It is designed to grip primarily in one direction, which reduces the "slop" or "sit-back" often experienced with symmetrical knots like the Prusik.
While it is most commonly seen in tree climbing, it is also utilized in hauling systems and as a secondary safety backup in specialized rescue configurations. Understanding the mechanics of the Distel Hitch knot is essential for any professional working with life-support lines.
Materials and Tools Needed
To tie a secure and functional Distel Hitch, you must select materials that are compatible and meet safety standards for climbing. Using mismatched gear can lead to "hitch failure," where the knot either fails to grip or becomes impossible to move.
1. The Host Rope (Main Climbing Line)
The host rope is typically a 16-strand, 24-strand, or kernmantle rope with a diameter ranging from 11mm to 13mm. The texture of the rope’s sheath plays a significant role in how the hitch performs.
2. The Hitch Cord (Lanyard)
The Distel Hitch is most effectively tied using an eye-to-eye lanyard. This is a short length of cord (usually 24 to 32 inches) with factory-sewn or spliced eyes at both ends.
- Diameter: The hitch cord should generally be 2mm to 3mm smaller than the host rope. Common sizes include 8mm or 9mm cordage.
- Material: Look for heat-resistant fibers such as Technora, Nomex, or Kevlar blends. These materials prevent the knot from melting during rapid descents.
3. Connecting Hardware
You will need a high-quality triple-action locking carabiner. In most climbing systems, this carabiner connects the two eyes of the lanyard to the climber’s harness or a micro-pulley.
How to Tie Distel Hitch?
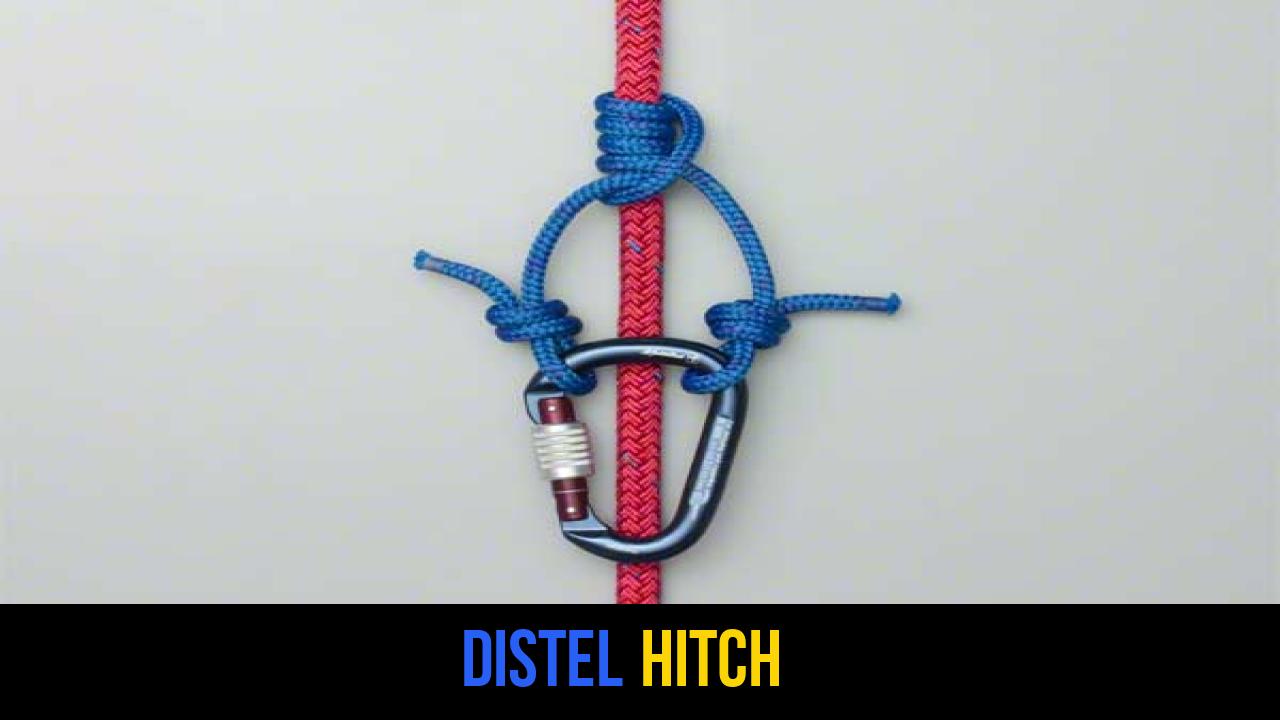
Follow these steps precisely to ensure the knot is formed correctly. This configuration uses a lanyard with pre-formed eyes for maximum security.
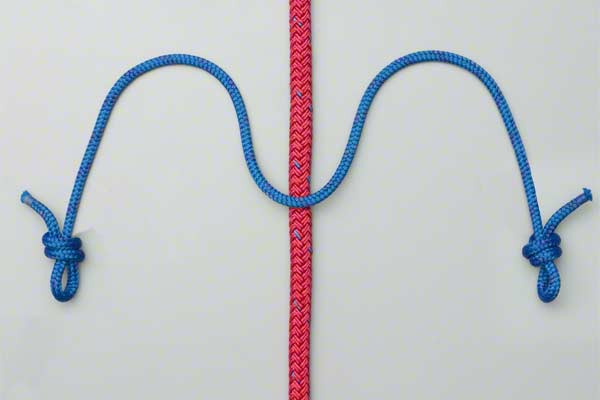
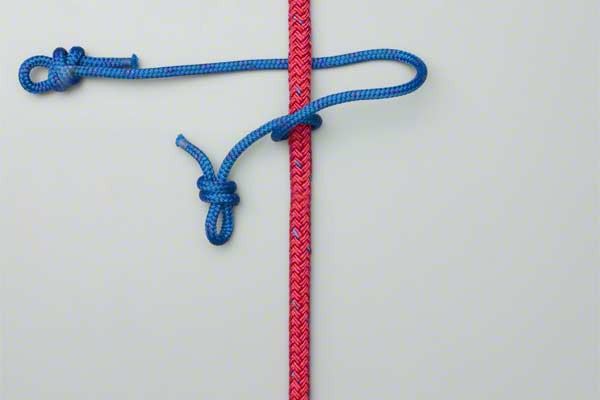
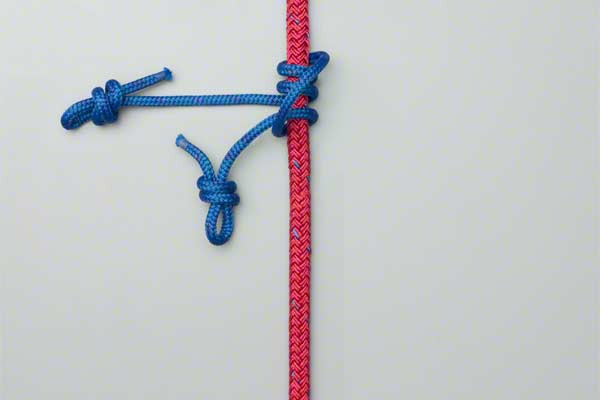
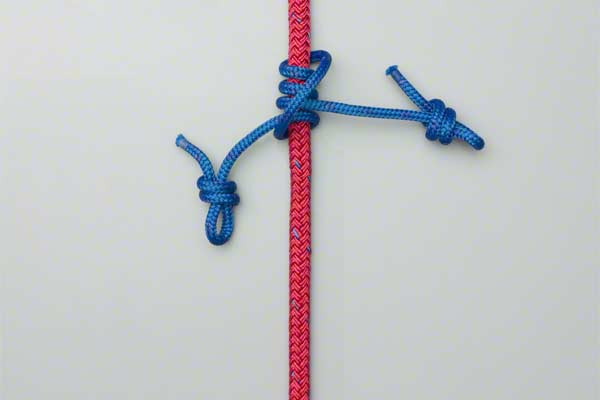
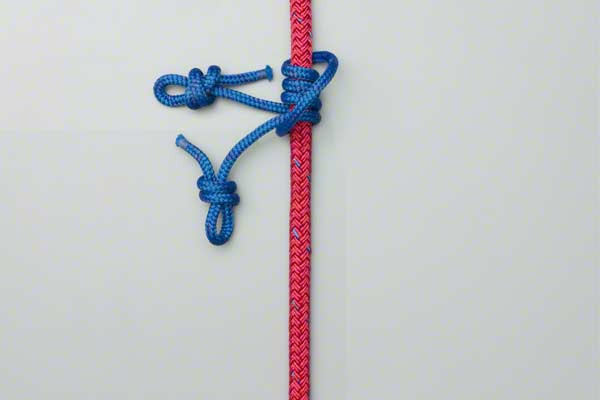
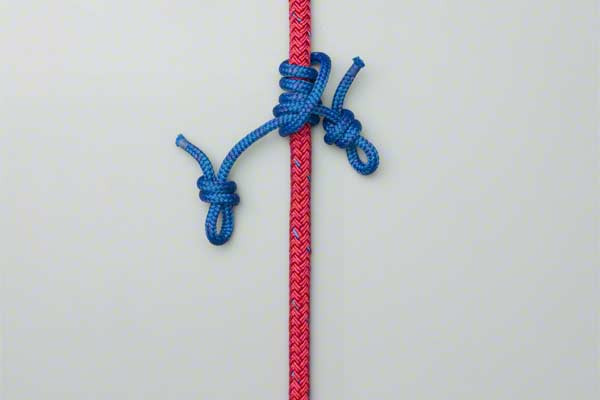
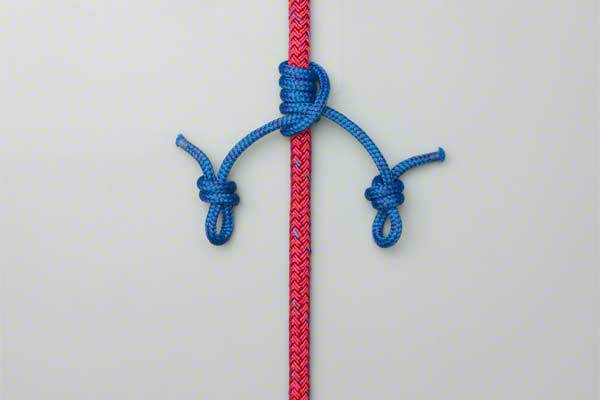
- Use a lanyard with an eye at each end.
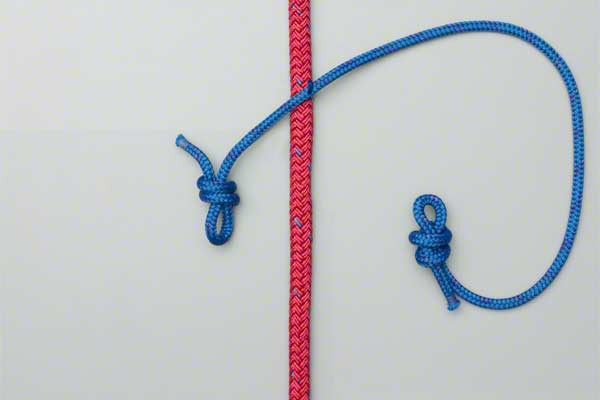
- Wrap the longer end around the climbing rope to make two Half Hitches.
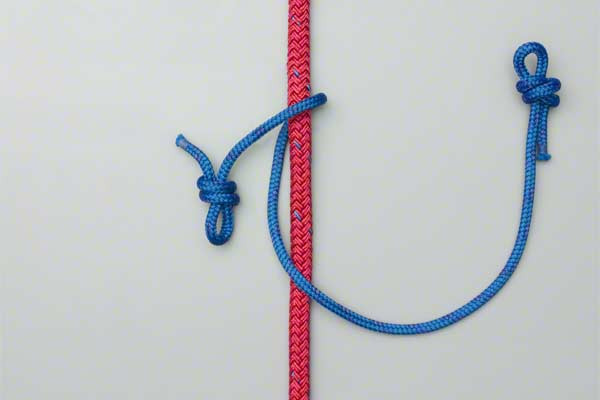
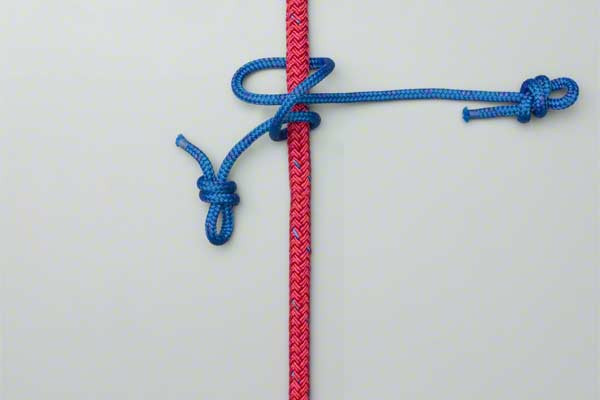
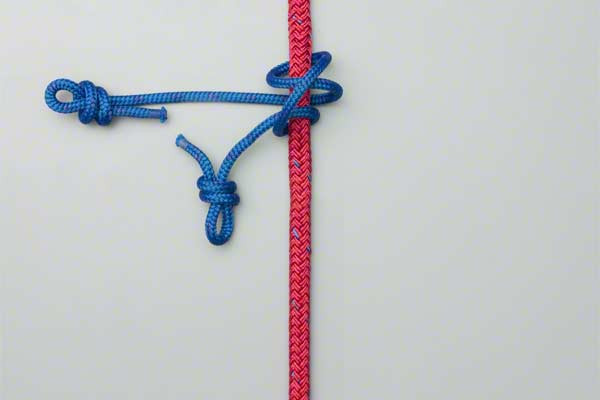
- Then continue around and through the top Half Hitch three more times.
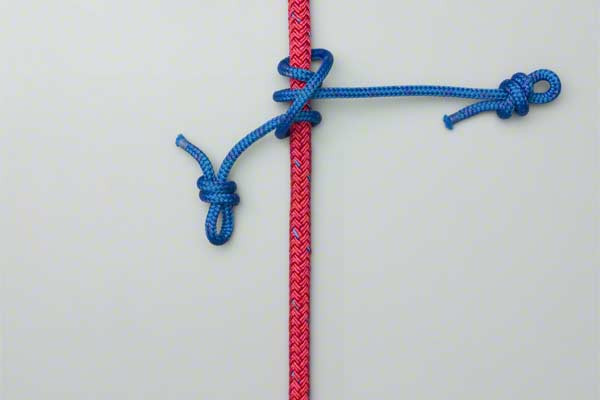
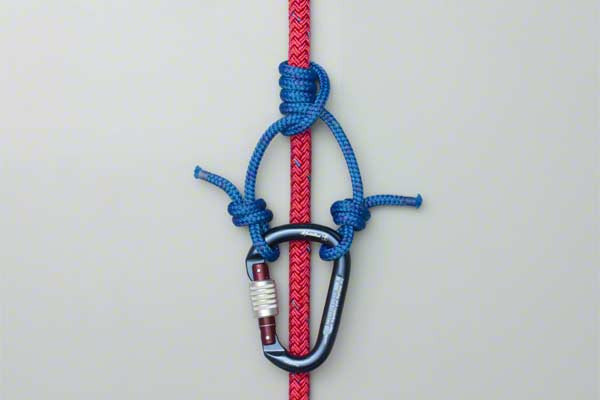
- Balance the lengths and pull tight.
- Attach the carabiner.
Note: After following these steps, always perform a "set and check" by weighting the knot at ground level before ascending.
Common Mistakes to Avoid
Even experienced climbers can make errors when rigging outdoor rope techniques. Accuracy is paramount when your safety is on the line.
Incorrect Wrap Direction
The wraps must be tidy and stacked. If the wraps overlap or cross each other haphazardly, the hitch may not grip the rope consistently, leading to dangerous slips.
Mismatched Cord Diameters
If the hitch cord is too thick relative to the host rope, there won’t be enough "bite," and the knot will slide. Conversely, if the cord is too thin, it may grip too tightly, making it nearly impossible to slide the knot upward during an ascent.
Failure to "Dress and Set"
A knot is not finished until it is dressed (arranged so all parts are in their proper place) and set (tightened by hand). A loose Distel Hitch can fail to engage when you transition your weight onto it.
Ignoring Heat Damage
Friction creates heat. If you descend too quickly, the friction between the Distel Hitch knot and the host rope can "glaze" the cordage. Always inspect your hitch cord for stiff spots or discoloration before every use.
Related Knots and Splicing
Understanding the broader context of rope knots helps you choose the right tool for the job. Here are a few knots related to the Distel:
- Prusik Knot: A classic, symmetrical friction hitch used for ascending ropes and rescue scenarios.
- Schwabisch Hitch: A variation of the Distel that offers a slightly different friction profile for smoother release.
- Michoacan Hitch: A complex friction hitch that provides excellent grip and is highly favored by professional arborists.
- Blake’s Hitch: A friction hitch that can be tied with the end of a rope, requiring no closed loop or eyes.
- Clove Hitch: A foundational knot used to secure a rope to a spar or post, often forming the basis of other hitches.
The Physics of the Distel Hitch
To truly master the Distel Hitch, one should understand the physics of friction. The knot works based on the Capstan Equation, where the holding power increases exponentially with the number of wraps (turns) around the rope.
By making two Half Hitches and then continuing through the top wrap three more times, you are creating a high-surface-area interface. This specific structure allows the knot to compress the host rope when load is applied to the eyes of the lanyard. Because the load is distributed across multiple wraps, the "bite" is secure but the pressure is not so localized that it damages the rope fibers.
Maintenance and Inspection
Your hitch cord is a "consumable" item. Unlike your climbing rope, which may last years, a hitch cord used for a Distel Hitch should be replaced frequently.
- Daily: Check for fraying or "fuzziness."
- Weekly: Feel for "flat spots" in the core.
- Monthly: If you climb daily, consider replacing the cord every 30 to 60 days to ensure peak performance.
Final Words
The Distel Hitch is a masterpiece of functional knot-tying. It bridges the gap between traditional friction hitches and modern mechanical ascenders, offering a lightweight, reliable, and cost-effective solution for vertical mobility. By mastering this knot, you add a versatile tool to your repertoire of outdoor rope techniques, enhancing both your safety and your efficiency in the field.
Remember, knot-tying is a perishable skill. Practice the Distel Hitch knot at ground level until the muscle memory is second nature. Whether you are a weekend adventurer or a seasoned professional, the quality of your hitches is the foundation of your climbing safety. Always stay vigilant, respect the equipment, and never stop refining your technical rope skills.
[content]
