
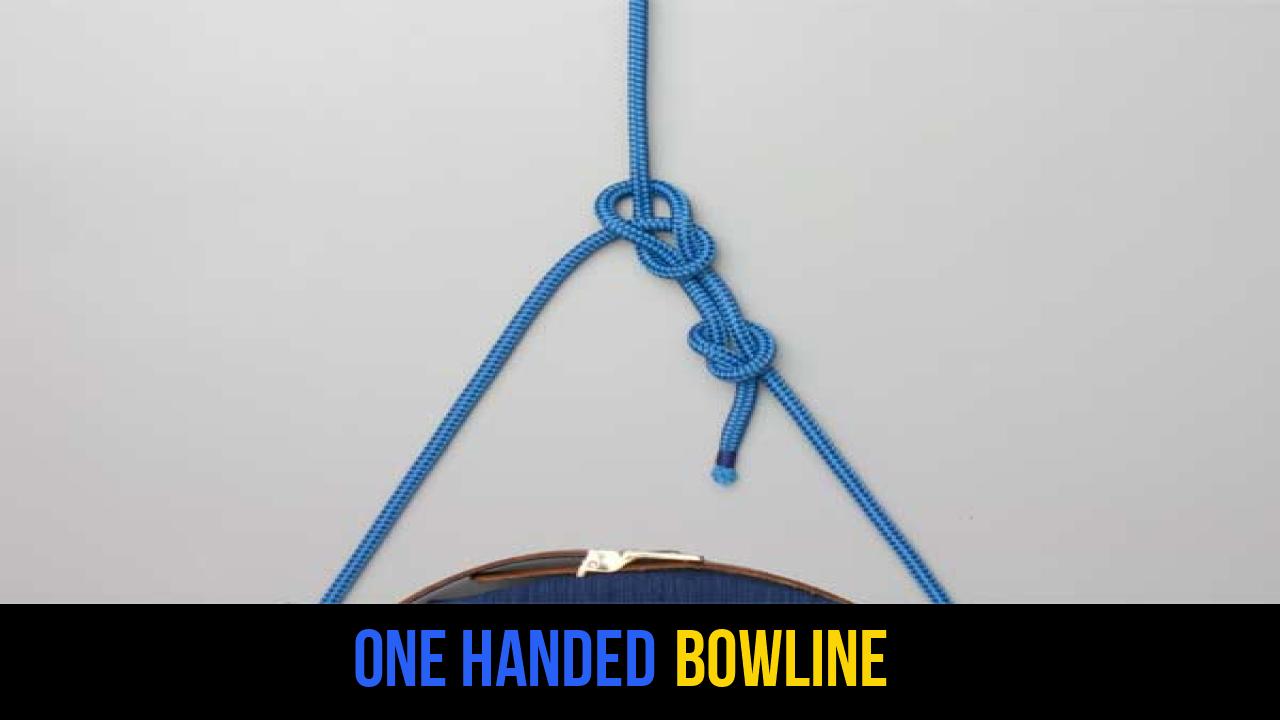
In the world of wilderness survival and maritime tradition, few skills are as legendary or as life-saving as the ability to tie a knot with a single hand. Whether you are a seasoned sailor, a high-altitude climber, or a dedicated bushcraft enthusiast, mastering rope knots is a fundamental requirement. Among the vast library of hitches, bends, and loops, the One Handed Bowline stands out as the ultimate "survival knot."
Imagine a scenario where you have fallen into a crevasse or are being swept away by a current. You have managed to grab a rescue line with one hand, but your other arm is injured or occupied holding onto a ledge. In this high-stakes moment, the standard two-handed bowline is useless. You need a technique that allows you to secure a fixed loop around your torso using only one hand.
This article provides a comprehensive deep dive into the One Handed Bowline knot, its mechanical advantages, and the precise methodology required to execute it under pressure. By the end of this guide, you will understand why this specific entry in the catalog of outdoor rope techniques is considered a mandatory skill for search and rescue professionals worldwide.
Alternative Names: Survival Bowline, Rescue Bowline, Single-Handed Bowline, Emergency Loop.
What Is a One Handed Bowline?
The One Handed Bowline is a specialized variation of the classic Bowline knot—often referred to as the "King of Knots." While the traditional bowline is used to form a fixed loop at the end of a rope that neither slips nor binds under load, the one-handed version is specifically adapted for self-rescue.
Definition and Mechanical Integrity
Mechanically, the knot creates a secure, non-slipping loop. Its primary advantage is that it can be tied around one’s own body using only the dominant hand while the rope is already under some tension or being held. Once set, the knot is incredibly strong and can withstand significant force, making it ideal for hauling a person to safety.
Practical Uses in the Field
- Search and Rescue (SAR): If a victim is conscious but unable to use both hands, they can be instructed to tie this knot around themselves.
- Maritime Safety: Sailors use this technique if they fall overboard and are thrown a line while trying to stay afloat in rough seas.
- Climbing and Mountaineering: It serves as a secondary emergency skill if a climber becomes stranded on a face and needs to be hoisted without a harness.
- Tactical Applications: Used by emergency responders who may need to secure themselves to a line while carrying equipment or a casualty.
Materials and Tools Needed
To practice and master the One Handed Bowline knot, you need the right equipment. Not all ropes are created equal, and the "feel" or hand of the rope significantly impacts your ability to tie this knot quickly.
Recommended Rope Types
- Static Kernmantle Rope: This is the gold standard for rescue work. It has low stretch, making the loop more stable once tied. A diameter of 9mm to 11mm is ideal for grip.
- Nylon Braid: Excellent for practice because of its flexibility. It allows the loops to seat properly without excessive friction.
- Manila or Hemp: While traditional, these can be rough on the skin. If practicing with natural fibers, ensure the rope is "broken in" and supple.
Tools and Considerations
- Gloves: When practicing outdoor rope techniques, lightweight leather work gloves can prevent rope burn during high-repetition training.
- Anchor Point: You will need a sturdy post or a heavy object to act as the "standing end" (the part of the rope leading away from you to the rescuer).
- Environment: Start practicing in a controlled, dry environment before attempting to tie the knot in wet or cold conditions where manual dexterity is compromised.
How to Tie One Handed Bowline?
The following instructions are the industry standard for executing this knot safely and efficiently. Accuracy is paramount; a poorly tied rescue knot can fail under load. Follow these steps exactly to ensure your safety.
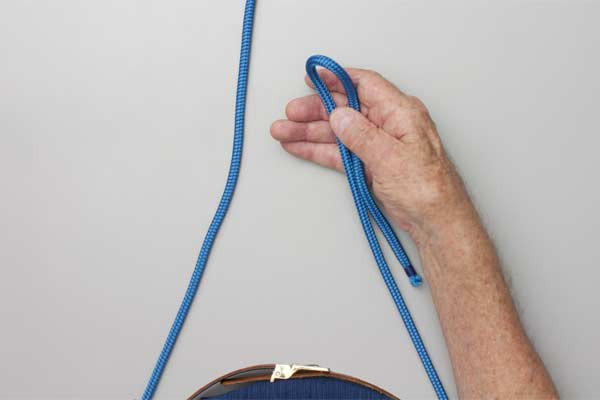
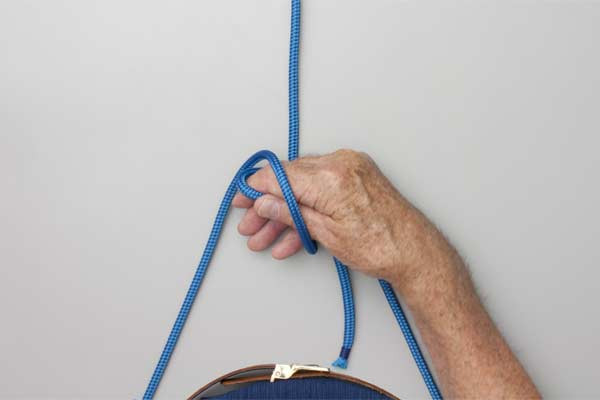
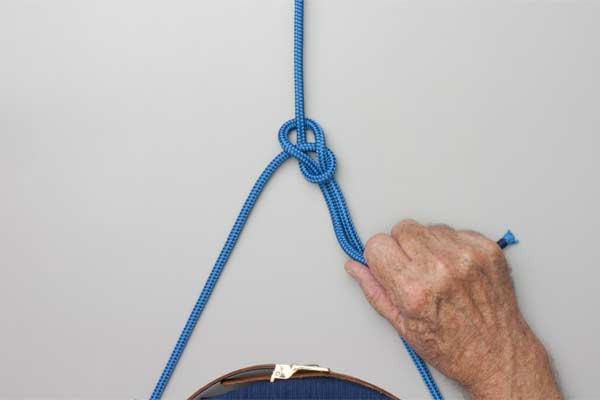
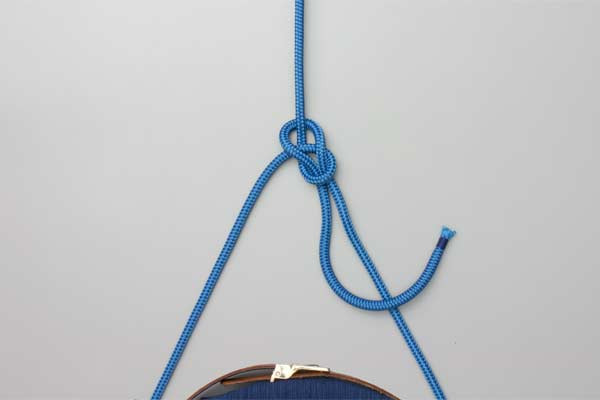
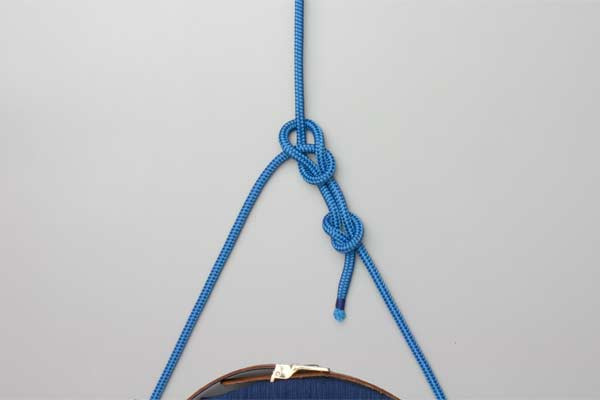
- With the rope round your back, hold about half a meter of the short end in your hand.
- Hook the standing end with your thumb to form a loop around your hand.
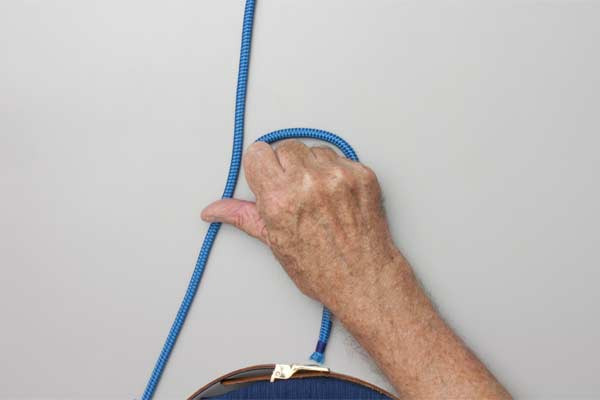
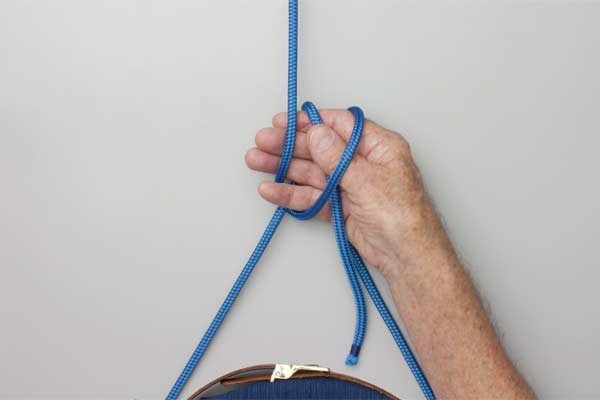
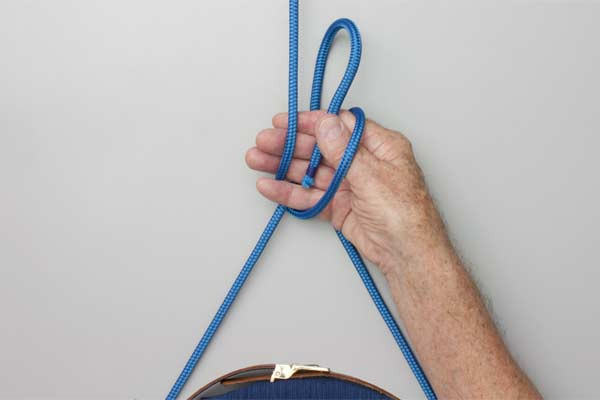
- Pass the short end round the standing end and pull it back through the loop.
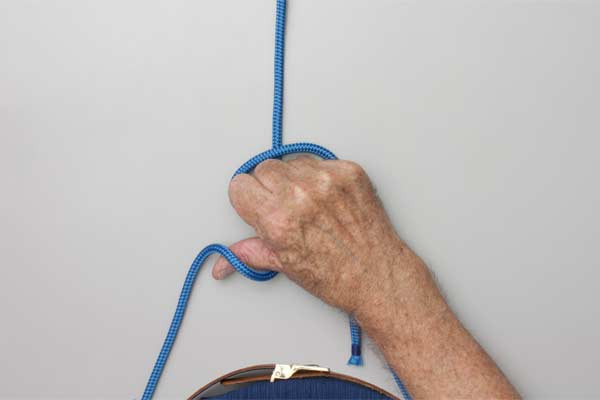
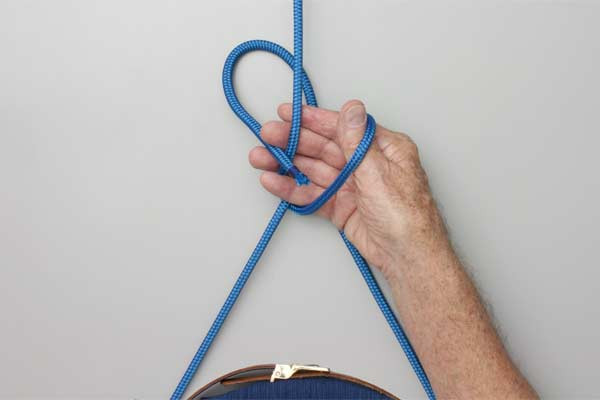
- Secure the end with an overhand knot to the loop.

Common Mistakes to Avoid
Even expert outdoorsmen can fumble the One Handed Bowline when adrenaline is high. Awareness of these common errors is the first step toward mastery.
1. Insufficient Tail Length
One of the most dangerous mistakes is not leaving enough of the "short end" (the tail) after the knot is completed. If the tail is too short, the knot may "crawl" or slip when loaded, leading to a complete failure. Always ensure at least 4–6 inches of tail remain.
2. Tying the Loop Too Tight
When you hook the standing end to form the initial loop, beginners often pull it too tight against their wrist. This prevents the hand from moving freely to complete the "pass the short end" phase. Keep the initial loop loose enough to allow for wrist rotation.
3. Neglecting the Backup Knot
The instruction source explicitly states to secure the end with an overhand knot. In modern safety protocols, this is often called a "stopper knot." Without this overhand knot, the bowline can become untied if the rope is shaken or cycled through loading and unloading.
4. Wrong Direction of Wrap
If you pass the short end around the standing end in the wrong direction (clockwise vs. counter-clockwise depending on your hand orientation), you may create a "Left-Handed Bowline" (also known as a Cowboy Bowline). While still a knot, it is generally considered less secure in rescue scenarios because the tail ends up on the outside of the loop.
Related Knots and Splicing
To truly understand rope knots, it is helpful to see how the One Handed Bowline relates to other essential hitches and loops used in the field.
- Standard Bowline: The foundational loop knot used in almost all outdoor sectors; it is prized for being easy to tie and easy to undo even after heavy loading.
- Figure Eight on a Bight: A robust, highly visible loop knot used primarily in climbing for attaching to a harness; it is exceptionally strong but requires two hands to tie.
- Running Bowline: Effectively a "noose" version of the bowline, this knot creates a sliding loop that can be used to retrieve logs or gear from a distance.
- Water Bowline: A variation involving an extra half-hitch, making it more secure when using synthetic or slippery ropes in wet conditions.
- Sheet Bend: A close relative of the bowline used for joining two ropes of unequal diameters together securely.
Final Words
The One Handed Bowline is more than just a trick; it is a critical component of professional outdoor rope techniques. Its utility in emergency situations cannot be overstated. However, like any technical skill, it requires "muscle memory." You should be able to tie this knot in total darkness, with your eyes closed, and while under physical stress.
The key to success lies in the final step: always secure the end with an overhand knot. This ensures that the loop remains fixed and life-ready. We encourage all hikers, sailors, and climbers to integrate this knot into their regular training regimen. In the unpredictable world of the great outdoors, the One Handed Bowline knot might just be the most important thing you ever learn to do with one hand tied behind your back—or at least, one hand busy holding on for dear life.
Always remember: Practice until you can’t get it wrong, not just until you get it right.
