
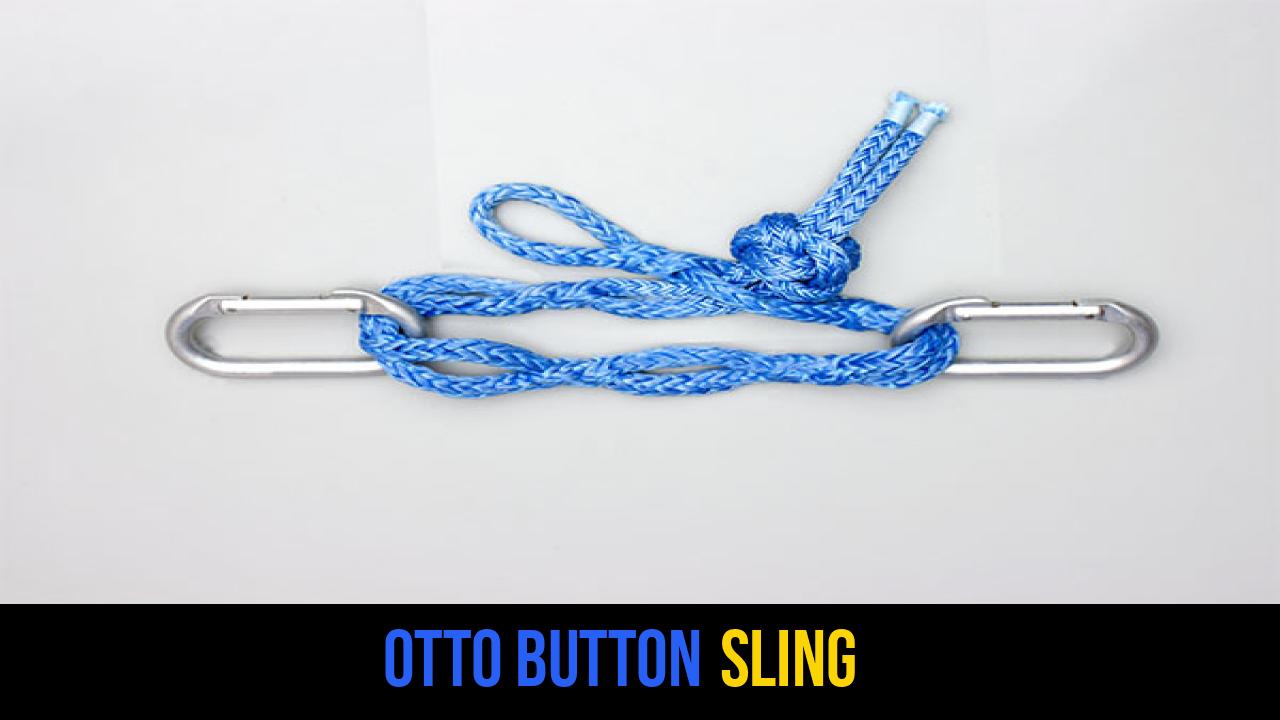
In the world of high-performance rigging and technical outdoor gear, the Otto Button Sling stands as a testament to the ingenuity of modern splicing techniques. Whether you are a professional arborist, a competitive sailor, or an outdoor enthusiast focused on light-weight recovery systems, understanding how to construct this specialized sling is a vital skill.
The Otto Button Sling is essentially an adjustable soft shackle or a multi-loop rigging sling. Unlike traditional slings that have a fixed length, the "button" design allows the user to select various attachment points along the length of the rope, providing unparalleled versatility in the field. By utilizing the inherent properties of hollow-braid synthetic ropes, this sling achieves incredible strength-to-weight ratios, often replacing heavy steel hardware in critical applications.
This guide will walk you through the technical requirements, the materials needed, and the precise steps to create your own Otto Button Sling. We will also explore the mechanics of the Brummel Splice and why the Diamond Knot is the gold standard for this specific assembly.
Alternative names for the Otto Button Sling include: Multi-Hole Soft Shackle, Adjustable Button Sling, Rigging Button Sling, and the Spliced Multi-Loop.
What Is an Otto Button Sling?
An Otto Button Sling is a high-strength, adjustable rigging tool made primarily from 12-strand hollow-braid rope, such as AmSteel-Blue or other High-Modulus Polyethylene (HMPE) fibers. Its primary function is to provide a secure, non-mechanical connection point that can be adjusted for length by "buttoning" a stopper knot through a series of spliced openings.
Practical Uses and Applications
- Arboriculture: Used as a lightweight alternative to heavy steel blocks or for creating adjustable redirects in climbing and rigging lines.
- Sailing and Marine: Ideal for attaching blocks to decks or masts where weight and corrosion are concerns.
- Off-Road Recovery: Serves as an adjustable soft shackle for connecting kinetic ropes or winching lines to various anchor points.
- Industrial Rigging: Used in "dead-eye" configurations where a variable length is required to choke a load securely.
The beauty of the Otto Button Sling lies in its "locked" construction. Because it utilizes a series of Locked Brummel Splices, the holes do not collapse or slip under tension, ensuring that the connection remains secure even when the rope is subjected to heavy loads.
Materials and Tools Needed
To create a professional-grade Otto Button Sling, you must use the correct materials. Using the wrong type of rope can lead to catastrophic failure, as the Brummel splice relies on the "Chinese Finger Trap" friction of hollow-braid construction.
Recommended Rope Types
- 12-Strand Hollow Braid: This is mandatory. Materials like Dyneema, Spectra, or AmSteel-Blue are preferred for their high tensile strength and ease of splicing.
- Diameter Considerations: For general rigging, 1/4" (6mm) to 1/2" (12mm) diameters are most common. Ensure the rope’s Working Load Limit (WLL) exceeds your intended application.
Essential Tools
- Splicing Fid or Wire Puller: A specialized tool to pull the rope through itself.
- Sharp Scissors or Ceramic Knife: HMPE fibers are notoriously difficult to cut and will dull standard steel blades quickly.
- Permanent Marker: For marking the precise points where the splices will begin and end.
- Measuring Tape: To ensure consistent spacing between the "button holes."
- Masking Tape: To taper the ends of the rope for easier passage through the braid.
How to Tie Otto Button Sling?
Creating the Otto Button Sling requires precision and attention to detail. Follow these steps exactly as outlined to ensure the structural integrity of the sling.
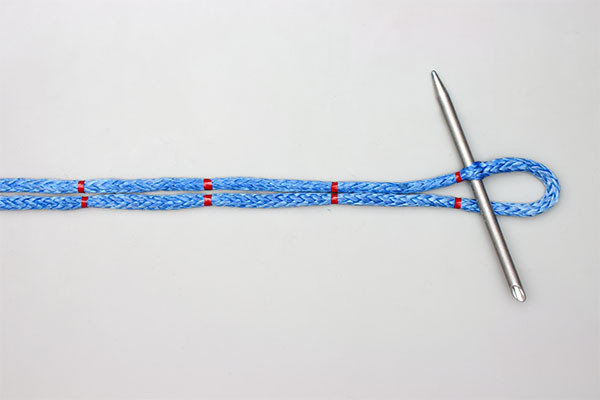
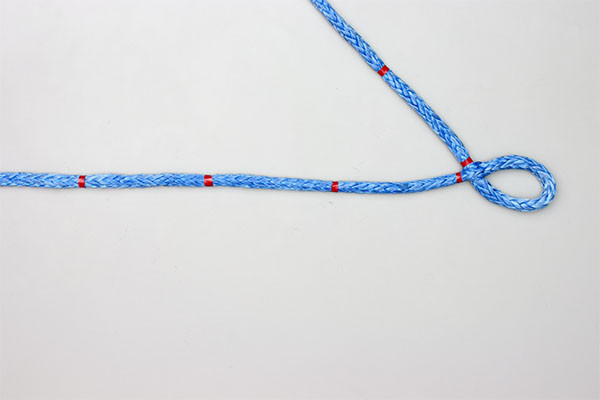
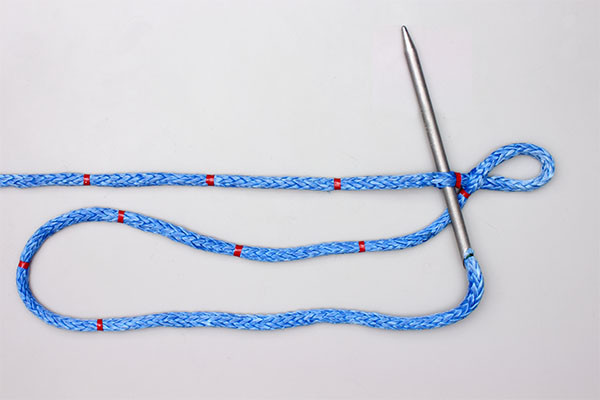
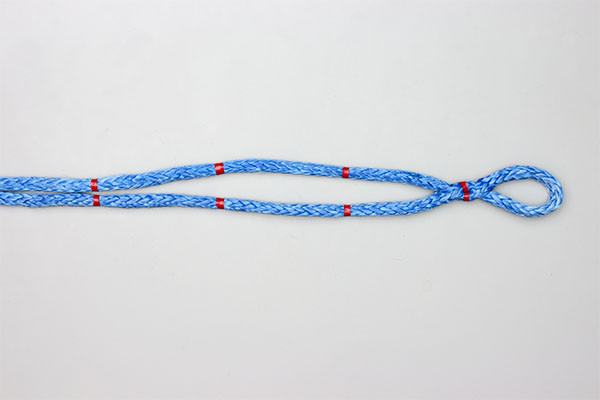
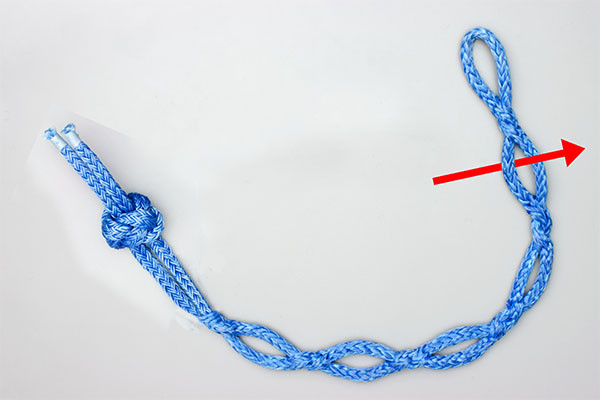
- Mark the rope and pass the ends through each other to create a locked Brummel Splice.
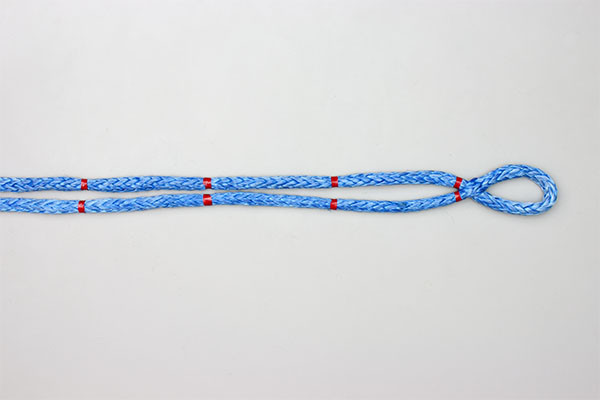
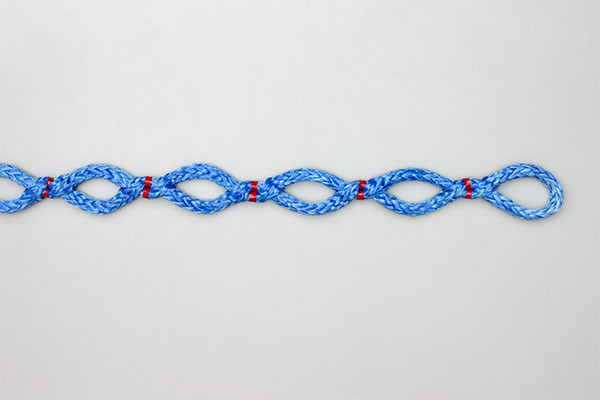
- Repeat along the rope’s length to create the holes.
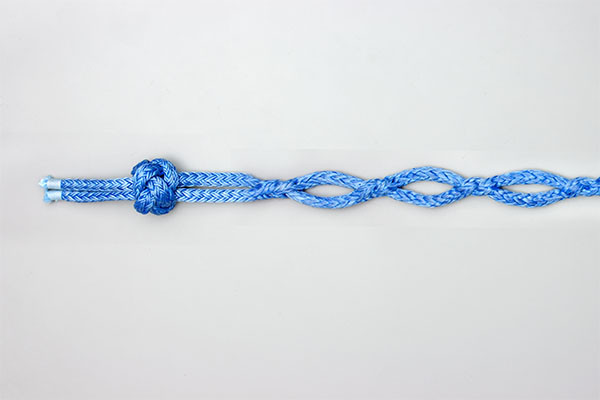
- Tie a Diamond Knot in the end.
- Pass the Diamond knot through a selected hole to make the Sling.
Technical Deep Dive: Understanding the Steps
While the steps above provide the core framework, a professional rigger understands the why behind each action.
The Locked Brummel Splice
The first step involves creating the "locked" mechanism. A standard splice can slip if not under tension. However, by passing the ends through each other (the Locked Brummel), you create a mechanical lock that prevents the eye from opening regardless of the load. This is the foundation of the Otto Button Sling knot logic.
Creating the "Button Holes"
By repeating this process along the length, you are essentially creating a ladder of high-strength eyes. It is crucial to maintain consistent spacing—usually 3 to 6 inches apart—to ensure the sling remains functional and easy to "button" in cold or wet conditions.
The Diamond Knot (Stopper Knot)
The Diamond Knot, also known as the Lanyard Knot, is used because of its symmetrical shape and large footprint. When tensioned, the knot expands slightly, preventing it from pulling back through the spliced holes. In technical rope knots, the Diamond Knot is preferred over a standard overhand knot because it distributes the load more evenly across the fibers, reducing the risk of the rope snapping at the knot.


Common Mistakes to Avoid
Even for experienced outdoorsmen, splicing the Otto Button Sling can present challenges. Avoid these common pitfalls to ensure your gear is safe:
- Inconsistent Hole Spacing: If the holes are too close together, you compromise the integrity of the rope’s "spine." If they are too far apart, the sling loses its adjustability.
- Failure to Taper: When finishing the ends of a Brummel splice, failing to taper the buried tail can create a "stress riser"—a specific point where the rope is significantly more likely to break.
- Using Twisted or Double-Braid Rope: The Otto Button Sling instructions are designed specifically for hollow-braid rope. Attempting this on twisted Manila or double-braid climbing rope will result in a knot that cannot hold a load.
- Improper Knot Dressing: The Diamond Knot must be "dressed" (tightened and shaped) perfectly. A loose Diamond Knot can deform under heavy load and slip through the button hole.
- Ignoring Wear and Tear: HMPE ropes are sensitive to UV degradation and abrasion. Always inspect your Otto Button Sling for fuzziness or "glazing" (melting) before use.
Related Knots and Splicing
To further your mastery of outdoor rope techniques, it is helpful to understand how the Otto Button Sling relates to other rigging configurations.
- The Soft Shackle: A lightweight alternative to steel shackles, using a single loop and a stopper knot to secure loads.
- The Whoopie Sling: An adjustable sling using a bury splice that allows for infinite adjustment within a range, often used in hammock camping and arboriculture.
- The Diamond Knot: A decorative yet highly functional stopper knot that provides a secure "head" for soft shackles and slings.
- The Eye Splice: The most basic form of rope termination, creating a permanent loop at the end of a line.
Final Words on the Otto Button Sling
The Otto Button Sling is a masterpiece of modern cordage engineering. By combining the ancient art of the Diamond Knot with the structural security of the Locked Brummel Splice, riggers have created a tool that is as versatile as it is strong.
Its primary advantage lies in its adjustability. In the field, conditions change rapidly. Having a sling that can adapt its length without the need for bulky hardware or complex re-tying saves time and increases safety. Whether you are cinching a load in the back of a truck or setting a high-point redirect in a massive oak tree, the Otto Button Sling provides a reliable, professional-grade solution.
By following these instructions and practicing your splicing technique, you can add one of the most effective outdoor rope techniques to your repertoire. Remember: safety first. Always test your splices with a non-critical load before putting them into professional service.
Keywords Included: Otto Button Sling, Otto Button Sling knot, rope knots, outdoor rope techniques, Locked Brummel Splice, Diamond Knot, technical outdoor gear.
