
In the world of outdoor rope techniques, few knots are as versatile and dependable as the Rolling Hitch. Whether you are a seasoned sailor, an arborist, or a weekend camper, understanding how to manipulate friction and tension is a fundamental skill. The Rolling Hitch knot belongs to a category known as friction hitches, designed specifically to grip a cylindrical object—such as a pole, a spar, or another rope—when pulled in a specific direction, while remaining easy to slide and reposition when the tension is released.
The brilliance of the Rolling Hitch lies in its mechanical simplicity. Unlike a standard Clove Hitch, which can slip under heavy or shifting loads, the Rolling Hitch utilizes an extra turn that "jams" the knot against the object it is tied to. This makes it an indispensable tool for situations where you need to take the strain off a line or secure a load that might otherwise shift. In technical terms, it is a "directional" knot, meaning its security depends on the load being applied in the correct direction (usually away from the double turns).
Historically, this knot has been a staple in maritime environments, used for everything from securing a stopper to a cable to shifting the tension of a fouled winch. Today, its utility extends to modern camping, where it is often used for adjustable guy lines, and in rescue scenarios where a temporary "grab" on a rope is required.
Alternative Names:
Depending on the region and the specific application, the Rolling Hitch may also be referred to as the Magnus Hitch, the Kelleg Hitch, or sometimes the Magner’s Hitch.
What Is a Rolling Hitch?
The Rolling Hitch is a friction hitch used to attach a rope to a rod, pole, or another rope. Its primary characteristic is that it is designed not to slip along the object it is tied to when pulled in a longitudinal direction. This "grip-and-slide" functionality is what distinguishes it from fixed loops or binding knots.
Practical Uses in the Field
- Relieving Tension on a Jammed Line: If a rope on a winch or a pulley becomes jammed, a Rolling Hitch knot can be tied to the tensioned line using a secondary rope. This allows you to pull the tension away from the jam and clear the obstruction safely.
- Securing Guy Lines: For campers and backpackers, the Rolling Hitch is excellent for securing tent stakes or tarps. It allows for easy adjustment of the line’s tension without untying the entire knot.
- Sailing and Rigging: In maritime applications, it is used to secure a smaller line to a larger stay or shroud, or to tow a spar.
- Arboriculture: Tree climbers use variations of friction hitches to move up and down ropes, and the Rolling Hitch serves as a foundational concept for many of these advanced outdoor rope techniques.
How It Works
The knot works through the principle of snubbing. By wrapping the rope over itself (the "overlapping turn"), the standing part of the rope presses down on the turns beneath it. The more tension you apply in the direction of the double turns, the tighter the knot grips the object.
Materials and Tools Needed
To master the Rolling Hitch knot, you don’t need expensive equipment, but choosing the right materials can significantly affect the knot’s performance.
1. Rope Types
- Natural Fiber Ropes: Manila or hemp ropes have a natural "tooth" or roughness that helps the Rolling Hitch grip exceptionally well.
- Synthetic Ropes (Nylon/Polyester): These are common in modern outdoor rope techniques. While durable, they can be slippery. When using slick synthetic lines, you may need to apply more tension during the "cinching" phase to ensure the knot seats properly.
- Paracord (550 Cord): Great for practice and light-duty camping applications, though its thin diameter requires precision when tucking the ends.
2. The Target Object
- The Main Rope (Red Rope): In many instructional contexts, the "main" rope is colored differently to show contrast. Ensure the main rope is under some degree of stability so you can wrap the hitch tightly.
- Poles and Spars: If tying to a smooth metal pole, the knot may require more "dressing" (tightening and squaring) to prevent initial slippage.
3. Considerations
- Diameter Ratio: Friction hitches work best when the hitching rope is of a smaller or equal diameter to the object it is being tied to. If the hitching rope is significantly thicker than the main rope, the grip will be less effective.
How to Tie a Rolling Hitch?
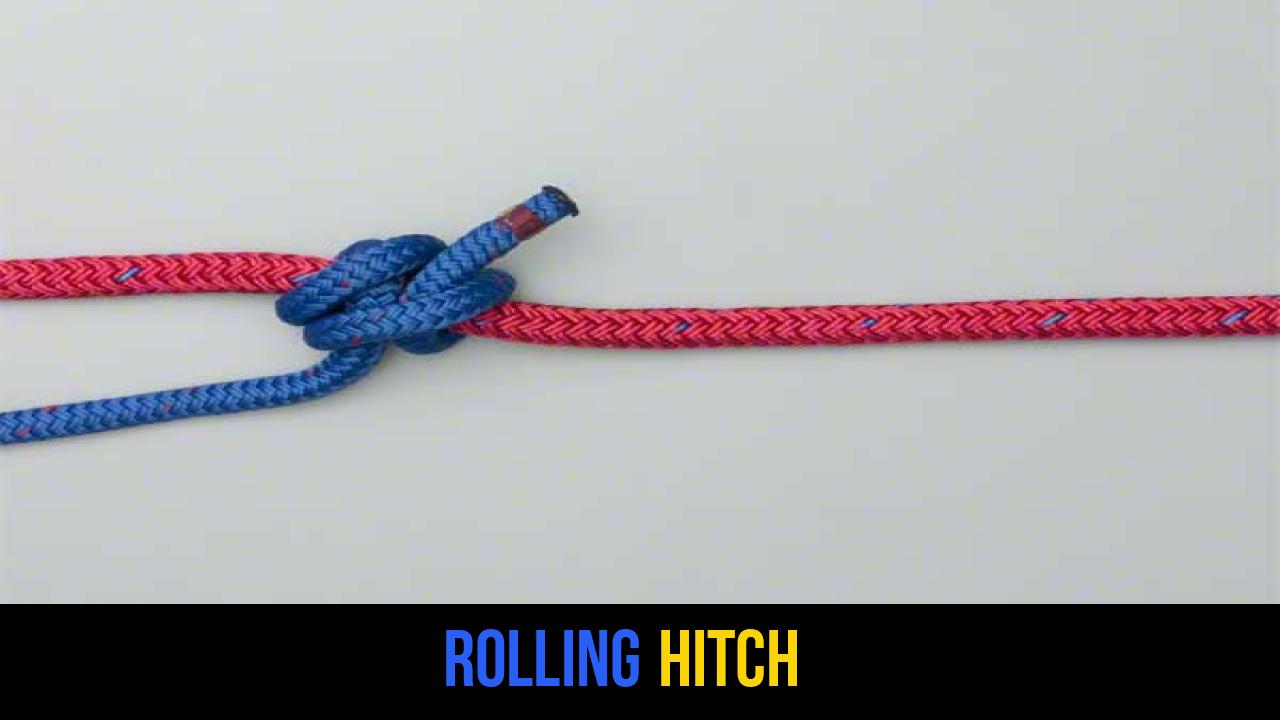
To ensure the highest level of safety and reliability, follow these specific steps. This method focuses on securing the hitch to a main (often color-coded) rope to demonstrate the "dog-leg" effect which signifies a properly tied knot.
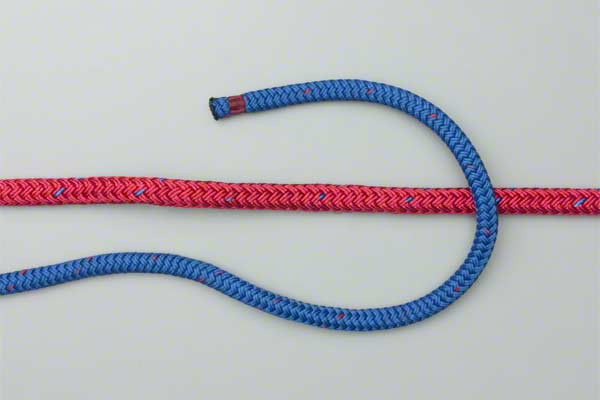
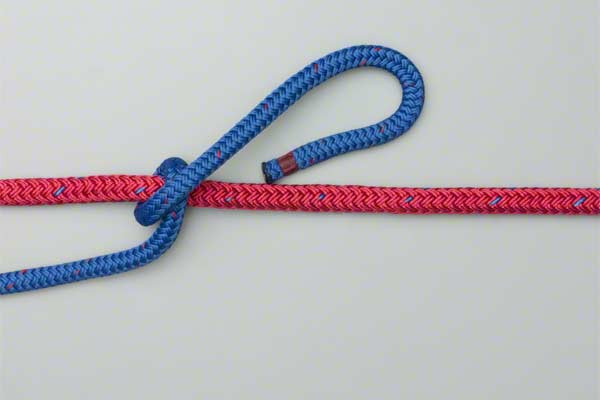
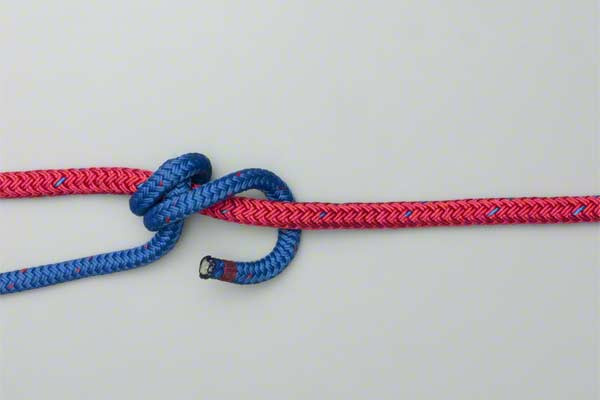
- Pass the end around the main (red) rope to make a Half Hitch.
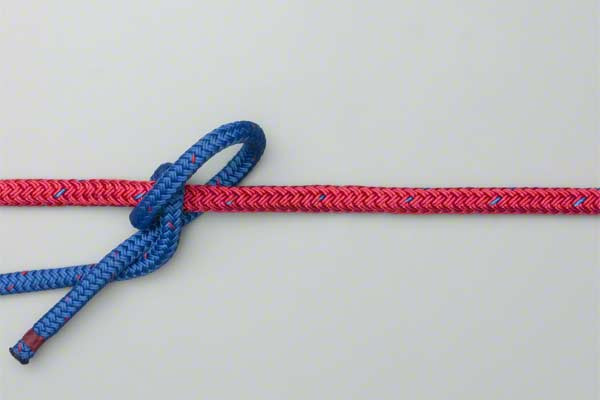
- Continue around going over the first turn.
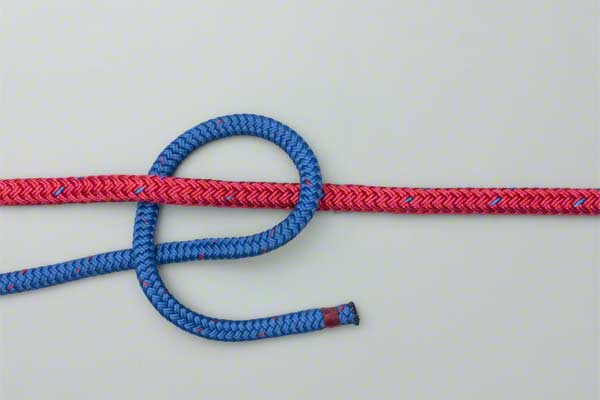
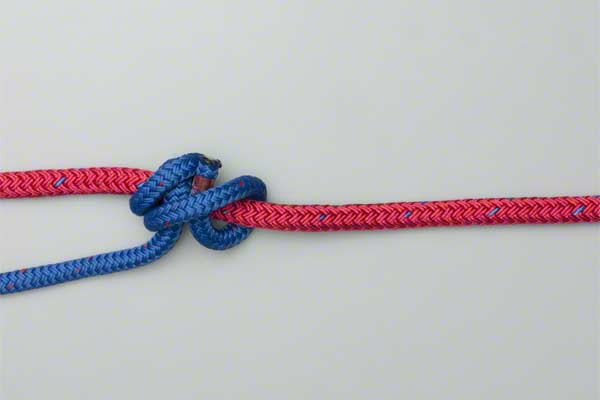
- Tuck the rope between the standing end and the first turn.
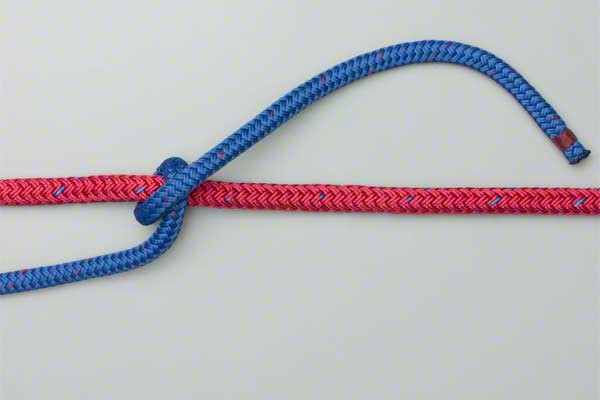
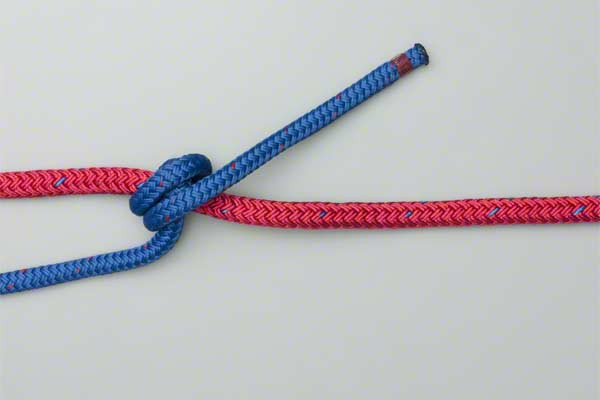
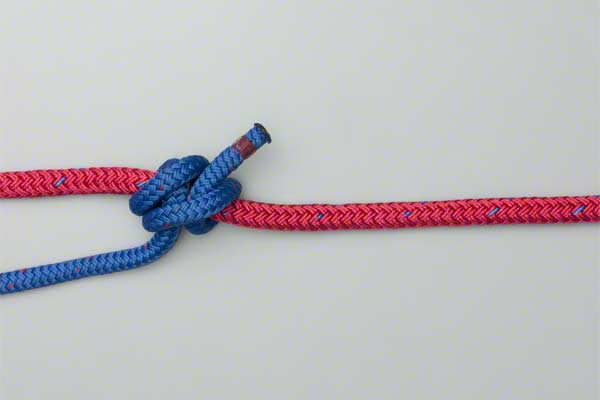
- Tighten to make it secure (this introduces a slight dog-leg in the main rope).
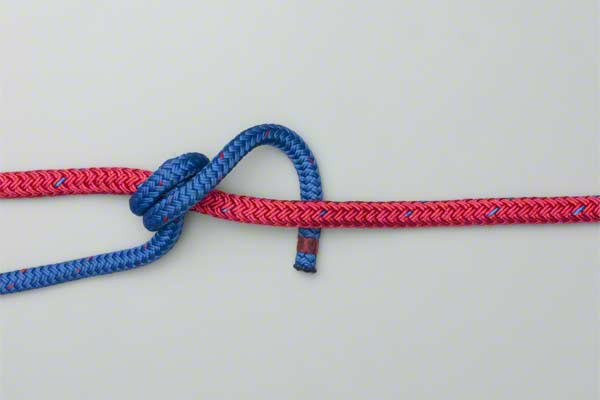
- Continue around to add a final Half Hitch.

Common Mistakes to Avoid
Even for experts, the Rolling Hitch can fail if not executed with attention to detail. Here are the most common errors seen in outdoor rope techniques:
- Tying in the Wrong Direction: The Rolling Hitch is directional. It is designed to resist pull in the direction of the side with the double wraps. If you apply load in the opposite direction, the knot will likely slide or collapse.
- Insufficient Tightening: If the initial turns (Steps 1 and 2) are loose, the "grip" will never engage. You must see that "dog-leg" (a slight bend in the main rope) to know the friction is sufficient.
- Overlapping Turns Incorrectly: If the second turn does not cross over the first turn before tucking, the knot becomes a simple Clove Hitch variation, which lacks the necessary longitudinal grip.
- Using Slippery Rope on Smooth Surfaces: On stainless steel or polished plastic, the knot may slip regardless of how well it is tied. In these cases, adding an extra wrap before the final half hitch can increase safety.
Safety Tip
Never use a Rolling Hitch as a primary life-safety attachment in climbing without a backup. While it is an excellent utility knot, mechanical rope grabs or specialized friction hitches (like the Prusik) are preferred for vertical life-support.
Related Knots and Splicing
Expanding your repertoire of rope knots allows you to choose the perfect tool for every situation. Here are several knots related to the Rolling Hitch:
- Taut-Line Hitch: A variation of a friction hitch that creates an adjustable loop for use on lines under tension, commonly used for securing tents.
- Prusik Knot: A friction hitch that grips the rope when under tension in either direction, but slides easily when the tension is released.
- Clove Hitch: A simple binding knot used to secure a rope to a post; it is faster to tie than a Rolling Hitch but prone to slipping under heavy loads.
- Midshipman’s Hitch: Often confused with the Rolling Hitch, this knot includes an extra "awnyard" turn that creates a more secure sliding loop that won’t slip as easily.
- Icicle Hitch: An advanced friction hitch known for its incredible grip on smooth, tapered objects like a spar or a vertical pipe.
Final Words
The Rolling Hitch is more than just a way to tie two ropes together; it is a masterclass in the physics of friction. By mastering this knot, you gain the ability to manage heavy loads, adjust tension on the fly, and solve complex rigging problems with nothing more than a length of cordage.
Whether you are securing a load in the bed of a truck, adjusting a rain fly in a storm, or performing maintenance on a sailing vessel, the Rolling Hitch knot stands as a testament to the enduring importance of traditional outdoor rope techniques. Practice these steps until they become muscle memory—the "dog-leg" in the rope is your signal that you’ve mastered one of the most useful hitches in the maritime and outdoor world.
Remember, the key to any successful knot is "Dress, Setting, and Testing." Always dress the knot so the turns are neat, set it by pulling it tight, and test it under a controlled load before relying on it in a high-stakes environment. Happy tying!
