
In the world of rope knots, few techniques are as fundamental yet versatile as the Two Handed Ligature. Whether you are an experienced climber, a dedicated survivalist, or a hobbyist interested in the intricate art of cordage, understanding how to manipulate rope with precision is a vital skill. The Two Handed Ligature is a method of securing a line that emphasizes control, tension management, and symmetry.
While many knots can be tied with one hand in emergency situations, the two-handed approach ensures that the tension is distributed evenly across the fibers of the rope. This technique is often the basis for more complex structures, providing a reliable foundation for securing gear, bundling materials, or creating a primary binding that won’t slip under moderate stress. In outdoor rope techniques, the ability to tie a clean, effective ligature can mean the difference between a secure campsite and a logistical failure.
Alternative names for this technique include: The Two-Handed Reef Method, The Square Ligature, and the Double-Throw Binding.
What Is a Two Handed Ligature?
A Two Handed Ligature is a specific method of tying a binding knot—most commonly a variation of the square knot or reef knot—using a systematic two-handed motion. The term "ligature" historically refers to anything used to bind or tie something tightly. In a technical outdoor context, it refers to the process of creating a secure, low-profile connection between two ends of a single rope or cord.
Practical Uses in the Outdoors
The versatility of the Two Handed Ligature makes it a staple in various environments:
- Gear Compression: Use it to compress sleeping bags or bulky clothing items to save space in your rucksack.
- Shelter Building: When constructing a lean-to or a temporary tarp shelter, this knot can secure cross-beams or ridge lines.
- Firewood Bundling: It provides the necessary "bite" to keep a bundle of dry wood together while transporting it back to camp.
- First Aid (Training Only): In emergency survival training, this technique is taught for securing bandages or splints where consistent pressure is required.
The primary advantage of the Two Handed Ligature is the "Double Throw." This initial stage of the knot creates significant friction, allowing the user to maintain tension on the rope before the final locking throw is completed.
Materials and Tools Needed
To practice the Two Handed Ligature, you don’t need expensive equipment, but choosing the right cordage will enhance your learning experience and the knot’s performance.
Recommended Rope Types
- Paracord (550 Cord): Excellent for beginners due to its flexibility and slight elasticity, which helps the knot "seat" properly.
- Nylon Utility Rope: Provides good grip and is resistant to rot, making it ideal for outdoor applications.
- Natural Fiber Rope (Jute or Hemp): These offer high surface friction, which is excellent for ligatures that need to stay tight without slipping.
- Static Cord: For professional applications, a 3mm to 5mm static accessory cord is often used for its high tensile strength and minimal stretch.
Considerations for Success
- Diameter: Ensure the rope diameter is appropriate for the object being tied. A rope that is too thick may become bulky and lose its security.
- Texture: Smoother ropes (like some polyesters) may require an extra throw to prevent slipping.
- Condition: Always inspect your rope for frays or "soft spots" before tying a critical knot.
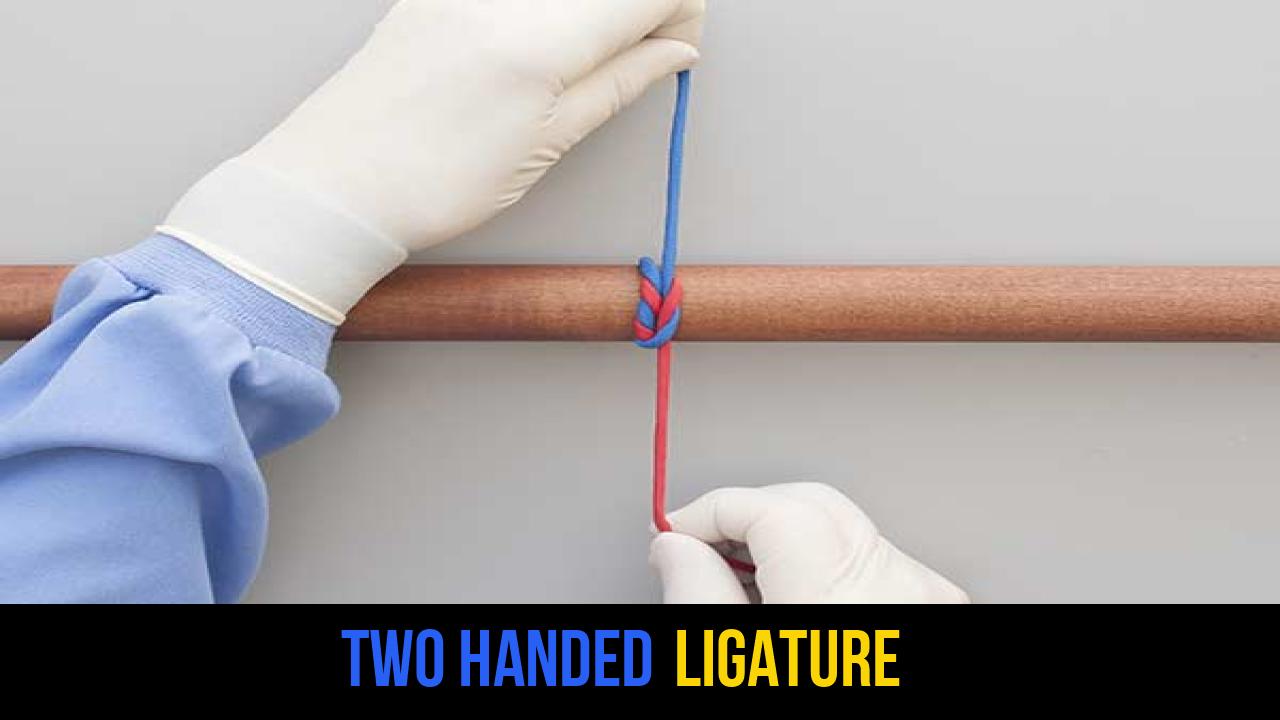
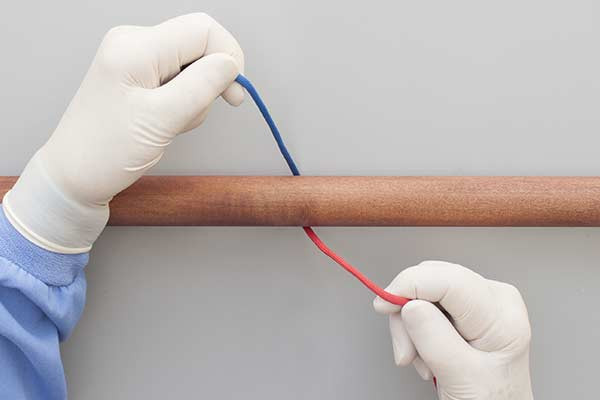
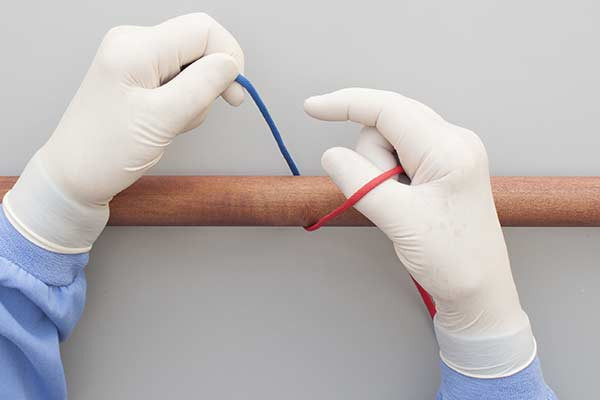
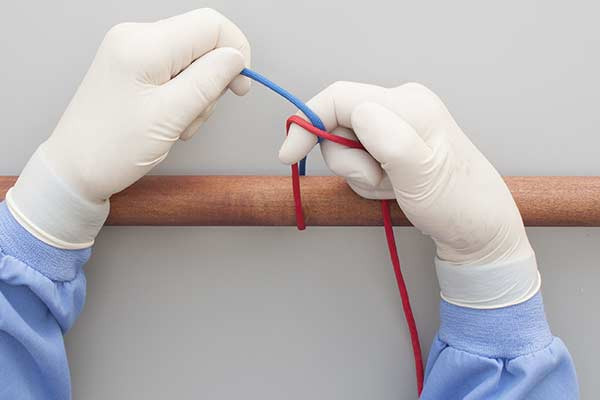
How to Tie Two Handed Ligature
Following the correct sequence is essential for the structural integrity of the knot. Use the following steps to master the Two Handed Ligature technique.
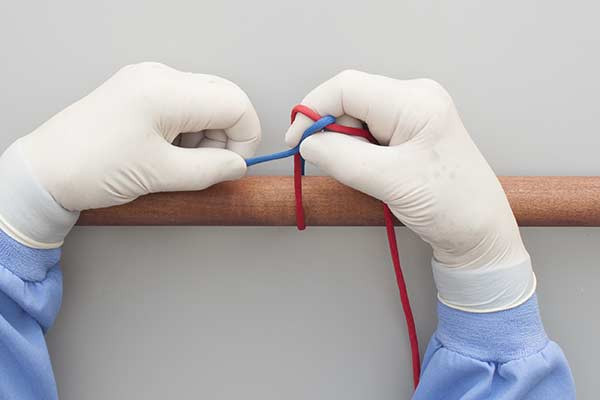
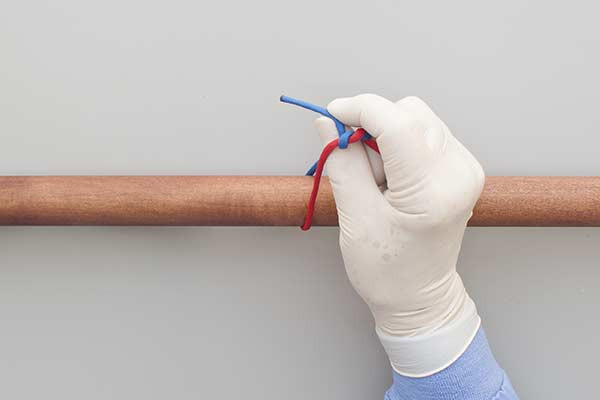
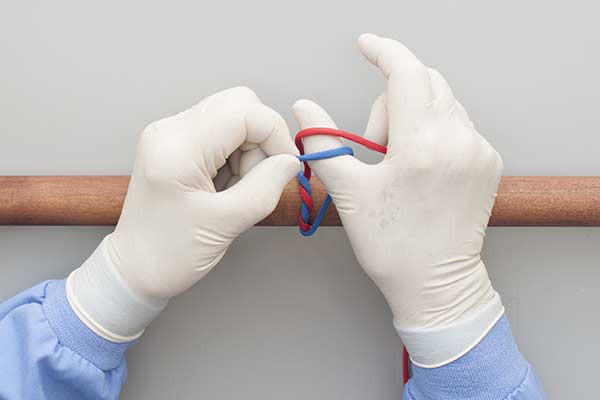
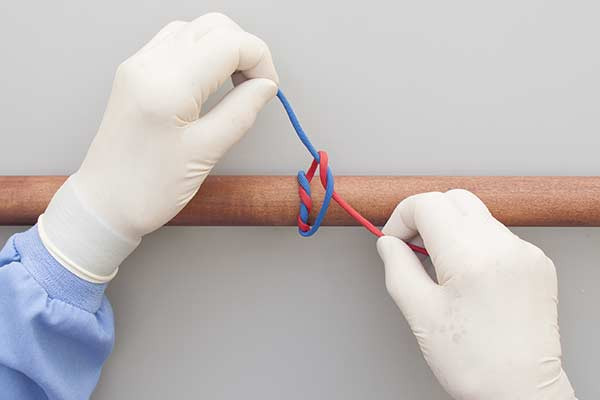
- With the short end away from you.
- Hook your index finger between the ends.
- Grip the end with your thumb and push it through.
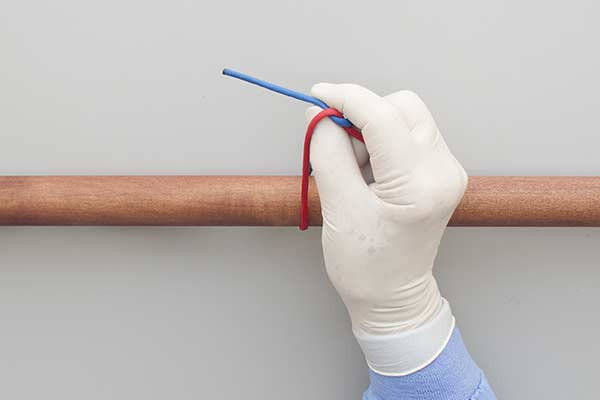
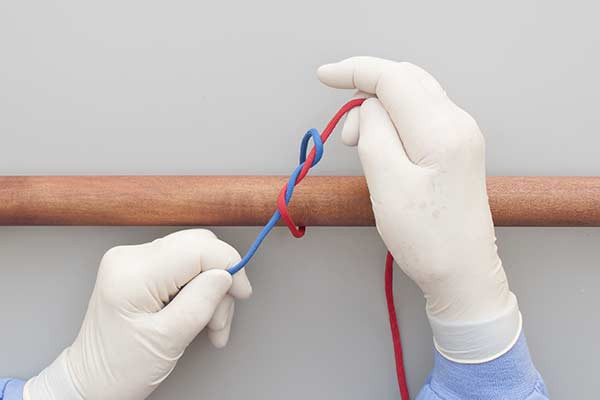
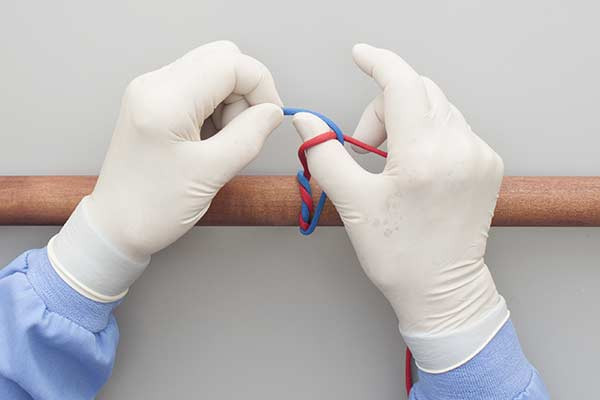
- Hook, grip, and push again.
- Tighten to make a Double Throw.
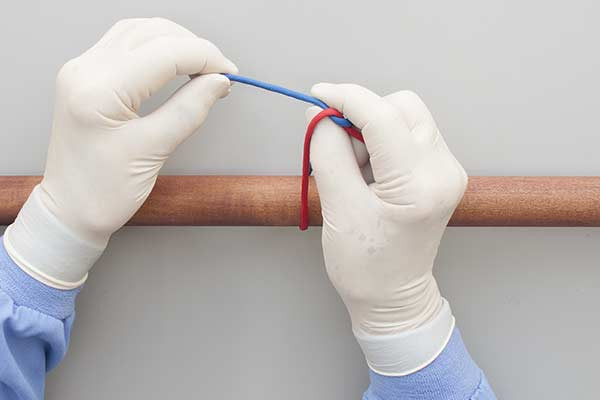
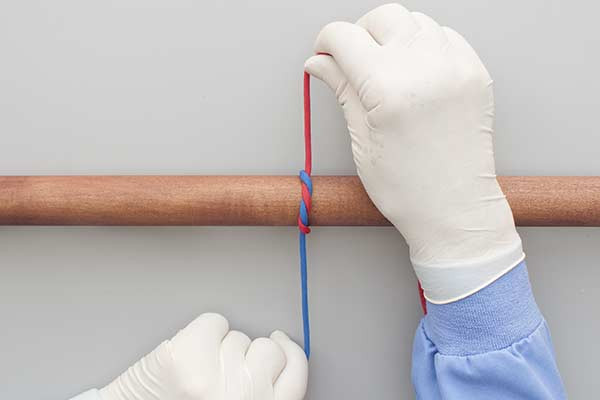
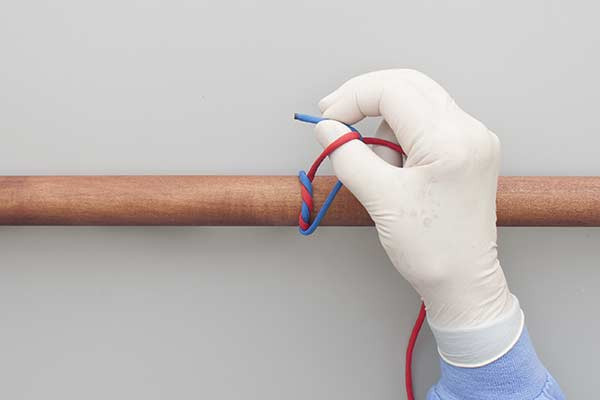
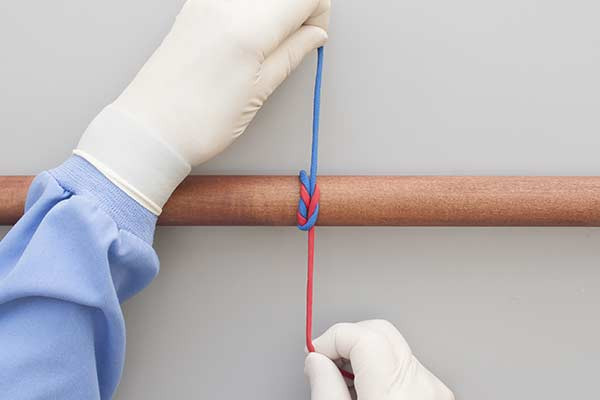
- Then hook your thumb between the ends.
- Grip the end again and push it through.
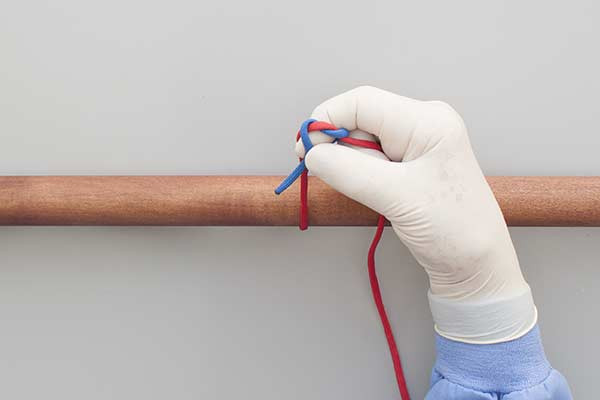
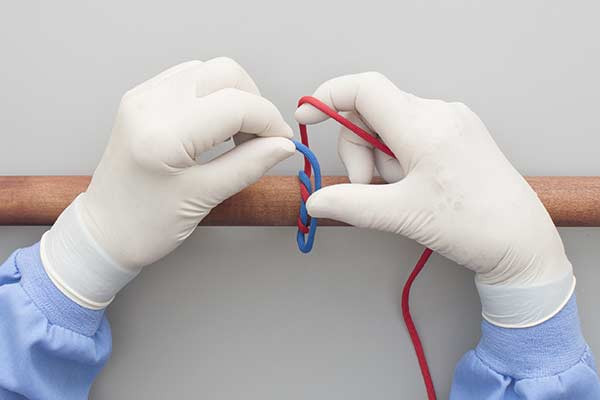
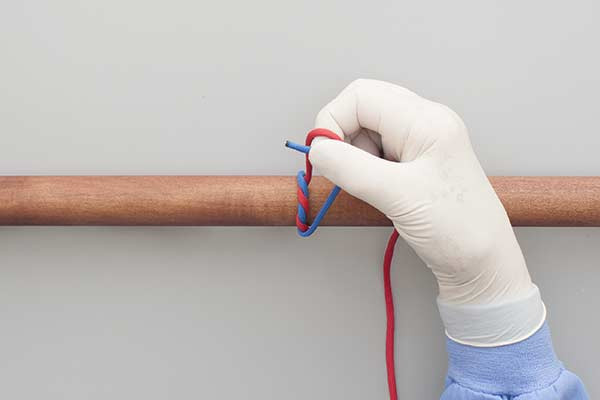
- Tighten to complete the Ligature Knot.

Common Mistakes to Avoid
Even seasoned experts can occasionally make errors when tying the Two Handed Ligature. Pay attention to these common pitfalls to ensure your knot is safe and effective.
1. Creating a "Granny Knot"
One of the most frequent mistakes is reversing the direction of the final throw. If the second half of the knot does not mirror the first correctly, you end up with a "Granny Knot," which is notorious for slipping and jamming under load. Ensure your movements are deliberate and symmetrical.
2. Insufficient Tension on the Double Throw
The "Double Throw" (Step 5) is designed to hold the tension of the material you are binding. If you do not tighten this stage sufficiently before moving to the final throw, the entire Two Handed Ligature will be loose and ineffective.
3. Using Mismatched Rope Diameters
The Two Handed Ligature works best when both ends of the rope are of equal diameter and texture. Tying a ligature with one thick rope and one thin cord often leads to the thinner cord "cutting" into the larger one or slipping through the loops.
4. Over-Tightening on Fragile Objects
In outdoor gear repair, it is possible to apply so much leverage with the two-handed method that you damage the equipment you are trying to secure. Always feel for the resistance of the material.
Related Knots and Splicing
Understanding the Two Handed Ligature is a gateway to mastering other essential rope knots. Here are a few related techniques:
- The Square Knot (Reef Knot): A simple binding knot used to secure a rope or line around an object. It is the foundation upon which the ligature is built.
- The Surgeon’s Knot: Similar to the ligature, this knot adds an extra twist in the first throw to increase friction and prevent slipping while the knot is being tied.
- The Clove Hitch: A quick-release knot used to secure a rope to a post or cylindrical object, often used in conjunction with ligatures for lashings.
- The Sheet Bend: Used for joining two ropes of unequal diameters together, providing a more secure alternative to the square knot in those specific instances.
Final Words
The Two Handed Ligature is more than just a way to join two ends of a rope; it is a fundamental skill in the catalog of outdoor rope techniques. Its strength lies in the "Double Throw" mechanics, which provide superior friction and control compared to simpler knots. By mastering the rhythm of the hook, grip, and push, you develop a "muscle memory" that is invaluable in high-pressure outdoor situations.
Whether you are securing a load on your vehicle, repairing a torn tent flap, or bundling gathered materials in the wilderness, the Two Handed Ligature offers a professional-grade solution for stability and security. Practice these steps with different types of cordage to understand how material science interacts with knot geometry. With patience and repetition, this knot will become a reliable tool in your outdoor repertoire.
