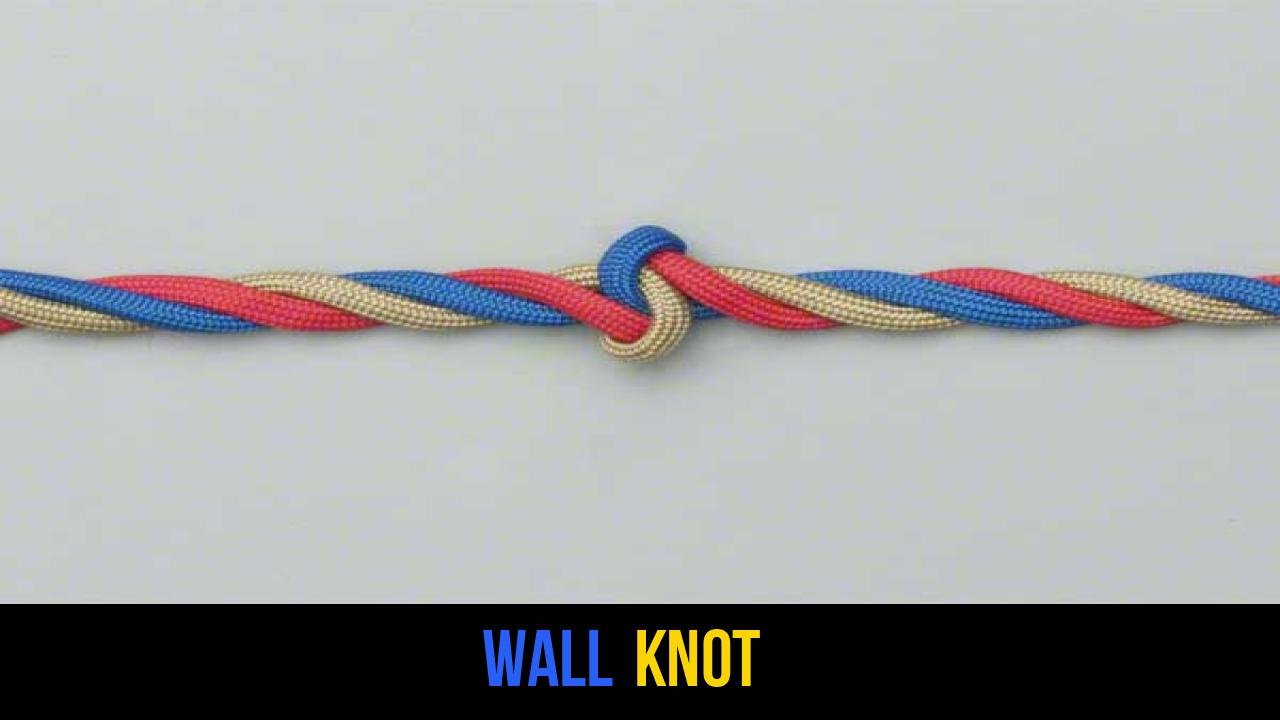
In the world of rope knots and maritime heritage, few techniques are as foundational and visually satisfying as the Wall Knot. Whether you are a professional rigger, an avid sailor, or an outdoor enthusiast exploring outdoor rope techniques, understanding how to manipulate multi-strand rope is a critical skill. The Wall Knot serves as the cornerstone for dozens of more complex knots, providing both functional utility and aesthetic appeal.
While many modern climbers and hikers focus on single-line hitches and loops, the Wall Knot introduces the practitioner to the intricate world of "fancy" rope work and terminal knots. In this comprehensive guide, we will explore the history, mechanics, and practical applications of this classic knot, followed by a precise, step-by-step tutorial on how to execute it perfectly every time.
Alternative Names: Single Wall Knot, French Wall, Footrope Knot (variation).
What Is a Wall Knot?
The Wall Knot is a terminal knot—a knot tied at the end of a rope—specifically designed for multi-strand (usually three-strand) twisted cordage. Unlike a simple overhand knot, which treats the rope as a single unit, the Wall Knot requires the user to "unlay" or un-twist the individual strands and weave them together to form a crown-like structure that sits against the standing part of the rope.
Practical Uses and Applications
Historically, the Wall Knot was a staple of the Golden Age of Sail. It was used primarily to prevent the end of a rope from fraying and to provide a secure grip on the ends of "falls" (the ropes used in block and tackle systems).
Today, its applications remain diverse:
- Stopper Knots: It prevents a rope from slipping through a block, hole, or grommet.
- Decorative Work: It is the base for more complex decorative knots like the Manrope Knot or the Wall and Crown.
- Lanyards and Fobs: It provides a comfortable, textured grip for knife lanyards or zipper pulls.
- Traditional Rigging: Used in classic boat restoration to maintain historical accuracy and functional integrity.
- Crafting: Often seen in macramé and heavy-duty rope furniture.
Materials and Tools Needed
To tie a successful Wall Knot, you must choose the right materials. Because this knot relies on the "lay" of the rope, it is best performed with twisted cordage rather than braided rope.
Rope Types
- Three-Strand Twisted Nylon: Excellent for practice because it holds its shape well and the ends can be heat-sealed.
- Manila or Hemp: The traditional choice. These natural fibers provide incredible friction, which helps the Wall Knot stay tight even under heavy use.
- Polyester (Dacron): Offers high UV resistance, making it ideal for outdoor applications where the knot will be exposed to the elements.
Essential Tools
- Marlinspike or Fid: A pointed tool used to open the lay of the rope and tuck strands. This is particularly helpful when working with stiff or large-diameter rope.
- Whipping Twine or Tape: Used to temporarily secure the ends of the individual strands to prevent them from fraying while you work.
- Sharp Knife or Heavy-Duty Scissors: For clean cuts.
- Heat Source (Lighter/Torch): Only for synthetic ropes, used to seal the ends once the knot is complete.
How to Tie a Wall Knot?
Tying the Wall Knot requires patience and attention to the direction of the rope’s twist. Follow these specific steps to ensure a secure and symmetrical finish.
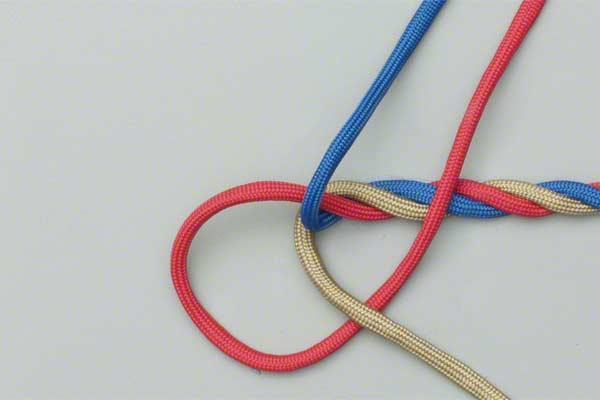
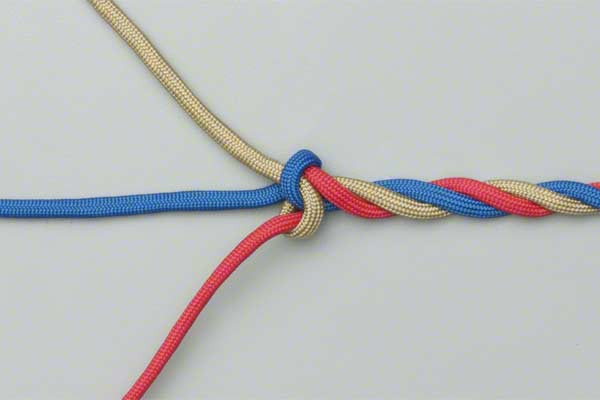
- Unwind enough rope to form the knot and re-lay the rope.
- Pass one strand around in the direction of the rope’s lay and under the next strand.
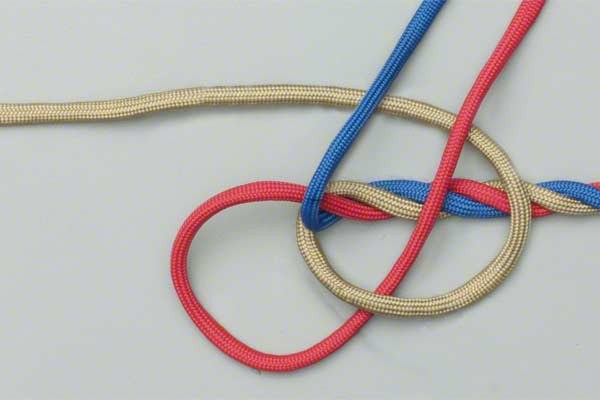
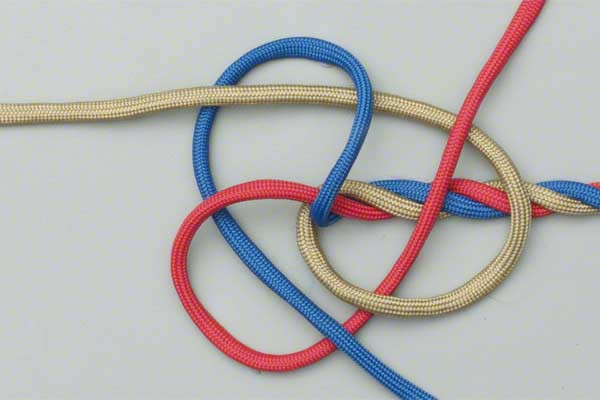
- Repeat the same process with the second and again with the third which will exit through the first strand.
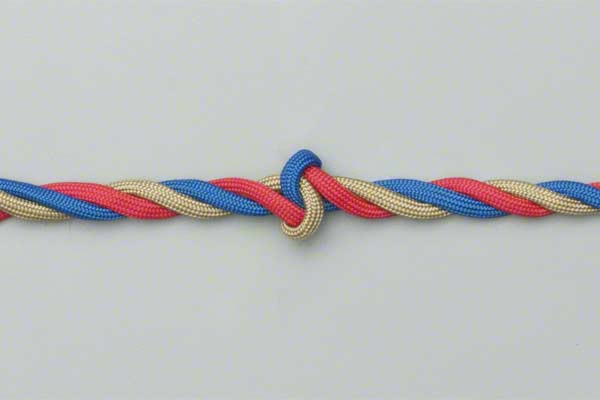
- Tighten the knot and re-lay the rope.
Technical Deep Dive: Understanding the "Lay"
One of the most common challenges for beginners is understanding the phrase "direction of the rope’s lay." Most three-strand ropes are Z-twist (right-handed), meaning the strands spiral upward and to the right when held vertically. When you "pass one strand around in the direction of the rope’s lay," you are following the natural path the rope wants to take.
If you attempt to tie a Wall Knot against the lay, the knot will feel "mushy" and will likely unravel under tension. Professionals always look for the "scallops" or grooves between the strands to guide their tucks.

Common Mistakes to Avoid
Even experienced riggers can run into trouble with multi-strand knots. Here are the most frequent errors and how to fix them:
- Unlaying Too Much Rope: If you unwind too much, the standing part of the rope will become loose and lose its structural integrity. Only unlay about 4-6 inches for standard 1/2-inch rope.
- Uneven Tensioning: The Wall Knot must be tightened "radially." This means pulling each of the three strands incrementally and evenly. If you pull one strand too hard, the knot will become lopsided.
- Confusing the Strands: It is helpful to mark the ends of your strands with different colored tape (Red, Blue, Green) when you are first learning. This ensures you don’t accidentally tuck the same strand twice.
- Neglecting the "Re-lay": The final step of the instructions is to re-lay the rope. This means twisting the loose ends back together above the knot to maintain the rope’s original form.
Related Knots and Splicing
The Wall Knot is often just the beginning of a larger project. Understanding these related rope knots will enhance your technical repertoire.
- Crown Knot: A complementary knot to the Wall Knot. While the Wall Knot strands go up, the Crown Knot strands go down, often used to cap a Wall Knot.
- Matthew Walker Knot: A complex stopper knot where each strand is tucked under two other strands, creating a very secure and bulky "turk’s head" appearance.
- Diamond Knot (Lanyard Knot): A beautiful combination of a Wall and Crown knot that results in a decorative, ball-like stopper.
- Short Splice: A method of joining two ropes by unlaying the strands and weaving them into each other, utilizing similar principles to the Wall Knot.
- Back Splice: This starts with a Crown Knot and then tucks the strands back into the standing part of the rope to prevent fraying permanently.
Safety Tips for Outdoor Rope Techniques
When using the Wall Knot in a functional environment—such as securing gear or maritime rigging—safety is paramount.
- Inspect Your Rope: Before tying, ensure the rope is free of "hockles" (kinks) or internal abrasion.
- Dress the Knot: "Dressing" a knot means ensuring all strands are parallel and not crossing over each other in an unintended way. A well-dressed Wall Knot is a safe Wall Knot.
- Consider the Load: While the Wall Knot is an excellent stopper, it is not a "life-safety" knot for climbing. Never use a Wall Knot as the primary point of attachment for human weight.
- Seal the Ends: For synthetic ropes, always singe the ends after tightening to prevent the individual filaments from migrating out of the knot.
Final Words
The Wall Knot is more than just a way to end a rope; it is a gateway into the sophisticated world of traditional seamanship and outdoor rope techniques. By mastering the art of unlaying, passing, and re-laying, you develop a "feel" for cordage that single-line knots simply cannot provide.
Whether you are finishing a custom dog leash, securing a fender on a boat, or simply practicing your bushcraft skills, the Wall Knot offers a blend of security and classic style. Remember to work slowly, follow the lay of the rope, and practice until the movement becomes second nature. With these steps, you are well on your way to becoming an expert in the timeless craft of knot tying.
