
In the world of outdoor exploration, maritime operations, and search-and-rescue missions, the integrity of a single knot can be the difference between success and catastrophe. Among the vast library of rope knots, the Bowline Knot stands as a cornerstone of technical proficiency. Known for its reliability and the fact that it does not slip under tension, this knot is a fundamental skill that every outdoorsman, climber, and sailor should have in their repertoire.
Whether you are securing a load on a vehicle, pitching a tent in high winds, or preparing for a vertical ascent, understanding outdoor rope techniques is paramount. The Bowline Knot provides a fixed loop at the end of a rope that is easy to tie, easy to untie even after being heavily loaded, and remarkably stable. Its geometry allows it to handle significant weight without jamming, making it one of the most versatile tools in a rigger’s kit.
In this comprehensive guide, we will delve into the mechanics of the Bowline Knot, explore the best materials for the job, and provide the exact steps required to master this essential technique. By the end of this article, you will not only know how to tie the knot but also understand the physics that make it a “safety” standard in the industry.
Alternative names for the Bowline Knot include: The King of Knots, Fixed Loop Knot, Safety Knot and the Rescue Loop.
What Is a Bowline Knot?
The Bowline Knot is a type of loop knot that forms a secure, non-slipping eye at the end of a line. Unlike a slip knot, which tightens around an object when pulled, the Bowline Knot maintains its diameter regardless of the load applied to the standing part of the rope. This characteristic is what makes it a “safety” knot—it will not constrict an object or a person’s waist if used in an emergency rescue scenario.
Practical Uses and Applications
The versatility of the Bowline Knot allows it to be used across various disciplines:
- Sailing and Maritime: It is most famously used to fasten a halyard to the head of a sail or to secure a boat to a mooring. Because it doesn’t jam, sailors can untie it quickly even after it has been soaked in saltwater and strained by gale-force winds.
- Search and Rescue: While modern harnesses are preferred, the Bowline Knot was historically the primary knot used to tie a rope around a person’s waist during a rescue. It provides a secure loop that won’t tighten and choke the victim.
- Camping and Bushcraft: It is the go-to knot for creating a fixed loop for guy lines, hanging bear bags, or securing gear to a backpack.
- Arboriculture: Tree surgeons use variations of this knot to send tools up to a climber or to secure branches during a descent.
- General Utility: From securing a Christmas tree to the roof of a car to creating a makeshift handle for a heavy bucket, the applications are nearly endless.
Materials and Tools Needed
To practice and execute the Bowline Knot effectively, you must choose the right equipment. Not all ropes are created equal, and the performance of a knot is heavily dependent on the material and construction of the line.
Rope Types
- Static Rope: Ideal for practicing the Bowline Knot as it has minimal stretch. It is commonly used in rescue and rappelling.
- Dynamic Rope: Used primarily in rock climbing to absorb the shock of a fall. The Bowline Knot holds well in dynamic rope, though it requires careful “dressing” to ensure the coils are seated correctly.
- Synthetic Fibers (Nylon, Polyester, Polypropylene): These are the most common modern ropes. Nylon is strong and elastic, while Polyester offers excellent UV resistance.
- Natural Fibers (Manila, Sisal): While less common today, natural fibers provide excellent grip. However, they are prone to rot and can be more difficult to untie once wet.
Tools and Considerations
- Gloves: When working with heavy loads or rough hemp rope, leather work gloves protect your hands from rope burn.
- Rope Sealing Tool: If using synthetic rope, a heat knife or a simple lighter is necessary to singe the ends to prevent fraying.
- Visual Aids: For beginners, using two different colored ropes can help distinguish the “working end” from the “standing end” during the learning process.
How to Tie The Bowline Knot?
Follow these instructions precisely to ensure a secure and functional knot. Mastery of outdoor rope techniques comes through repetition and attention to detail.
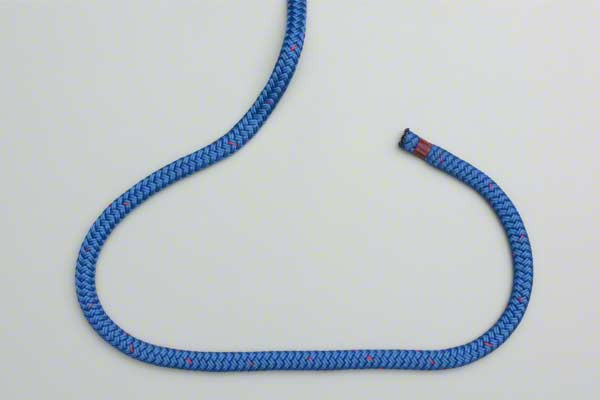
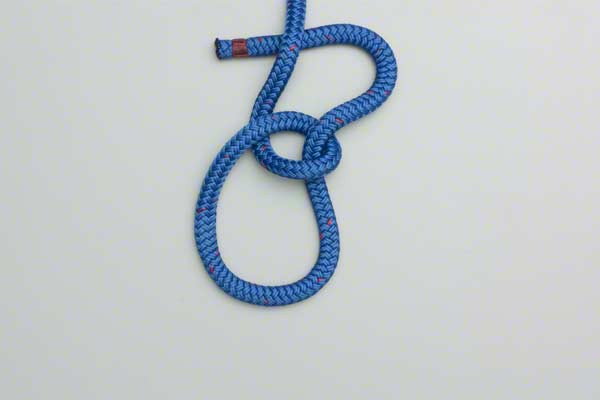
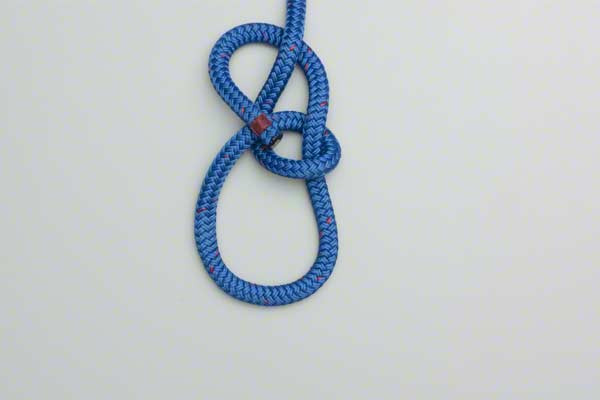
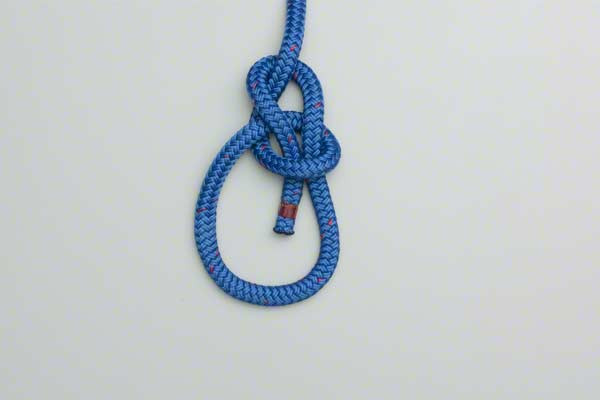
- Form a small loop leaving enough rope for the desired loop size.
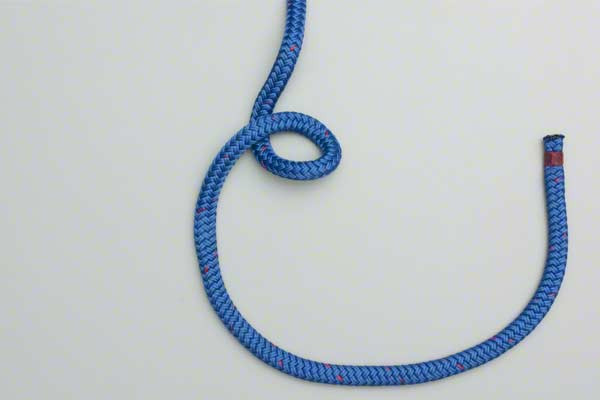
- Pass the end of the rope through the loop as though making an overhand knot.
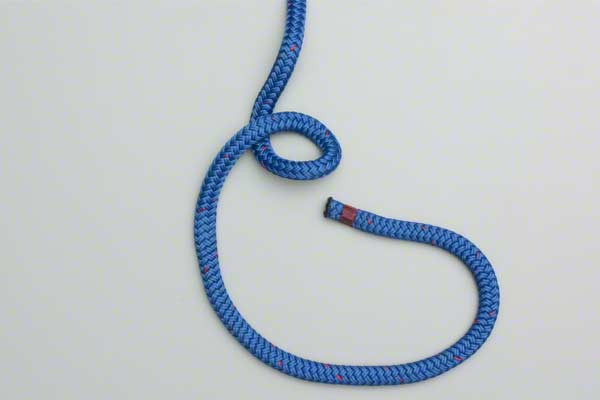
- Continue around the standing end and then back through the small loop.
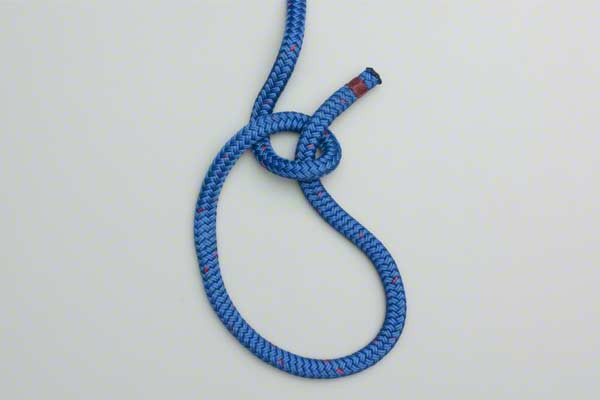
Once these steps are completed, grasp the loop and the working end in one hand and the standing part of the rope in the other, then pull firmly to “set” the knot. A properly tied Bowline Knot will have a distinct look, often described as a “little tree coming out of a hole, going around a pole, and going back into the hole.”
Common Mistakes to Avoid
Even seasoned professionals can make errors when tying rope knots under pressure. To ensure maximum safety, avoid these common pitfalls:
- Tying the Loop Too Small: If the initial loop (the “hole”) is too small, the knot becomes difficult to dress and may not seat properly, leading to potential failure under high tension.
- Crossing the Standing End Incorrectly: In Step 3, you must ensure the working end goes around the standing end. If you pass it over the wrong side, the knot will not lock and will simply fall apart when pulled.
- Insufficient Tail Length: Always leave a generous “tail” (the working end). If the tail is too short, it can slip back through the loop when the rope stretches, causing the knot to untie itself. A good rule of thumb is a tail length at least five times the diameter of the rope.
- Failure to “Dress” the Knot: Dressing a knot means straightening the strands so they lie flat and parallel. A messy knot creates internal friction and stress points that weaken the rope’s breaking strength.
- Using the Wrong Rope for the Load: Never use a decorative or low-grade utility cord for applications involving human weight or heavy machinery. Always check the Safe Working Load (SWL) of your rope.
Related Knots and Splicing
Expanding your knowledge of outdoor rope techniques involves learning how the Bowline Knot interacts with other hitches and loops. Here are a few related knots you should know:
- Running Bowline: Sliding bowline variation that creates a secure noose for rescue and rigging tasks.
- Double Bowline: Stronger bowline version with extra security and reduced risk of slipping under load.
- Bowline on a Bight: Forms two fixed loops in the middle of a rope without needing rope ends.
- Spanish Bowline: Creates two adjustable loops, commonly used in rescue and lifting situations.
- One Handed Bowline: Fast rescue-style bowline tied with one hand for emergency rope applications.
- Figure 8 Follow Loop: Reliable fixed loop knot often used as a safer alternative to the standard bowline.
Final Words
The Bowline Knot is more than just a configuration of cordage; it is a fundamental survival skill that has remained virtually unchanged for centuries. Its elegance lies in its simplicity—three basic movements create a bond that can hold hundreds of pounds yet be released with a simple flick of the wrist.
Whether you are an aspiring mountaineer, a weekend camper, or a professional rigger, mastering the Bowline Knot is a rite of passage. By following the steps outlined above and practicing with different types of rope knots, you build the muscle memory necessary to perform when it matters most. Remember, in the outdoors, your gear is only as good as your ability to use it. Stay safe, keep practicing, and always double-check your knots before putting them to the test.
Disclaimer: Knot tying is a technical skill. For life-safety applications such as climbing or rescue, seek professional in-person instruction.
