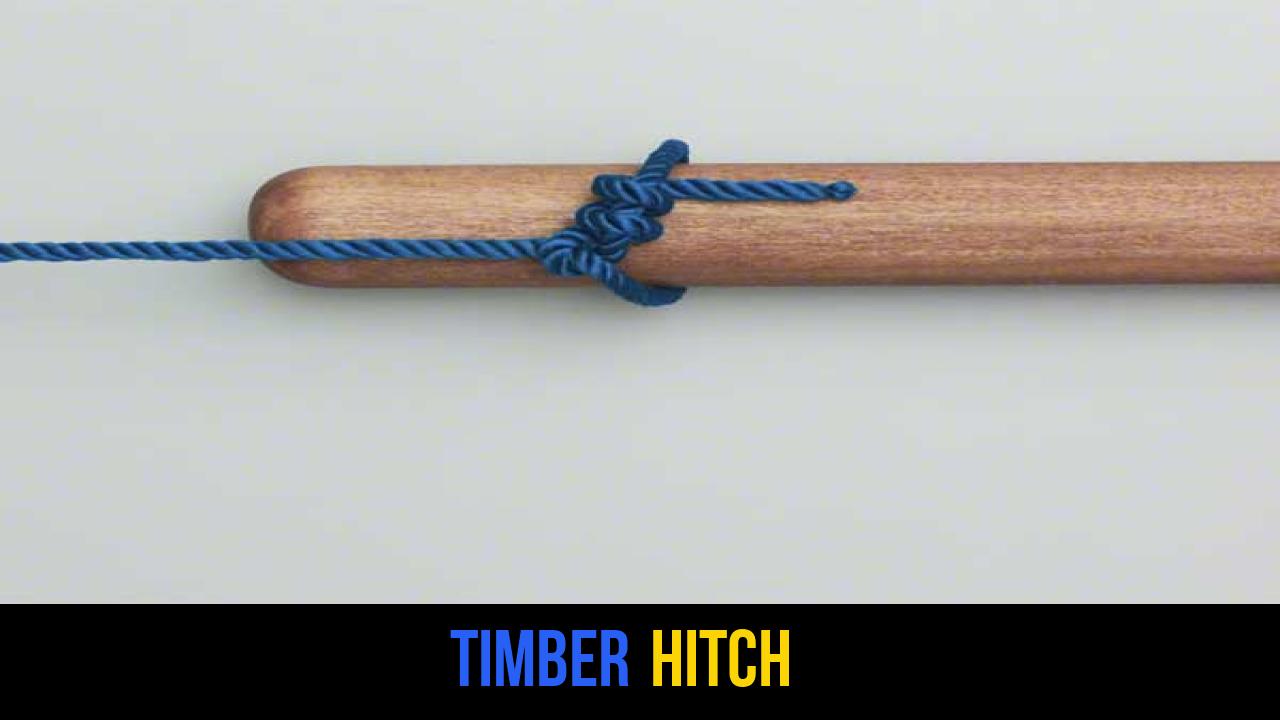
In the world of rope knots and outdoor rope techniques, few hitches are as historically significant and practically reliable as the Timber Hitch. This knot is a staple for arborists, sailors, and bushcraft enthusiasts alike. Its primary purpose is deceptively simple: it is designed to grip a cylindrical object—typically a log, pole, or spar—under tension. The beauty of the Timber Hitch lies in its efficiency; it is incredibly easy to tie, stays secure as long as there is a constant pull, and remains effortless to untie even after bearing a heavy load.
Whether you are hauling timber across a forest floor or securing a temporary anchor point for a shelter, understanding the mechanics of this knot is essential. It relies on the physics of friction, where the "wraps" of the rope press against the surface of the wood, creating a self-locking mechanism. As an expert in technical outdoor gear, I have seen this knot used in everything from traditional logging to modern-day rigging applications.
Alternative Names: The Timber Hitch is also known in various circles as the Bowyer’s Knot (often used for securing bowstrings), the Countryman’s Knot, or the Lumberman’s Hitch.
What Is a Timber Hitch?
The Timber Hitch is a temporary hitch used to secure a rope to a cylindrical object. It is classified as a "binding knot" or "hitch" because its security is entirely dependent on the tension applied to the standing part of the rope. If the tension is released, the knot can easily become loose, which is both its greatest strength and its primary safety consideration.
Practical Uses
- Logging and Forestry: Its most famous use is for dragging heavy logs. When tied correctly, the knot bites into the bark, providing a non-slip grip.
- Bushcraft and Pioneering: It is the standard knot used to start a diagonal lashing, a technique used to join two poles that cross each other.
- Marine Applications: Sailors often use it to secure spars or to tow objects behind a vessel.
- Arboriculture: Tree surgeons use the Timber Hitch to lower heavy limbs to the ground, often pairing it with a half hitch for added stability.
- Musical Instruments: Historically, it has been used to attach the ends of gut strings to the bridge of instruments in the lute or guitar family.
Materials and Tools Needed
To tie a secure Timber Hitch, the choice of materials is crucial. Not all ropes behave the same way under the friction required for this knot.
- Rope Types:
- Natural Fibers (Manila, Sisal, Hemp): These are traditionally the best for a Timber Hitch because the rough texture of the fibers creates additional friction against the pole.
- Synthetic Fibers (Nylon, Polyester): While strong, these can be "slick." If using synthetic rope, you may need to increase the number of wraps to ensure the knot doesn’t slip.
- Static Kernmantle: Often used in rescue and climbing, these ropes are very smooth. Extra care must be taken to ensure the wraps are tight.
- The Object: The Timber Hitch works best on rough, cylindrical surfaces like logs or wooden poles. It is less effective on smooth metal pipes or square-edged lumber, where the lack of surface contact can cause the knot to fail.
- Safety Gear: Always wear heavy-duty gloves when hauling timber to prevent rope burn or splinters.
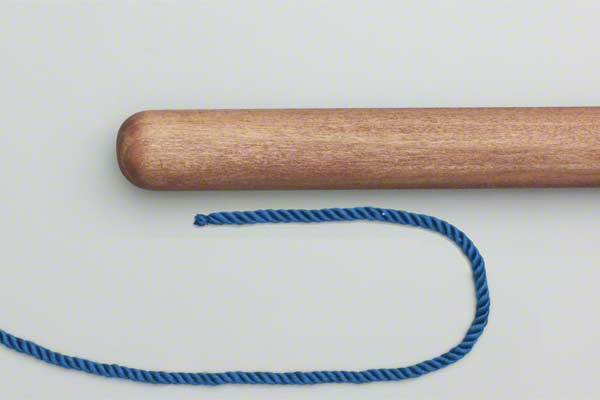
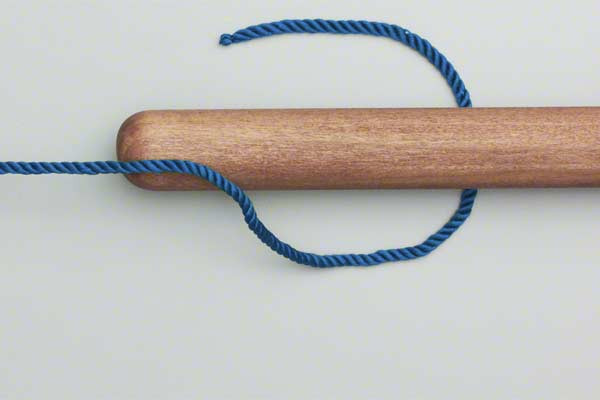
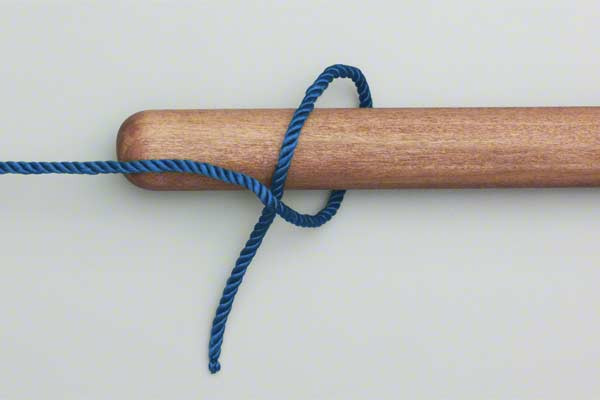
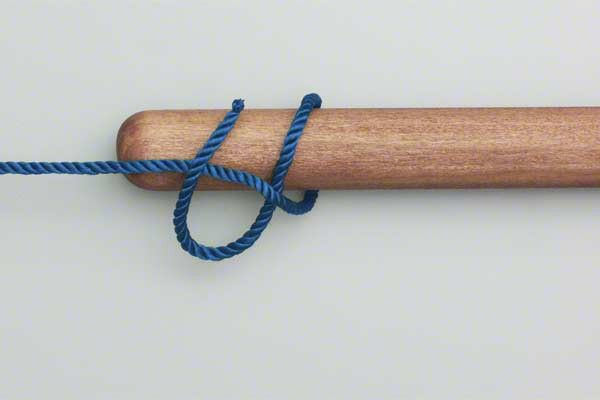
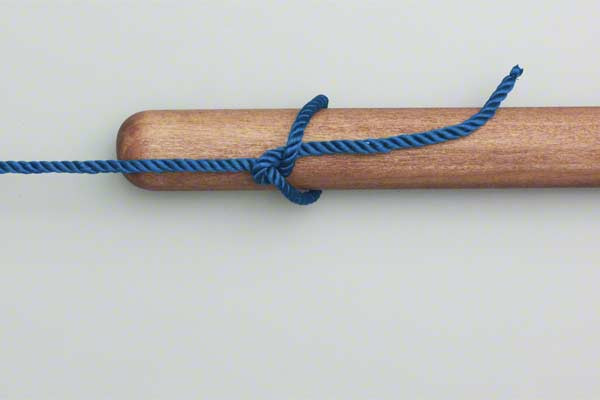
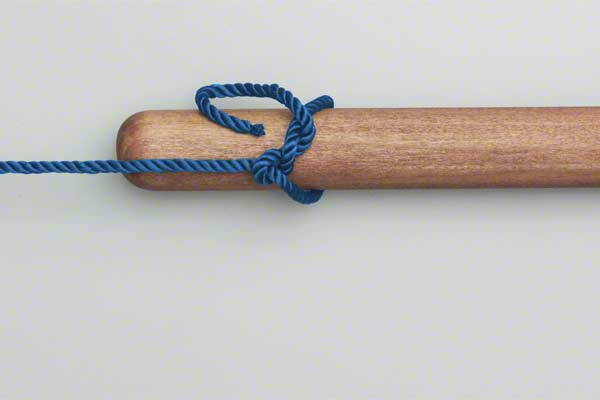
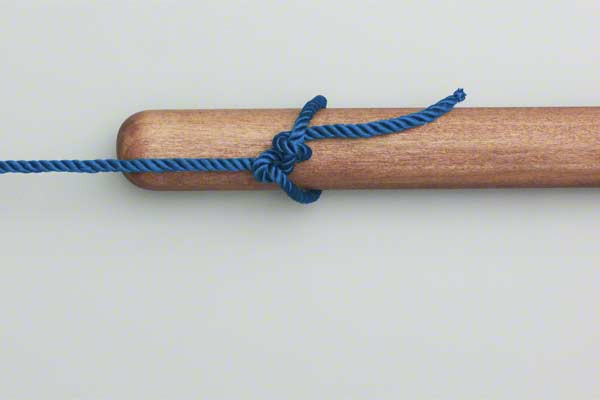
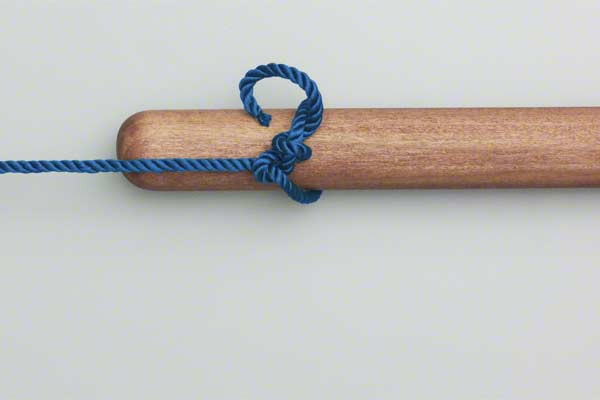
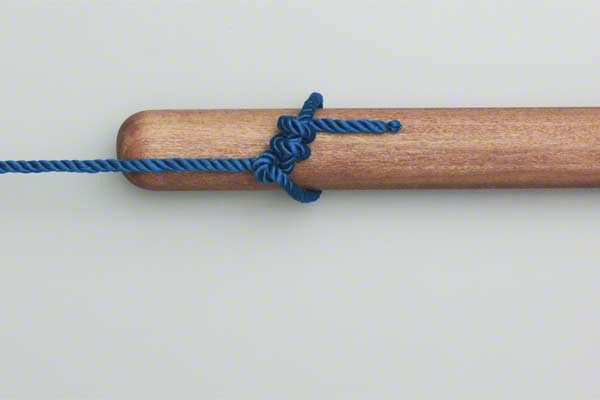
How to Tie a Timber Hitch?
Follow these steps precisely to ensure a secure and functional knot. The secret to a successful Timber Hitch is the placement of the wraps and the tension applied to the standing end.
- Pass the end of the rope around the pole and then around the standing end.
- Wrap the end around itself three times.
- Tighten the knot so that the three turns are gripped against the pole.
Note: For larger logs or slicker ropes, professionals often add more than three wraps to increase the surface area and friction.
Common Mistakes to Avoid
Even though the Timber Hitch is simple, errors in execution can lead to equipment damage or injury.
- Insufficient Wraps: The instruction source specifies three wraps. Using fewer than three can lead to the knot unraveling under high tension, especially on smoother logs.
- Wrapping the Standing End: A common beginner mistake is wrapping the end of the rope around the standing part multiple times. The wraps must be made around the loop itself (around the rope’s own end) so that they sit flush against the pole.
- Lack of Constant Tension: The Timber Hitch is not a permanent knot. If the rope goes slack, the wraps can loosen. For vertical lifts, this knot should almost always be supplemented with a half hitch (creating a Killick Hitch).
- Incorrect Pull Direction: The pull should be directed in a way that keeps the wraps pressed against the pole. Pulling at an extreme perpendicular angle can sometimes cause the hitch to slide or roll.
Related Knots and Splicing
Understanding the Timber Hitch is a gateway to mastering other essential rope knots. Here are a few related techniques:
- Killick Hitch: This is a Timber Hitch combined with a half hitch further down the pole. It is used for towing long objects or for vertical hauling to prevent the log from spinning.
- Clove Hitch: A quick, versatile knot used to secure a rope to a post. While faster to tie, it can slip under heavy, shifting loads more easily than a Timber Hitch.
- Bowline: Known as the "King of Knots," the Bowline creates a fixed loop at the end of a rope that will not slip or bind, making it essential for rescue and general utility.
- Rolling Hitch: A friction hitch used to attach a rope to a pole or another rope when the pull is parallel to the object. It is more secure than a Clove Hitch for longitudinal tension.
The Physics of the Timber Hitch
As a technical outdoor specialist, it is important to understand why this knot works. The Timber Hitch utilizes the Capstan Equation principles. As the rope wraps around itself and the pole, each turn increases the frictional force exponentially.
When you tighten the knot so that the three turns are gripped against the pole, you are creating a "locking" effect. The tension from the standing end pulls the first wrap tight, which in turn squeezes the subsequent wraps against the wood. This is why the knot is so effective on bark-covered logs—the fibers of the rope and the texture of the bark "interlock," making slippage nearly impossible as long as the load is maintained.
Final Words
The Timber Hitch is an indispensable tool in the arsenal of anyone practicing outdoor rope techniques. Its ability to transform a simple length of cordage into a powerful hauling mechanism makes it a favorite for heavy-duty tasks. By following the instruction source—passing the end around the pole, wrapping it around itself three times, and tightening it against the pole—you ensure a reliable connection that honors centuries of maritime and forestry tradition.
In modern applications, always remember to assess your rope’s condition and the environment. While the Timber Hitch is a workhorse, safety is paramount. Use it for hauling, use it for lashing, and appreciate the simple mechanical genius of one of the world’s most functional knots. Whether you are a weekend camper or a professional logger, mastering the Timber Hitch knot is a skill that will serve you for a lifetime.
